Notice: Function _load_textdomain_just_in_time was called incorrectly. Translation loading for the eleven40 domain was triggered too early. This is usually an indicator for some code in the plugin or theme running too early. Translations should be loaded at the init action or later. Please see Debugging in WordPress for more information. (This message was added in version 6.7.0.) in /home4/chemhall/public_html/wp-includes/functions.php on line 6131 Chemistry Lab Archives - Chemistry Hall
https://chemistryhall.com/category/laboratory/
From Research Highlights to EducationSat, 04 May 2024 23:59:15 +0000en-US
hourly
1 The Swern Oxidation: Mechanism and Features
https://chemistryhall.com/swern-oxidation/
https://chemistryhall.com/swern-oxidation/#commentsWed, 31 Mar 2021 21:51:08 +0000https://chemistryhall.com/?p=39327What is the Swern Oxidation? What can you do with this reaction? What is the mechanism of the Swern oxidation? How do you actually run this reaction in the lab and what are their most relevant practical features? These are some of the questions that I will try to answer in this guide, as someone... [Read More]
]]>What is the Swern Oxidation? What can you do with this reaction? What is the mechanism of the Swern oxidation? How do you actually run this reaction in the lab and what are their most relevant practical features? These are some of the questions that I will try to answer in this guide, as someone who has run this reaction in the lab countless times.
What Is the Swern Oxidation?
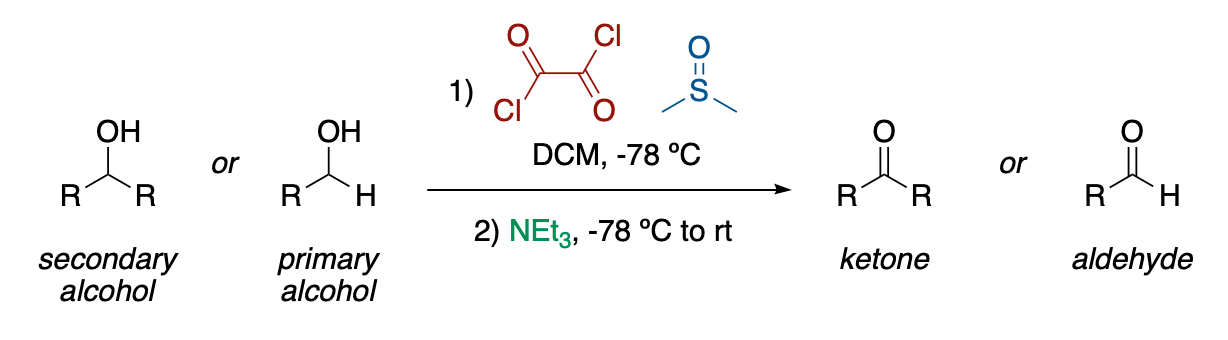
The Swern oxidation is the oxidation of a primary or secondary alcohol to an aldehyde or a ketone, respectively, by the combination of oxalyl chloride and dimethylsulfoxide followed by triethylamine.
The Swern Oxidation
Discovery and Applications
The Swern oxidation was first discovered by Daniel Swern and Kanji Omura in 1978. From this point, this methodology evolved into one of the most used strategies to oxidize both secondary and primary alcohols to ketones or aldehydes, respectively.
In this reaction, dimethylsulfoxide (DMSO) acts as the effective oxidizing agent, getting reduced to dimethylsulfide (DMS) as a consequence. However, DMSO by itself is not reactive enough to take part in this redox process, it needs to be activated by oxalyl chloride, (CO)₂Cl₂. This results in the formation of an adduct that can evolve into the corresponding ketone or aldehyde by action of a base (generally triethylamine), upon release of CO, CO₂, and dimethylsulfide (SMe₂), through a beautiful mechanism that is a must know for any student of organic chemistry.
This reaction has distinctive features that make it extremely popular among synthetic chemists.
Advantages and Drawbacks
One of the best features of this oxidation method is that it does not further oxidizes aldehydes to carboxylic acids, so a single 2-electron oxidation of primary alcohols can be achieved. This is often not the case with, for instance, metal-based oxidations, such as the use of potassium permanganate. Other alternatives that stop at the aldehydes, such as DMP, are usually much more expensive than the simple reagents required for the Swern.
This reaction often proceeds smoothly at very low temperatures. The usual procedure is run at -78 ºC, which means that the reaction conditions are extremely mild, this usually leads to very selective procedures that usually don’t harm other functional groups of complex molecules. On the other hand, this can also be considered a small inconvenience, since it requires setting up an acetone-dry ice bath (-78 ºC) or the use of a cryocooler instrument.
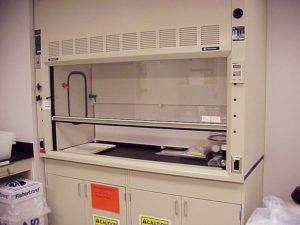
There are not many disadvantages for this reaction, as evidenced by how it has withstood the test of time, but the more characteristic one is on of the side products: dimethylsulfide is a nasty smelly gas! Make sure to run the reaction in a well-ventilated fumehood.
The Mechanism of the Swern Oxidation
The mechanism of this oxidation starts by the activation of the oxidant (DMSO) by oxalyl chloride. This generates an adduct upon release of a chloride anion. This chloride anion acts then as nucleophile towards the electrophilic sulfur atom, which makes the intermediate collapse. This results in the release of a molecule of CO₂ and a molecule of CO. This results in the formation of Me₂Cl₂S, and highly activated oxidizing agent.
Activation of DMSO with Oxalyl Chloride.
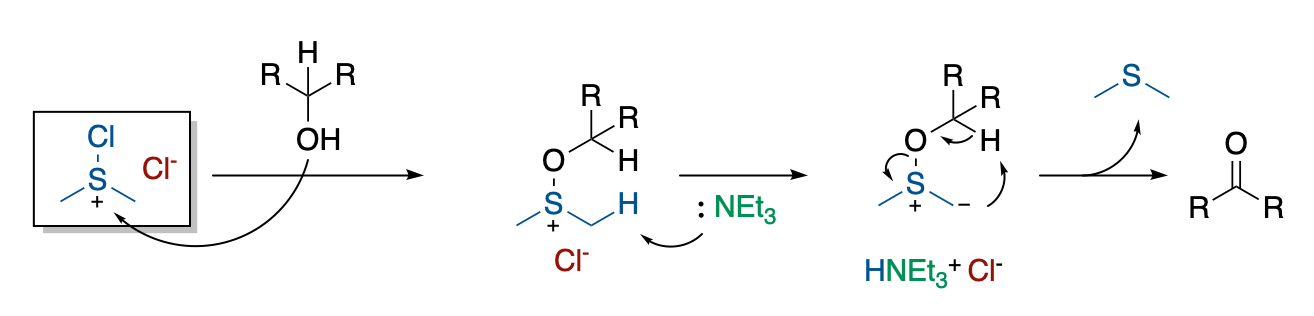
This Me₂Cl₂S intermediate can react with primary and secondary alcohols to give the adduct shown below. Then, this adduct can be deprotonated by an organic base (triethylamine) to give a sulfur ylide, upon release of triethylammonium chloride.
Mechanism of the Swern Oxidation
Finally, this ylide intermediate evolves through a 5-membered cyclic transition state to release dimethylsulfide (DMS) and the resulting oxidized product (an aldehyde or ketone).
How Do You Run a Swern Oxidation in the Lab?
As someone who has run this oxidation at work many times myself, here is a general illustration of the practical procedure for this reaction.
How to Run a Swern Oxidation
Preparation
A flask with a stirring bar is charged with dimethylsulfoxide (3 equiv), and it is dissolved in dichloromethane (ca. 0.1–0.5 M), and the solution is cooled down to -78 ºC.
Activation of DMSO
To the cooled solution is added oxalyl chloride (2 equiv) dropwise with a syringe. The mixture is further stirred for 30 min also at -78 ºC.
Addition of the alcohol
After that time, the corresponding alcohol is added to the mixture as a solution in dichloromethane (if it is a solid) or neat (if it is a liquid). The resulting mixture is stirred for 1 h at -78 ºC.
Addition of base
Then, triethylamine (4 equiv) is added to the mixture, and the mixture stirred first 10 min at -78 ºC, before removing the cooling bath. Then, thee resulting mixture is stirred at room temperature for 1 h.
Work-up and purification
The reaction mixture is diluted with water, and extracted three times with dichloromethane. The combined organic fractions are washed first with water, then with saturated aqueous NaCl, and finally dried over anhydrous magnesium sulfate. After filtration, the solvent is removed in vacuum.
Finally you can further purify the product if it is required by flash column chromatography, and you are all done1
]]>https://chemistryhall.com/swern-oxidation/feed/6Types of Chemistry Flasks: A Complete Guide
https://chemistryhall.com/types-of-chemistry-flasks/
https://chemistryhall.com/types-of-chemistry-flasks/#commentsThu, 05 Mar 2020 16:01:00 +0000https://chemistryhall.com/?p=38983An important concern within any chemistry laboratory is the handling and storage of chemical substances regardless of the physical state in which they are. We are going to help you identify the most common (or not so common) types of chemistry flasks out there! Through chemistry history, different materials have been employed to build these... [Read More]
]]>An important concern within any chemistry laboratory is the handling and storage of chemical substances regardless of the physical state in which they are. We are going to help you identify the most common (or not so common) types of chemistry flasks out there!
Through chemistry history, different materials have been employed to build these containers, although it is generally acknowledged that glass is the material of choice for most applications. From simple test tubes to the more complex micro-Kjeldahl distillation units, glass is used in most, if not all for some fields, chemical experiments performed in a laboratory.
Whether you are an experienced researcher or a curious student trying to unveil the fascinating world of chemistry, I am sure you will find in this article several interesting details that you could have missed and could be very useful once you are in front of you laboratory bench. Remember, small details make big differences!, particularly in experimental Chemistry.
Considering this, in the following paragraphs, you will find a description and useful information about the most common laboratory glassware found in any laboratory. All of them come with pictures so you can esily identify those weird pieces of glassware sitting around in the lab.
Enjoy!
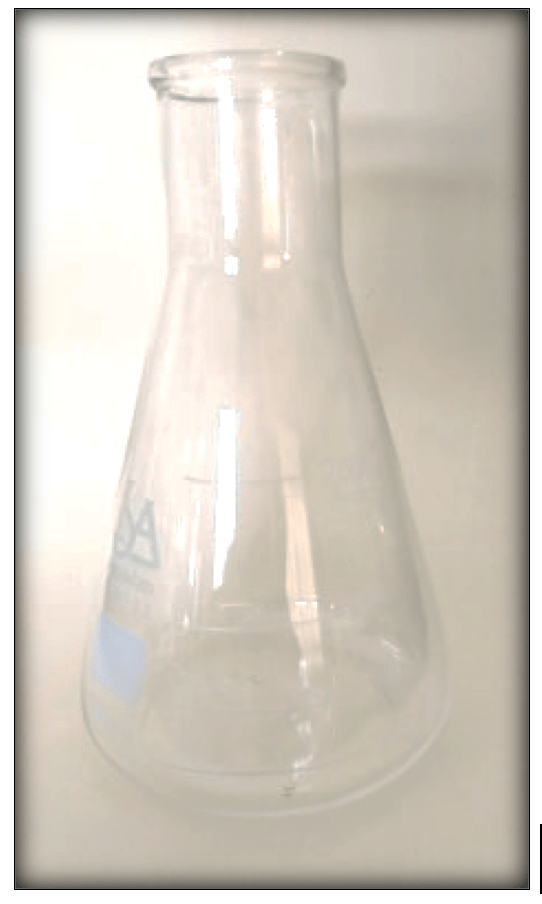
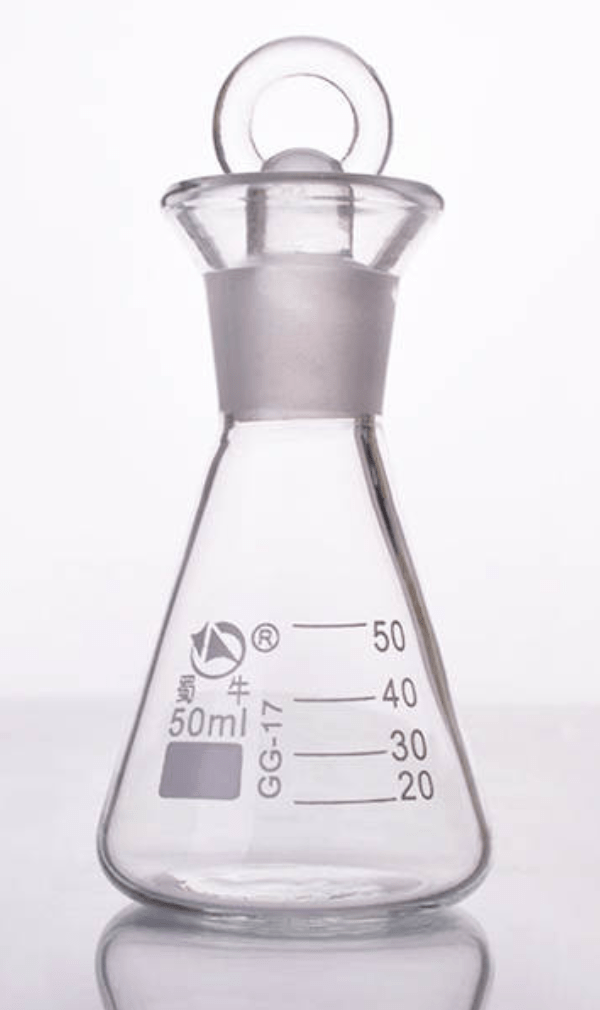
• Erlenmeyer flask: It has a cone shape and a cylindrical neck, being also flat by the base. It serves to contain substances or heat them, although the shape of this flask also helps to prevent liquid spillage and facilitates swirling motion to perform titrations, or other procedures. The narrow opening of this flask also prevents dust contamination and minimizes losses by evaporation.
Erlenmeyer Flask
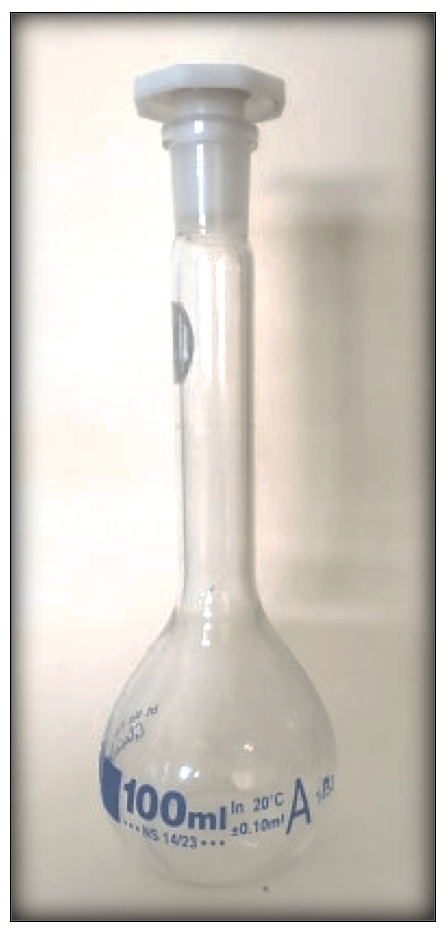
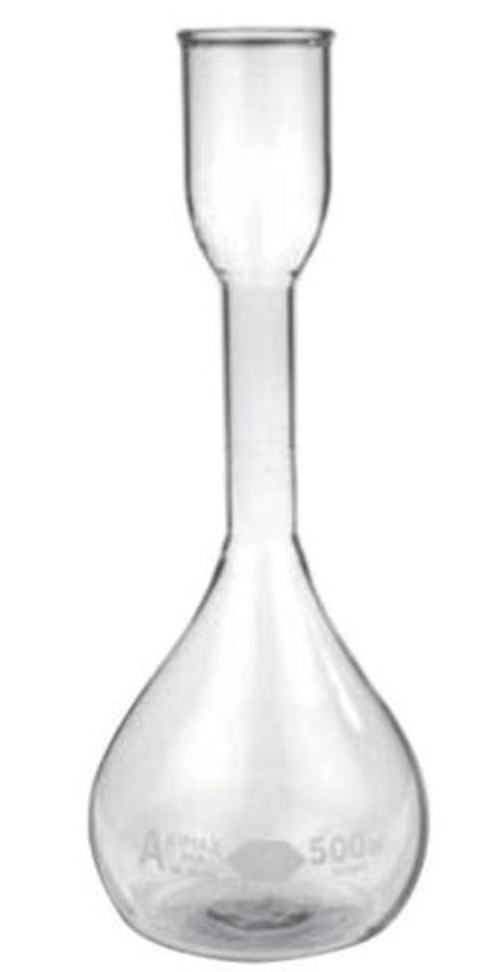
• Volumetric flask: A flat bottom glass container with an elongated and narrow neck that presents a line that exactly defines the volume of any liquid substance. It is generally employed to prepare solutions.
Volumetric Flask
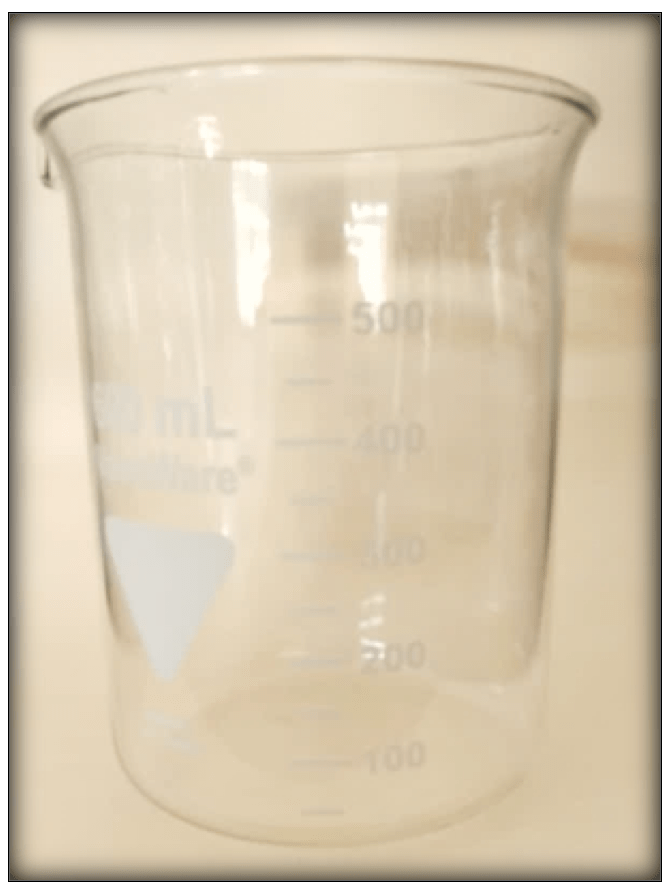
• Beaker: A cylindrical container with a flat bottom and a wide opening. It consists of presents graduations that can often be used as a measurement reference. It is commonly used to contain substances as well as to heat them.
Glass Beaker
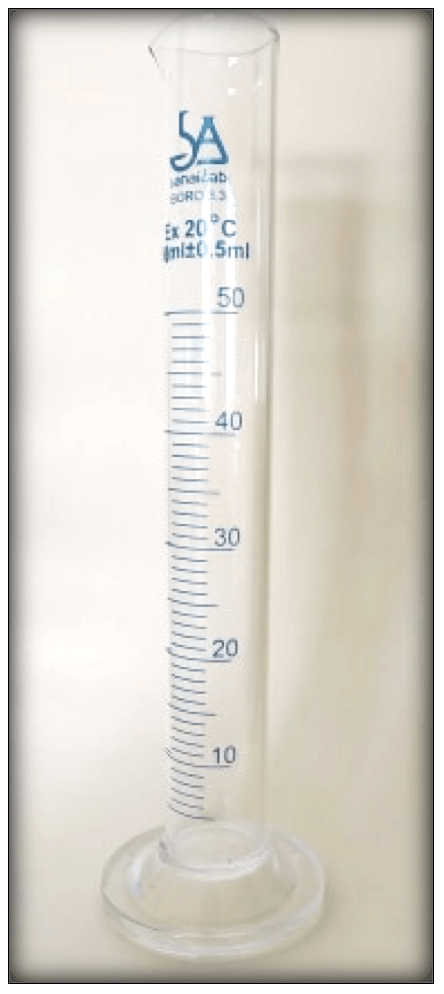
• Measuring cylinder: It is a cylindrical and graduated glass tube that is employed to measure precisely the volume of liquid substances.
Glass Measuring Cylinder
• Test Tube: These are a small cylindrical glass tube with one end open and the other closed and rounded. It is used to prepare small reactions or tests in it. They are also commonly used to collect fractions in column chromatography.
Glass Test Tubes
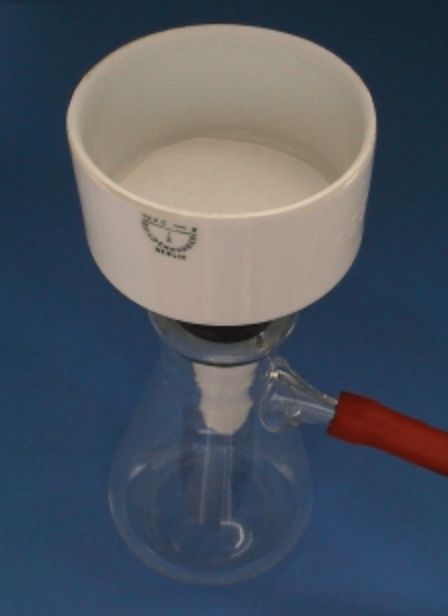
• Büchner flask: Volumetrically graduated glass container. It has a small side tube coming out of the neck which can be connected to other equipment, generally a vacuum pump. Widely employed to perform vacuum filtrations along with a Büchner funnel.
Büchner flask with a funnel and vacuum system.
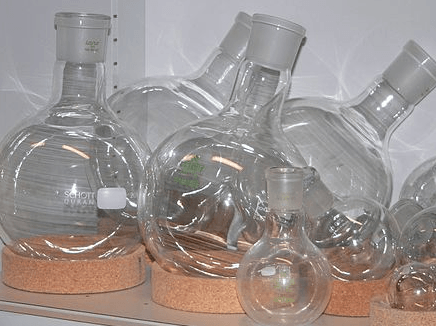
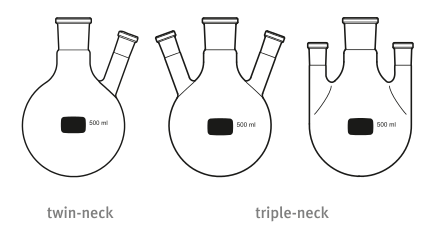
• Round-Bottom Flask: This is probably one of the most common types of chemistry flasks. Ball-like container with a wide base and narrow neck that has a stopper. It is used when the substances contained must be stirred, avoiding spillage and evaporation of gases. It can possess one, two, or three necks. They are the bread and butter for setting up chemical reactions.
Glass Round-Bottom Flasks sitting on cork rings.
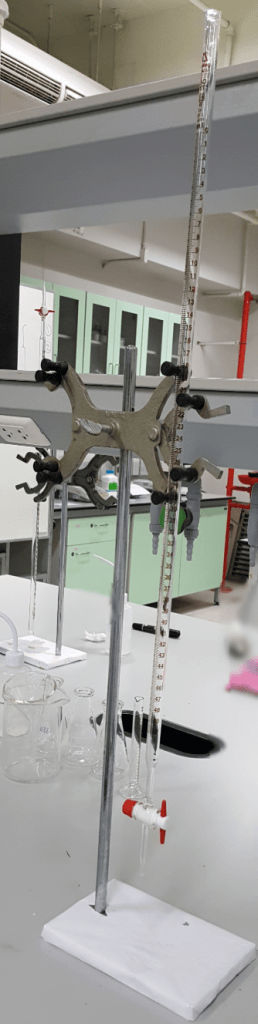
• Burette: Graduated container, usually made of glass. It is a long tube of small diameter with a stopcock that allows the liquid to drip. It is used to transfer exact amounts of liquids. The most common application of this are titrations.
Glass Burette
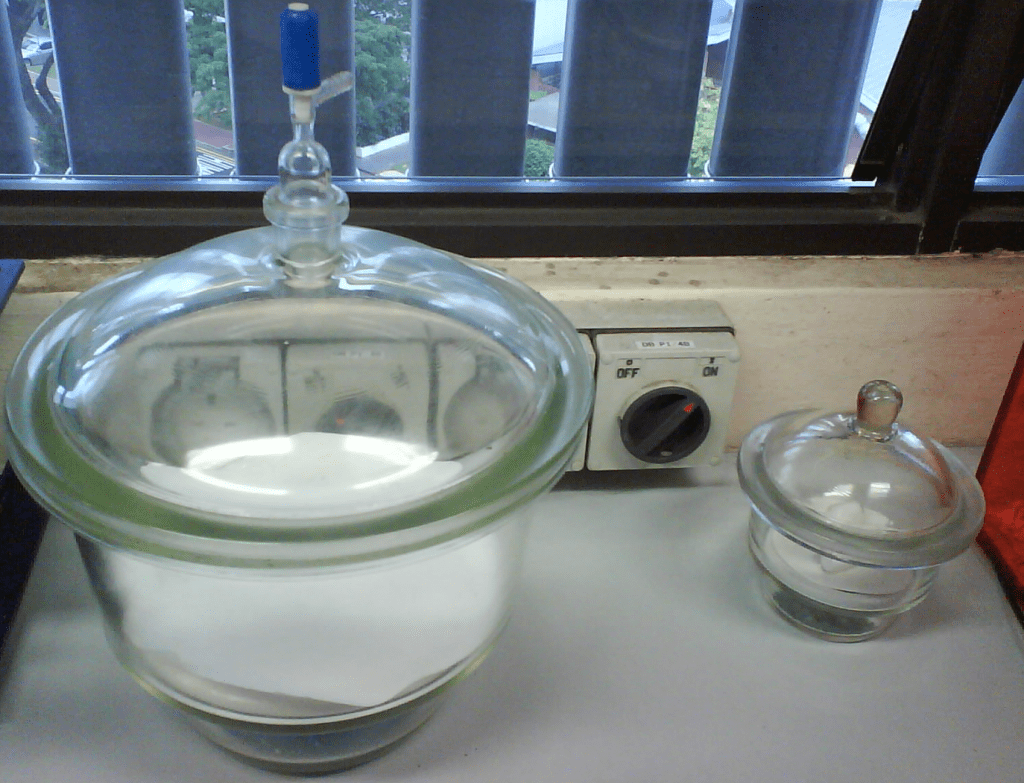
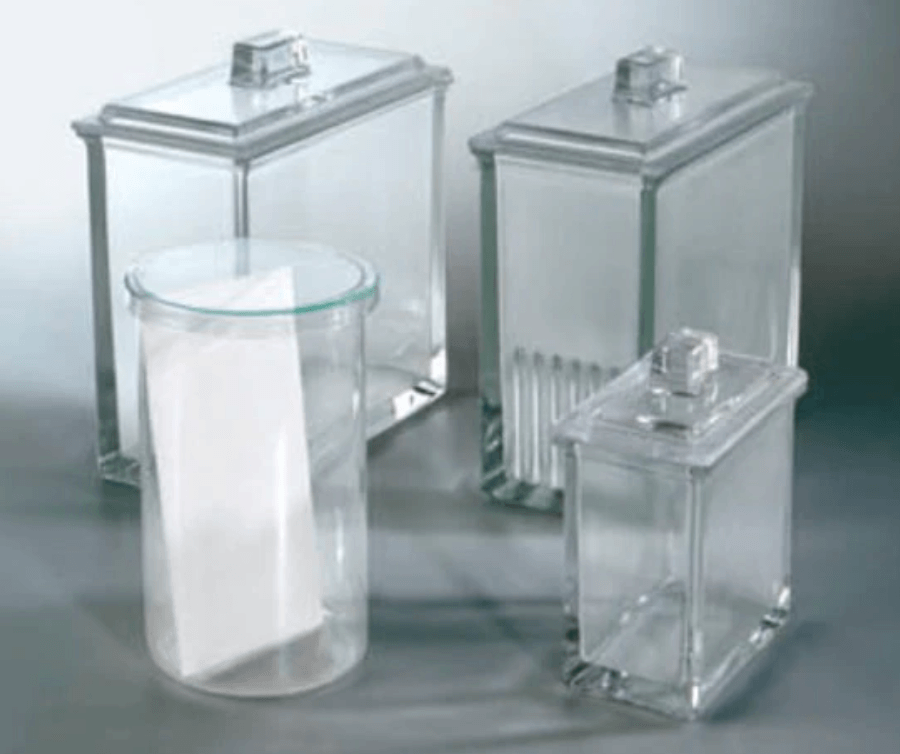
• Desiccator: Not really a reaction container, but you do store chemicals in it. It is a glass container with a lid that allows a tight seal. It is used to remove moisture from solid substances. Silica gel (desiccant) is placed at the bottom, while the substance to be dried is placed on a plate a few centimeters above.
Glass Desiccators
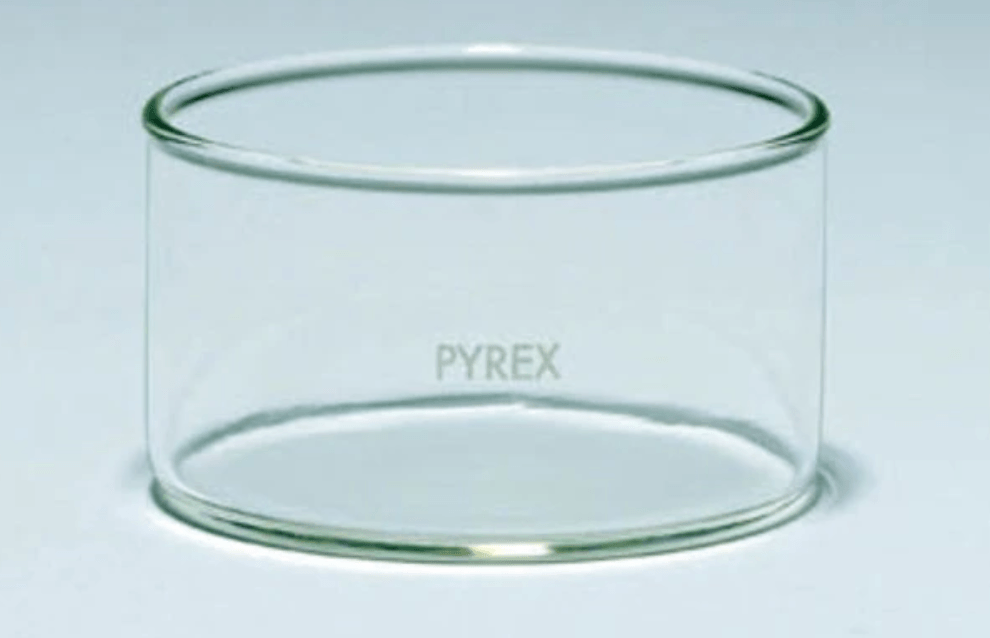
• Crystallizer: A low container with a flat base. It is used in the laboratory to crystallize the solute from a solution by evaporating the solvent.
Glass Crystallizer
• Fleaker flask: Sometimes used to heat liquids, not a very common piece of material. It resembles an Erlenmeyer flask and a beaker. Its body is cylindrical and culminates in a neck that curves before opening into a rounded opening.
Fleaker flasks
• Two-necked flasks. These are round bottom flasks with multiple (2-3) necks or entrances. One is usually employed to take chemicals in or out for the reaction. The others can have multiple uses. They can be connected to a condenser to perform reactions under reflux conditions. You can attach a dropping funnel. You can also attach a connection with a source of an inert gas to work in a closed system under argon or nitrogen, for air-sensitive reactions.
Two-necked flasks
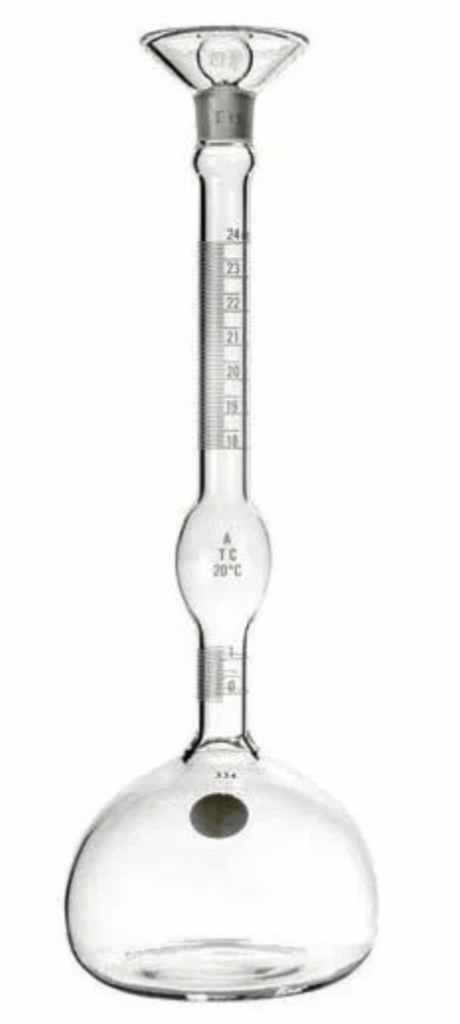
• Kohlrausch volumetric flask: They are used for sugar determination, according to the Kohlrausch method.
Kohlrausch volumetric flask
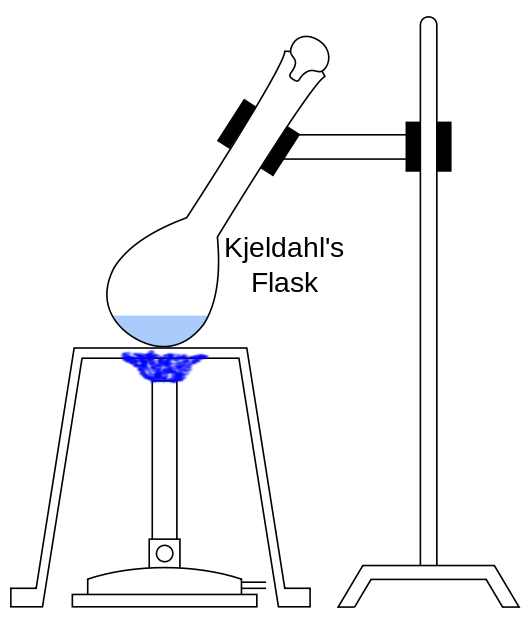
• Kjeldahl flask: It is used for the determination of organic nitrogen. Guess how: the Kjedahl method.
Kjeldahl flask
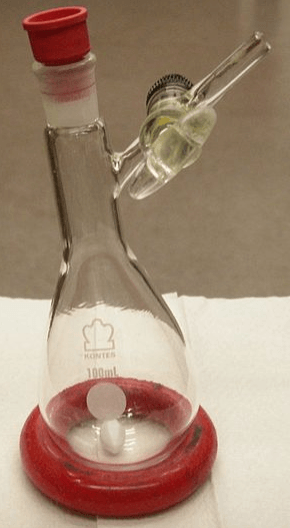
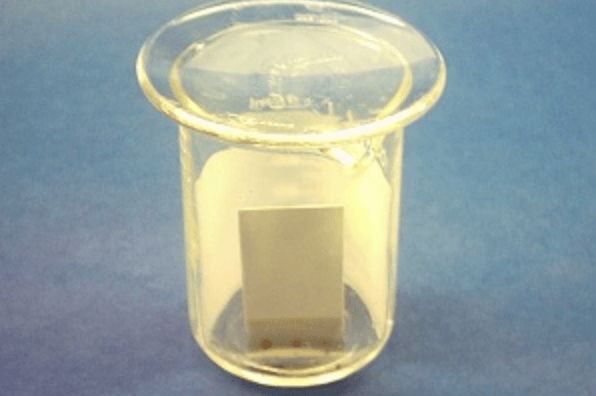
• Iodine flask: It is used to make iodine determinations in quantitative analysis of substances by electron exchange (oxidization-reduction) titrations that involve the use of iodine (or any other volatile chemical, for that matter). It’s quite similar to an Erlenmeyer flask (but significantly more expensive!), but is equipped with a stopper joint in order to avoid partial losses of iodine through evaporation, which would lead to errors on the quantifications.
• Fernbach flask: It is a narrow neck flask. Its shape provides a large cultivation area suitable for growing microorganisms, in liquid nutrient media. It allows faster growth, due to better ventilation.
Fernbach flask
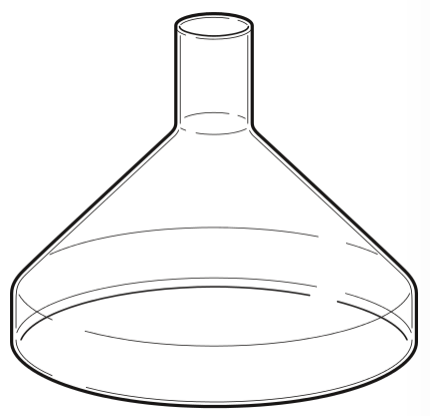
• Mojonnier flask: It is used in fat determination, which is extracted with a mixture of ethyl ether and petroleum ether in a Mojonnier flask, the extracted fat is placed at a constant weight and expressed as a percentage of fat by weight.
Mojonnier flask
• Le Chatelier flask: It is used to determine the density of things. Generally applied to determining density of stuff such as hydraulic cement, granulated blast furnace slag and fly ash for concrete, filler aggregates, and lime.
Le Chatelier flask
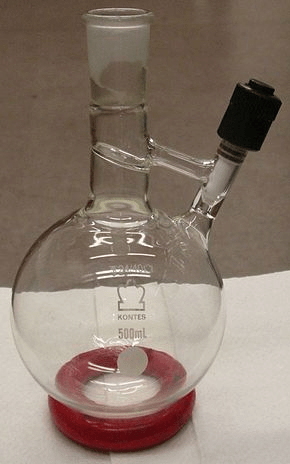
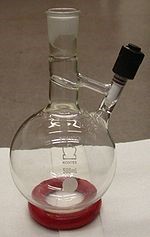
• Schlenk flask: The corner stone of working under strictly anhydrous conditions. This flask is a reaction vessel designed to perform chemical reactions which are sensitive to air. There are many variations for this, but usually it has two different necks or connections, one designed to put in the chemical reagents, and another one that is simply a connection to a Schlenk line, or source of an inert gas such as argon or nitrogen.
Schlenk flask
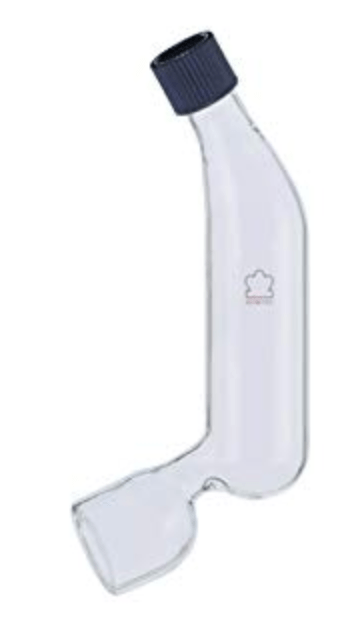
• Straus flask: They differ mainly from other Schlenk flasks by their neck structure. Two necks emerge from a round bottom flask, one larger than the other. The largest neck ends in a frosted glass joint and is permanently distributed by the blown glass with direct access to the flask. The smaller neck includes the thread required for a Teflon cap to be screwed perpendicular to the flask. The two necks are joined through a glass tube. The frosted glass gasket can be connected to a manifold directly or through an adapter and a hose. A typical use for these is storing anhydrous solvents with molecular sieves.
Straus flask
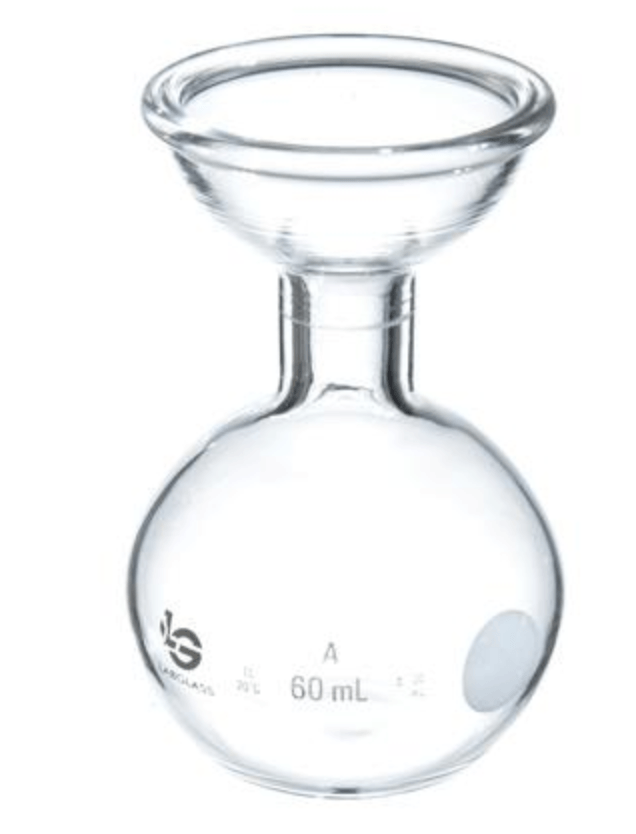
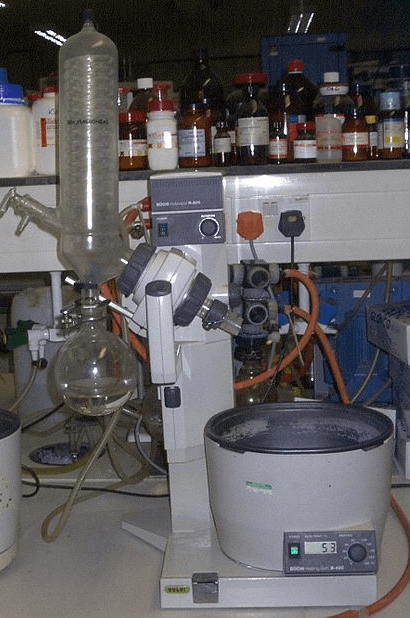
• Collector or Receiver Flask: It is a glass jar, with a very short neck, spherical body, and frosted mouth. It is designed as a piece of glass in rotary evaporators, to collect distillations of reactions with reflux. It is usually made of borosilicate glass.
Collector flask used on a rotary evaporator.
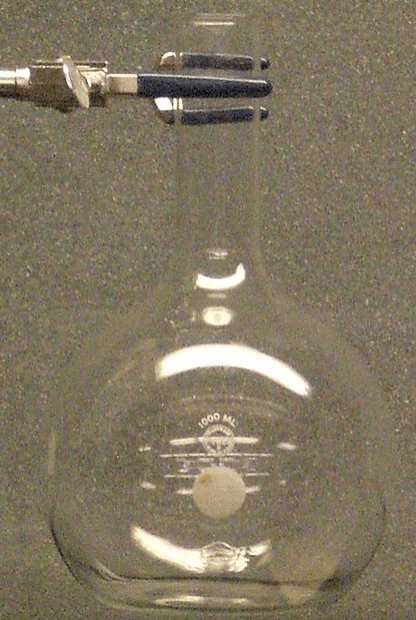
• Florentine Flask: It is a glass flask, with a long neck and spherical body. It is designed for uniform heating and is produced with different thicknesses of glass for different uses. It is usually made of borosilicate glass.
Florentine Flask
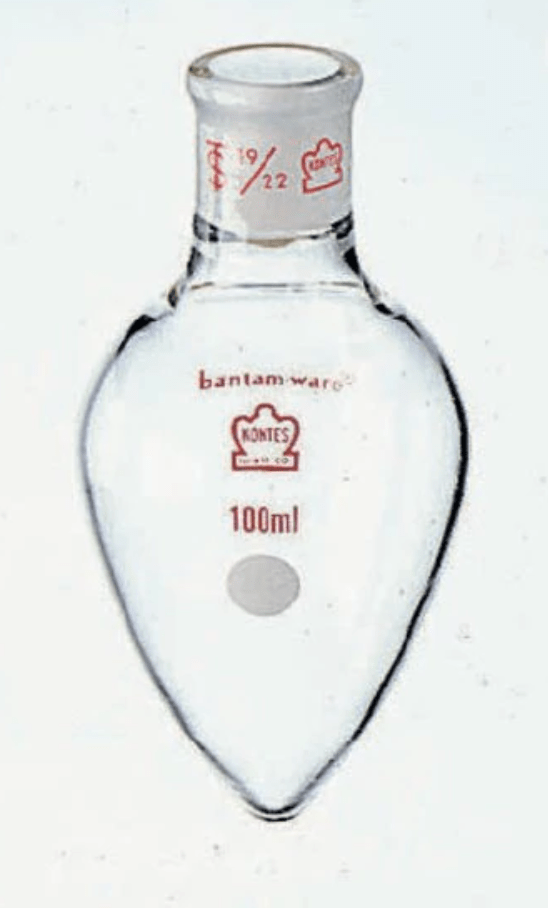
• Pear-shaped flask: It is designed for uniform heating and is produced with different thicknesses of glass for different uses. It is usually made of glass.
Pear-shaped flask
The biggest advantage of classic round bottomed flasks, is that its rounded base makes it easy to stir or remove its contents without being able to spill any substance out of its container as a precaution.
Pear-shaped flasks are used for evaporating solutions to dryness post-synthesis using a rotary evaporator, the ’rounded V’ shape of the flasks enables solid materials to be scraped out more efficiently than from a round-bottomed flask. Also, collecting liquids using a syringe, it’s easier with the pear-shape!
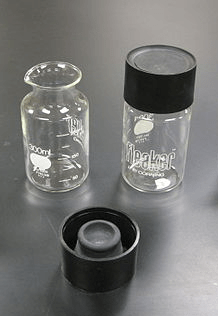
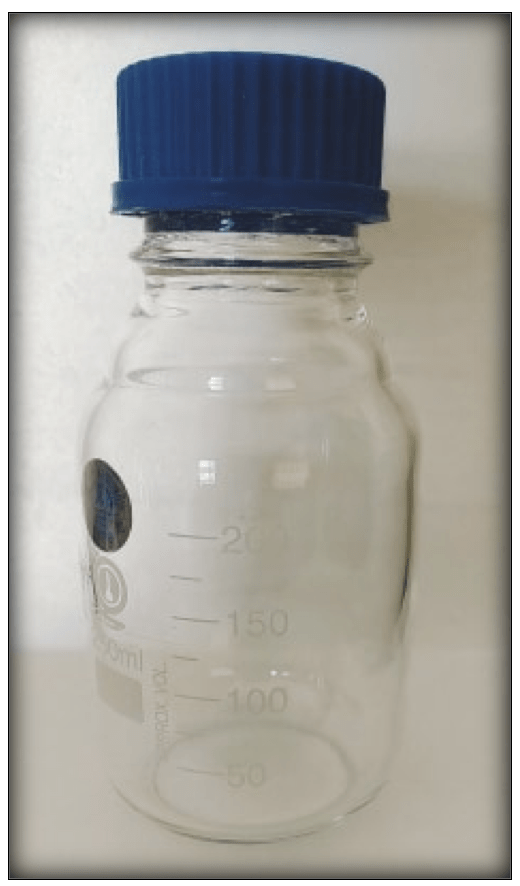
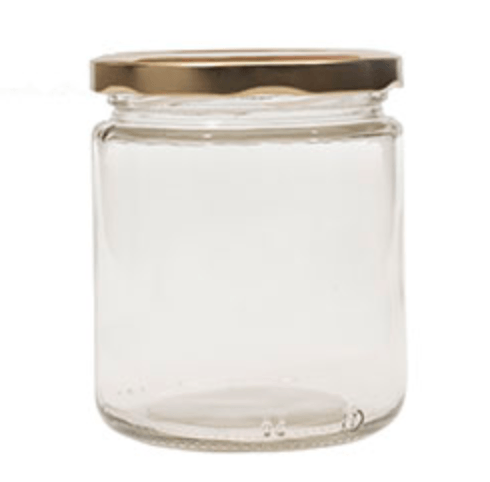
• Laboratory bottles: Made of borosilicate glass, they can withstand high temperatures and are of high chemical resistance. They are used basically to store chemicals and solutions, such as brine or ammonium chloride solutions for aqueous reaction work-ups.
Glass lab bottle
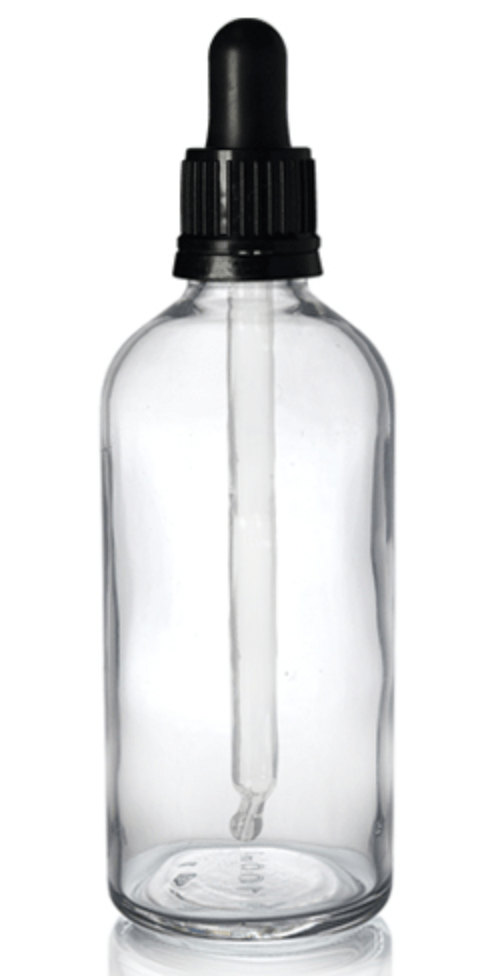
• Dropper bottles with pipette: Contains substances. It has a dropper and for that reason, it allows dosing substances, such as organic solvents, in small quantities.
Glass dropper bottle with s pipette
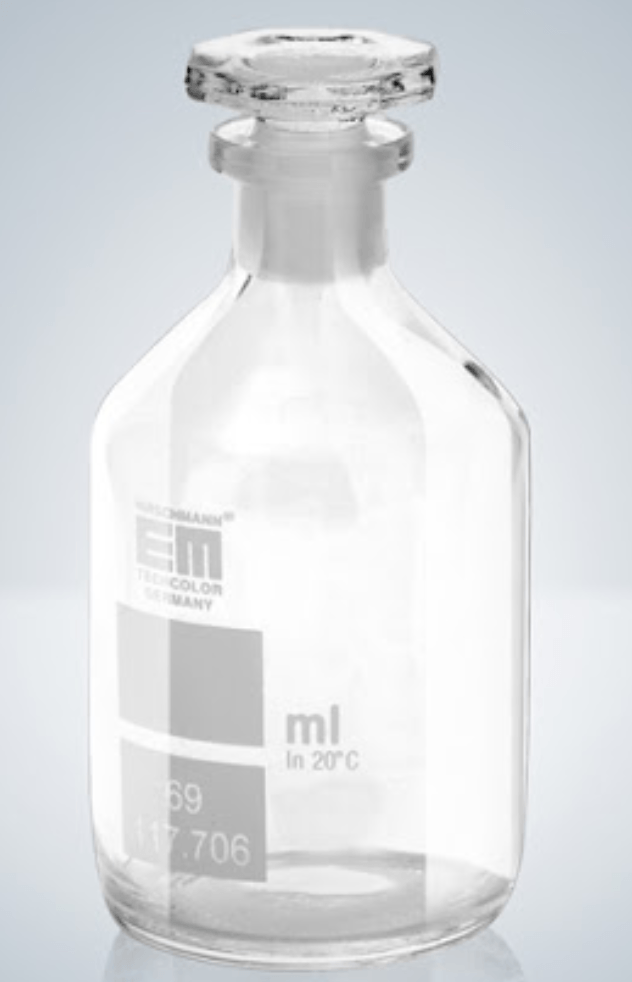
• Winkler oxygen bottles: It is made of clear glass, has a frosted cap and the exact volume is engraved on the bottle. It is used for the determination of dissolvable oxygen in the water.
Winkler oxygen bottles
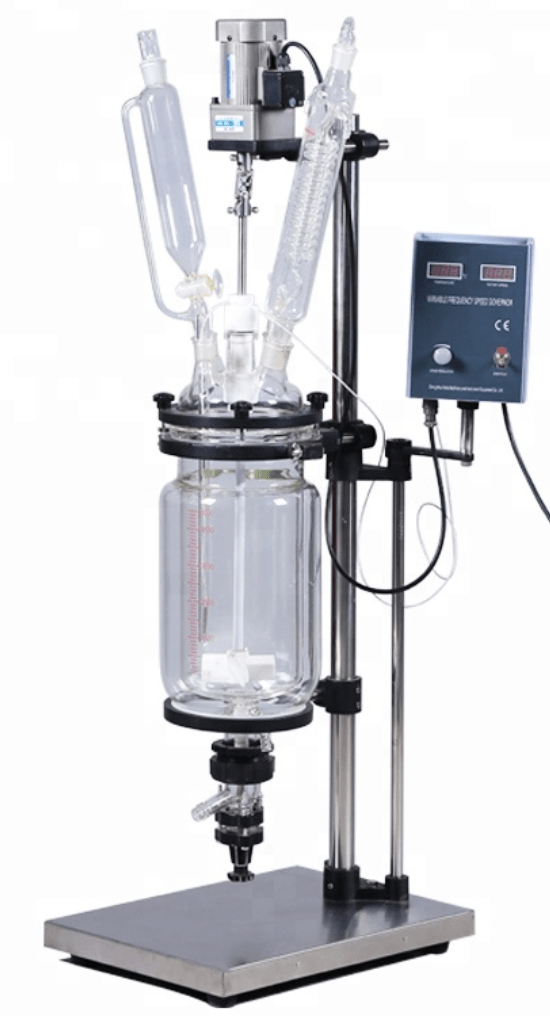
• Big reaction vessels resistant to high temperatures or pressures. These reactors usually consist of two parts: a cylinder where the reaction mixture has to be introduced and a cap or head where there are usually different valves or connections necessary to carry out the reaction, to be able to control or monitor safety elements. In some cases, it has a heating jacket that plays the role of keeping the fluid at a constant temperature, either high or low.
Big glass reactor resistant to high temperatures
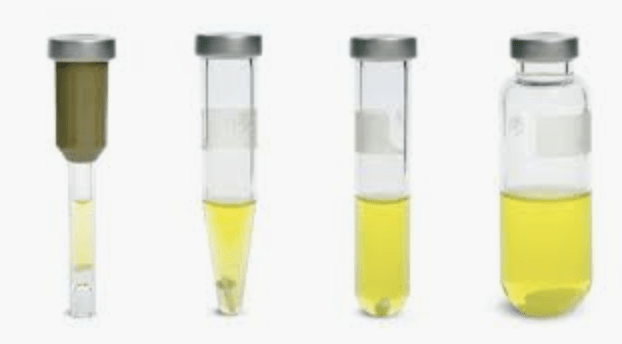
• Microwave vials: Reaction vials that can be sealed with a cap, snd can resist high pressures. They are used to heat up reactions at temperatures higher than the boiling point of the employed solvent. This happens usually when heating using a microwave reactor.
Microwave vials
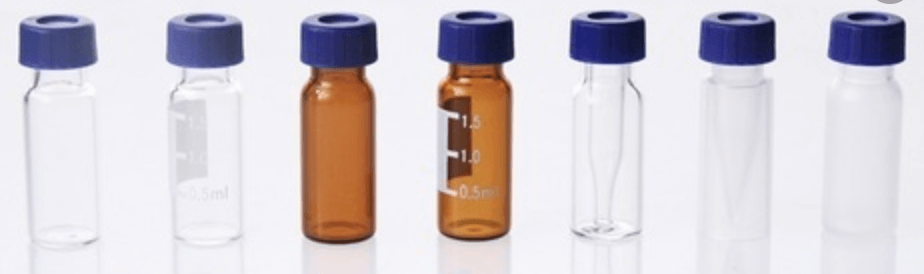
• HPLC vials: These vial have a cap with a septum that can be pierced by needles, such as the ones from an HPLC or GCMS autosampler, so they are used to inject samples on instruments such as those. You can also set up small-scale chemical reactions on those if you have a stirring bar small enough!
HPLC vials
As you can see, the list is long, and there is virtually a flask for every task you can possibly imagine. By the way, thanks to wikimedia for some of the pictures here.
Of course, you don’t really need everything if you want to set up of own home chemistry lab, but it is always good to know about them all!
]]>https://chemistryhall.com/types-of-chemistry-flasks/feed/3How to Write the Perfect Chemistry Lab Report: A Definitive Guide
https://chemistryhall.com/how-to-write-chemistry-lab-report/
https://chemistryhall.com/how-to-write-chemistry-lab-report/#respondTue, 11 Feb 2020 23:43:33 +0000https://chemistryhall.com/?p=38962Students have to deal with multiple academic tasks, and writing lab reports (lots of them!) is one of them. Its main purpose is to explain what you did in your experiment, what you learned and what the results meant. Performing experiments and reporting them properly is a cornerstone of on your way into learning chemistry.... [Read More]
]]>Students have to deal with multiple academic tasks, and writing lab reports (lots of them!) is one of them. Its main purpose is to explain what you did in your experiment, what you learned and what the results meant.
Performing experiments and reporting them properly is a cornerstone of on your way into learning chemistry.
But how do you write a chemistry lab report properly?
It’s now time to find out!
An experimental chemistry session is not complete without writing a good lab report.
Our ultimate guide sheds light on the main parts of lab report writing. You ought to be aware of every section and understand how to complete them properly. Therefore, we have divided our guide into three major sections that are:
Parts of the lab report;
A step-by-step review;
Writing your project.
General Information
It’s necessary to begin with an overview of the main sections that should be present on a laboratory report for chemistry.
Section
Description
Title Page
Provides general data about your experiment, including your name, date, the title of the experiment, your teammates (if you have any), the course you are taking, and your instructor’s name. You should leave space for an abstract right after.
Introduction/Purpose
It’s a couple of paragraphs long section, which briefly states the main purpose of your project. You should write a hypothesis right at the end of your intro. Back up everything with the appropriate references.
Materials
Make a list of all the materials you’ve used during your experiment.
Methods/Experimental Section
This section highlights your experimental procedures step by step and provides information about the scientific methods you have used to complete the experiment.
Data
You should mention all the results you’ve collected during your experiment. Simply record facts but don’t explain them yet.
Results
A researcher is supposed to explain all collected data in words.
Discussion
This section serves as the interpreter of the results. You should determine whether you’ve reached your hypothesis or not. Extract conclusions from your data.
Conclusion
Summarizes the entire project regardless of the success or failure of your hypothesis and explains it.
Graphs and Tables
Represent your dependent and independent variables in the form of graphs and/or tables. For example, you might want to add a representation of the TLC of your reaction.
References
Enlist the works of other scientists whose studies and articles were used to complete your project.
Mind that sometimes these sections are called differently but have the same purpose. Some of the sections may be missing, but the general structure should be close to this. Everything depends on the educational institution.
It is important to know that usually lab reports are written after the lab session is finished. This means that you need to have everything previously recorded in your lab notebook. You are supposed to keep track of everything you do in the lab in your laboratory notebook, and then using that notebook to write down your lab report, not the other way around.
Reviewing Every Step
Now, we’d like to go through the main stages of a chemistry lab report. It’s necessary to add brief comments concerning each of them. Your laboratory report begins with a title page. You already know what it consists of. Let’s check how to compose it correctly. The information must be presented on the upper right-hand side of the page. All the points (the title, your name, collaborators, etc.) should be mentioned on the separate line.
Afterward
comes the second part, which includes:
The course title
Title of the experiment
Title of the parts within the experiment
Semester, year, etc. (optional)
This data
appears in the middle of the title page.
The next section is the Introduction and it begins with this word in the left upper corner of your report. It should consist of no more than a couple of paragraphs and end with at least one hypothesis.
The body of your project consists of the procedure, materials and methods employed; data; results and observations. The section Procedure commonly consists of several steps that were followed for the proper conduction of the experiment(s). They could be divided in different parts, and those would describe your actions.
The section Data contains the numerical facts and Observations that provide the changes that took place. Afterwards, you move to the Discussions, in which you ought to plainly explain all the numbers, observations and collected data. Your conclusions provide an overall summary of the entire lab report, and the whole experimental session itself.
Writing a Chemistry Lab Report
The last lap in our “race” is to write a laboratory report. We have already mentioned the main constituents of the title page. Therefore, we can hit the text of your project. Your abstract appears soon after the title page. An abstract is a quick summary that sums up the whole thing (hypothesis to be proven, and conclusions that are reached). Nonetheless, you should leave some space and skip it until the entire project is finished. It is recommended to write the abstract last. The main point is that this section provides a brief review of what your lab report is about and what you’ve managed to achieve.
Main Sections
The introductory part tells your readers what to expect from the project. Write a couple o paragraphs and explain the purpose of your experiment. Including references here is also highly encouraged. The last sentence of your introduction is called a hypothesis or a thesis statement. It shows what you hope to achieve at the end of your research.
The main body consists of several parts and of course, each has its purpose. You should introduce the materials and methods you need to conduct the research. Explain your choice and how your choice helps to conduct a safe and accurate study.
Take instant records of everything that happens during the experiment in your lab notebook. Never rely on your memory!
Afterwards, you’ll interpret the data and explain it using plain words. Don’t draw any conclusions when you record data and don’t explain it in the section called Results. This function should be fulfilled in the sections Discussions or Analysis sections, which should come right afterwards.
Your conclusion makes a brief summary. It should consist of 3-4 sentences, not many more. Restate your hypothesis in other words. Mention whether you’ve achieved your initial goal and explain its value.
Importantly, do realize that if a hypothesis cannot be proven, or an experiment doesn’t give you the results you expected, it doesn’t mean that your experiment and lab session was a failure. It is extremely common in chemistry to find yourself on this kind of situations! You only need to be able to explain why you got the results that you got, and how would you go around to fix them!
Further Sections on Your Report
Don’t forget about the contributors (labmates, supervisiors…) to your research.
You should also obligatorily use some secondary sources to support your theory. Therefore, you have to cite and make references according to the assigned writing format. You can reference other articles all over your manuscript (especially in the introduction and discussion sections), but don’t forget to put them together (or at the bottom of each page), and cite them properly.
The final step is to proofread your lab report. You’re free to use reading aloud and in your head, reading everything again, and using special grammar and spelling checking applications.
To sum up, keep in mind all these guidelines when you’re assigned to write a lab report. Thus, you’ll never miss something important, which can cost you essential grades. Write each section properly to receive the highest grades for your experiment. Always be clear, cite the appropriate references, and be objective with your analysis and conclusions!
]]>https://chemistryhall.com/how-to-write-chemistry-lab-report/feed/0Thin Layer Chromatography: A Complete Guide to TLC
https://chemistryhall.com/thin-layer-chromatography/
https://chemistryhall.com/thin-layer-chromatography/#commentsThu, 02 Jan 2020 00:37:00 +0000https://chemistryhall.com/?p=38655If there is one technique or experiment that every chemist, or student learning chemistry should know, it is Thin Layer Chromatography (or TLC for short). If you want to become a synthetic chemist, or you are planning to ace an experimental course on organic chemistry, TLC is something you really need to master. So, what... [Read More]
]]>If there is one technique or experiment that every chemist, or student learning chemistry should know, it is Thin Layer Chromatography (or TLC for short).
So, what is this tutorial about? What am I going to learn if I continue reading?
Well, I am a synthetic organic chemist with years of experience in the lab, and I have run thousands of TLC and flash columns in any solvent combination that you can imagine. I also enjoy sharing and reading lab tricks with colleagues, or even online. You could say that there are very few things that I still don’t know about this technique.
What I decided to do, is to put together all my knowledge in this tutorial article, so you can start reading without knowing what a TLC is, and finish up by being able to separate and identify (almost) anything you want in an organic chemistry lab!
This guide is for many different levels.
I can tell you that even if you have never been in a chemistry lab before, you will be prepared to do a thin layer chromatography just by continuing to read the first sections.
On the other hand, I can also promise you that even if you have PhD in organic synthesis, there is still some tricks or hacks to learn in this guide.
Considering this, you can navigate this tutorial page by using the index shown right below. Happy TLCing everyone!
What is Thin Layer Chromatography?
You might be familiar with what chromatography is, but maybe you din’t know that, as a matter of fact, the name “chromatography” comes from some early experiments on thin layer chromatography.
The word chromatography comes from the Greek chroma, “color”, and graphein, “to write”. It was a technique to separate substances that had different colors.
Basically, a chromatography is any lab technique in which we separate different chemical components of a mixture by their affinity to a stationary phase (usually silica gel in TLC) and to a mobile phase (the solvent or mixture of solvents). They don’t necessary have to be colored compounds, since there are many other ways to detect or identify them.
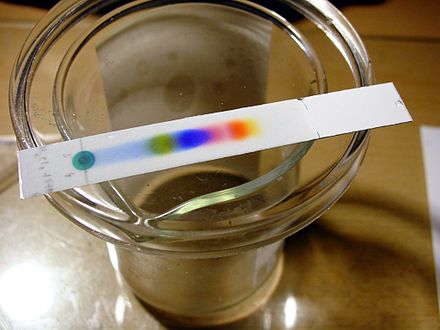
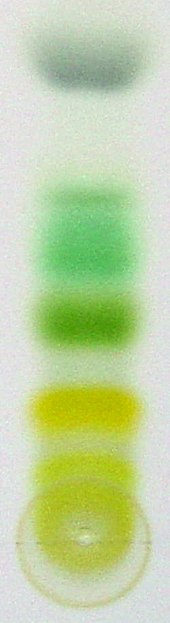
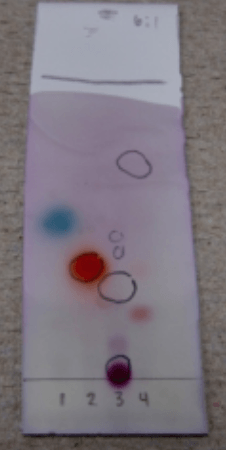
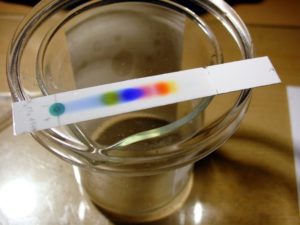
Initial experiments on TLC allowed separating pigments of plant’s extracts. These pigments (such as chlorophyl) have different colors, and elute at different rates through the stationary phase, so they can be separated and easily visualized:
TLC of a plant extract
Chromatography can get very complex, with complicated and expensive instruments such as GC-MS or HPLC, but the most basic, most important and oldest technique is thin layer chromatography, or TLC.
In TLC, we use a stationary phase (most frequently silica gel) which is deposited over a glass or aluminum support. We then can spot mixtures of compounds over the same line. Then we elute the TLC with an organic solvent, and the different compounds will move upwards at different rates, allowing the separation of the different components.
What Is Thin Layer Chromatography Used for?
Thin Layer Chromatography is a cheap, quick and easy technique to separate components of a mixture. It is used by synthetic chemists to monitor chemical reactions and purifications.
And How Does a TLC Work?
Well, a TLC plate is an aluminum plate coated by a “thin layer” of a stationary phase, which is usually (>95% of the time in organic synthesis) silica gel.
Around 1 cm above the bottom of the plate, you can spot a solution of a mixture of compounds of different polarity.
Then, you “elute” the plate. you basically put it vertically inside a closed chamber which contains an amount of an appropriate solvent mixture. The solvent flows slowly up the plate through capillary action.
The stationary phase, silica gel contains Si–O–H bonds that bind to the different compounds of the mixtures in a variable manner depending on the polarity of the compounds. Also, depending on the nature of the solvent used (more polar or less polar), it will pull upwards some compounds faster than others.
In general, more polar compounds will “climb” slower up through the TLC plate, and less polar ones will fly upwards.
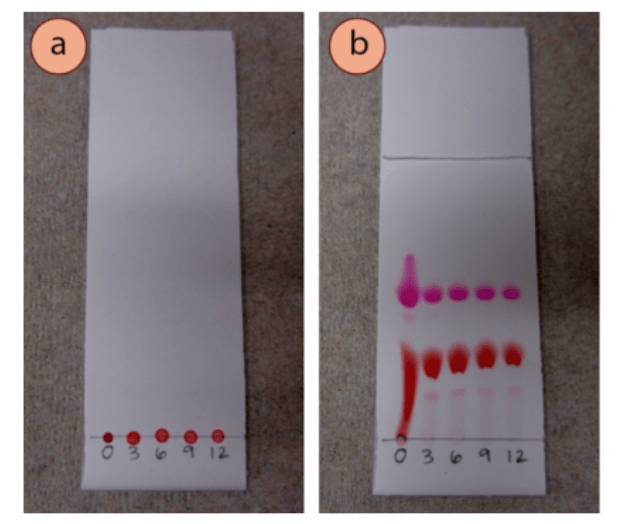
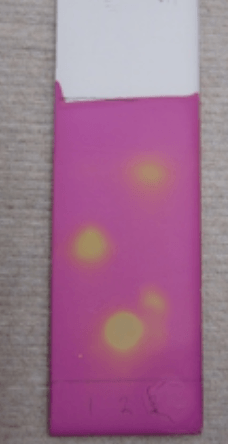
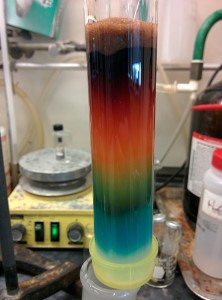
Then you just need to check how many and where in the TLC plate each spot is. Each spot corresponds to a different chemical compound on the mixture.
Separation of two main components of a mixture (pink spot and red spot). Credit to Lisa Nichols via LibreTexts
Usually you will need a UV (Ultraviolet) lamp to visualize the different spots, but if the compounds are strongly colored, as in the picture above, you can easily see the different components of the mixture.
How Do You Run a TLC? Step by Step Guide
1. Cut Your Plate
First you need to cut a piece of TLC plate of the appropriate size. What is the appropriate size? It depends on the purpose of the TLC, and how many spots you need to separate. If you just want to take a look on how many compounds you have in a mixture, one spot is enough.
TLC plates are generally made of aluminum coated by the stationary phase, and can be cut with scissors. Sometimes, the supporting material is glass and you will need a glass cutter to do the job.
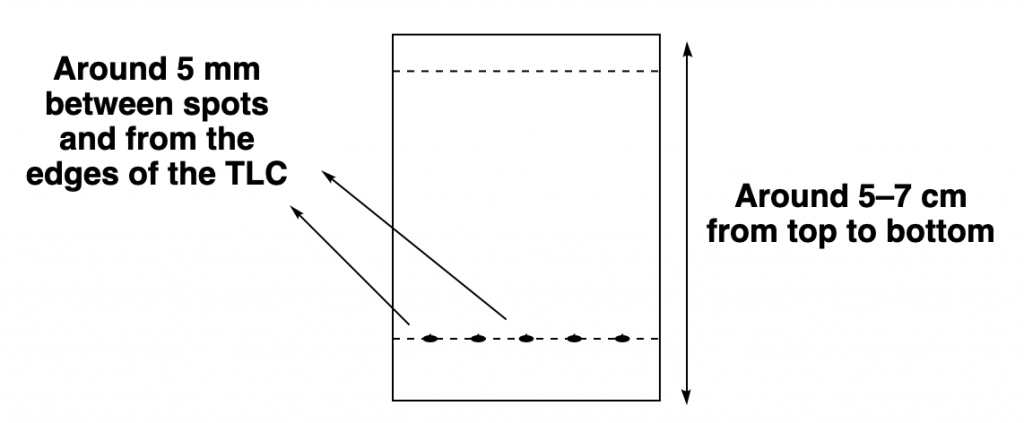
Usually, a thin layer chromatography plate is around 5–7 cm high, and a line is drawn around 0.5–1.0 cm from the bottom. That is the line in which you will spot your mixtures to separate. It is important that you spot the mixtures above the solvent level on your elution chamber!
Also, remember to leave some separation between each spot at the bottom spotting line (so they don’t mix to each other!) and also leave a similar separation (of around half a centimeter) from each edge of the TLC plate.
Typical TLC size and arrangement.
2. Spot Your TLC
Then is time to prepare the samples of the mixtures to separate, and spot them on the TLC plate.
For simplicity, let’s start off with just a single spot, in which we will put a solution of a mixture of several compounds.
First we need to prepare a solution of our mixture. The usual average concentration of these solutions is a few miligrams of mixture/compound in around 0.5–1 mL of solvent. Those few miligrams are totally approximate. Just add a spatula or Pasteur pipette tip and dissolve it in a bit of solvent!
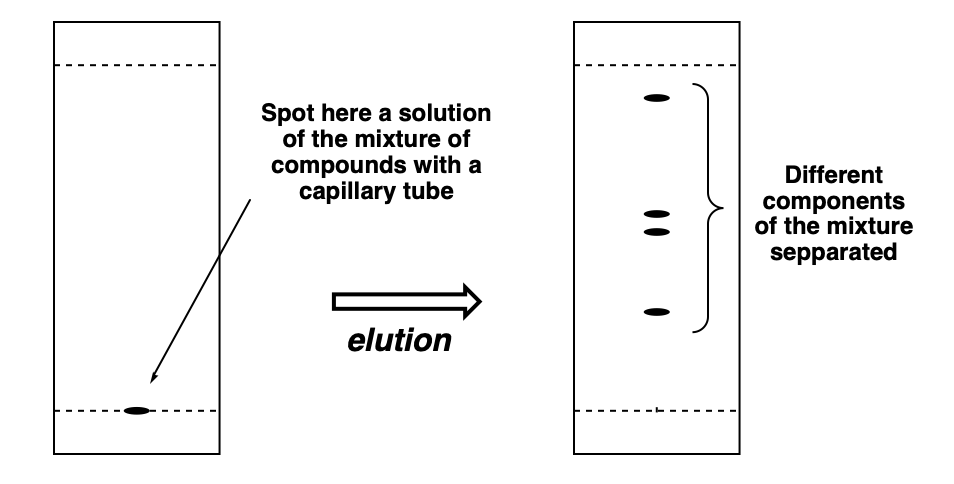
Once you got the solutions prepared (in this case, just the one!), it’s time to spot it on the bottom line of the TLC. You need to use a capillary tube (see the corresponding section for details). Take up some mixture solution with the capillary tube and press it lightly into the corresponding marked spot (use ALWAYS a pencil to mark in a TLC! Pen ink will elute with organic solvents, pencil graphite will not!) at the line around 0.5–1 cm above the bottom of the TLC.
Spot the TLC mixtures at the corresponding mark in the line above the bottom of the plate. Then elute the plate and see how many compounds there is in your mixture, and how polar are they, just by checking out the different spots.
Try to spot your mixtures as tightly as possible. Make very small spots of sample. Very wide spots will make the different compounds overlap leading to a not so nice separations. Maybe even some compounds will be hidden since those will be basically co-eluting with other massive spots. Generally speaking, more diluted and smaller spots are they way to go.
3. Elute the TLC Plate
Then is time to elute the plate. For this you need an elution chamber. There are commercial options, as the one in the picture below, specific for that purpose.
But you can use any glass container that you can cap, actually. A beaker works. A a clean jam jar will also do the job!
Then you need to fill it with about 0.5 cm height of the desired solvent system.
There is no absolute best starting point for selecting a solvent system. However, a extremely quick summary would be:
If you are working with absolutely apolar organic molecules (no polar functional groups, only C and H), such as naphthalene, start with pure pentane or hexane.
If you want to separate a compound with one or two mildly polar functional groups (ether, ketone, ester…), go for a 4:1 hexane/EtOAc mixture.
If your molecule has one or two very polar groups (alcohol, amine, etc), go for 1:1 hexane/EtOAc.
If your molecule is much more polar than that (e.g. a sugar, an amino acid…), swap hexane for DCM, and keep EtOAc as polar component. Use a 1:1 ratio for starters.
If your compounds are so polar that do not move at all from the baseline with DCM/EtOAc, go for 9:1 DCM/MeOH or even 9:1 EtOAc/MeOH.
If none of this works, you are looking at a extremely polar compound and you might want to consider using reverse phase (an apolar stationary phase, instead of silica gel)
If you want more details about choosing a solvent system, check the corresponding section below!
This being said, it is important that the solvent level is below the initial point where you spot your samples! Otherwise, they will get diluted and you will not get a clean separation.
Once the chamber is ready, just put in the TLC inside, vertically, and wait for the solvent to go up by capillary action. Take out the TLC plate when the solvent level is around 90% form the top (don’t let it drown!)
Left. TLC spots (before, at the bottom, and after elution, at the top). Right. TLC eluting in the solvent chamber. Credit to SiliCycle.
Before the plate dries, mark the eluent front (the line on the plate the solvent level has reached). You will need this to determine the retention factor (Rf) of each spot/compound.
Then, dry off the plate (with compressed air, blowing air, or just waiting…)
4. Visualize the TLC: Check Out the Results!
Finally, visualization. This is a matter of finding the right way to visualize the spots corresponding to each compound in the mixture you just separated.
If they are strongly colored (as in the picture above), you are good! You don’t need anything else, just look directly at the plate.
Most of the times, organic compounds will not be visible, but they will absorb UV radiation. So you just use a UV lamp. Finally, there are a lot of staining solutions that can be used to develop the plates and easily tell where each compound appears. Scroll down to the corresponding section to known more about visualization.
5. Determine the Retention Factor of the Different Compounds
What is Retention Factor?
In thin layer chromatography, retention factor (Rf) is the distance that a compound travels through the stationary phase (TLC plate) between the origin spot and the distance the solvent front moved above the origin.
To calculate the value of the Rf, you just have to apply this simple formula:
Rf(spot) = (distance the spot has moved)/(distance solvent front moved)
A visual example:
How to determine retention factor (Rf) in TLC
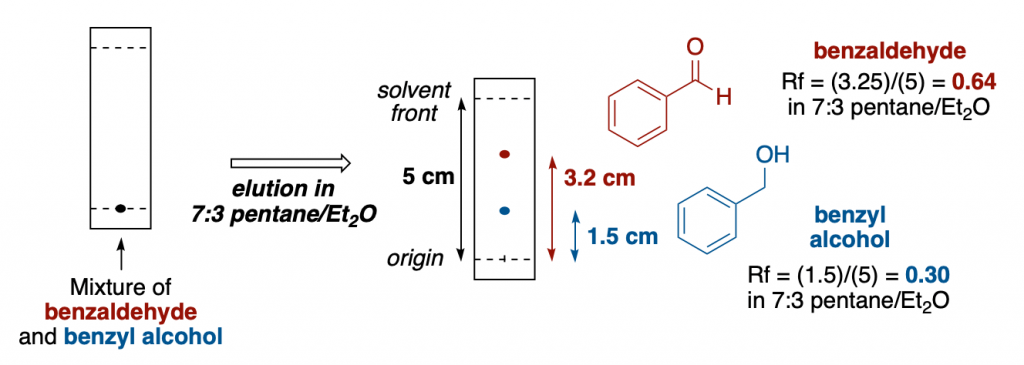
After eluting a mixture of benzaldehyde and benzyl alcohol in a TLC plate using 7:3 pentane/diethyl ether as a solvent, the two compounds travel a certain distance.
Benzaldehyde is less polar than the corresponding alcohol, so it is easily identifiable as the top spot.
After measuring the distance that both of the spots traveled, we can determine the retention factor for each compound in that solvent mixture. Simply divide the distance that one spot has traveled by the total distance the solvent has moved from the origin spot line.
For example, for benzaldehyde, it moved 3.2 cm from the origin. The solvent from has moved a total of 5 cm. So we can say and report the Rf of benzaldehyde in 7:3 pentane/diethyl ether to be 3.2/5 = 0.64.
Please, keep in mind that retention factors depend greatly on the solvent system used and on the stationary phase of the TLC. If you modify any of those, Rf will change. That’s why when reporting retention factor values, it is essential to specify those parameters for each compound.
6. Re-run the TLC with a Better Solvent System if the First Attempt Was not Successful
Finally, something that is very common while working with new compounds: Many times the first choice of solvent system will not be the appropriate, and maybe all the compounds of the mixture eluted together to the top of the TLC, or just didn’t move from the base spot, or maybe they are somewhere between, but still the separation is not perfect.
In any of these cases, you just have to keep tweaking the solvent system until you find the most suitable for your mixture!
It is not uncommon to run 3-4 TLC plates of a reaction crude (even for experienced chemists) before starting a flash column chromatography purification.
And that is pretty much what you really need to know to perform a TLC experiment. The only thing left is knowing which solvent system you need to separate your mixture appropriately, and to know what are the real-life applications of TLC.
Was anything not clear?
Don’t worry, a video is worth a thousand words! Check out this video guide for TLC:
Video tutorial on how to run a TLC plate
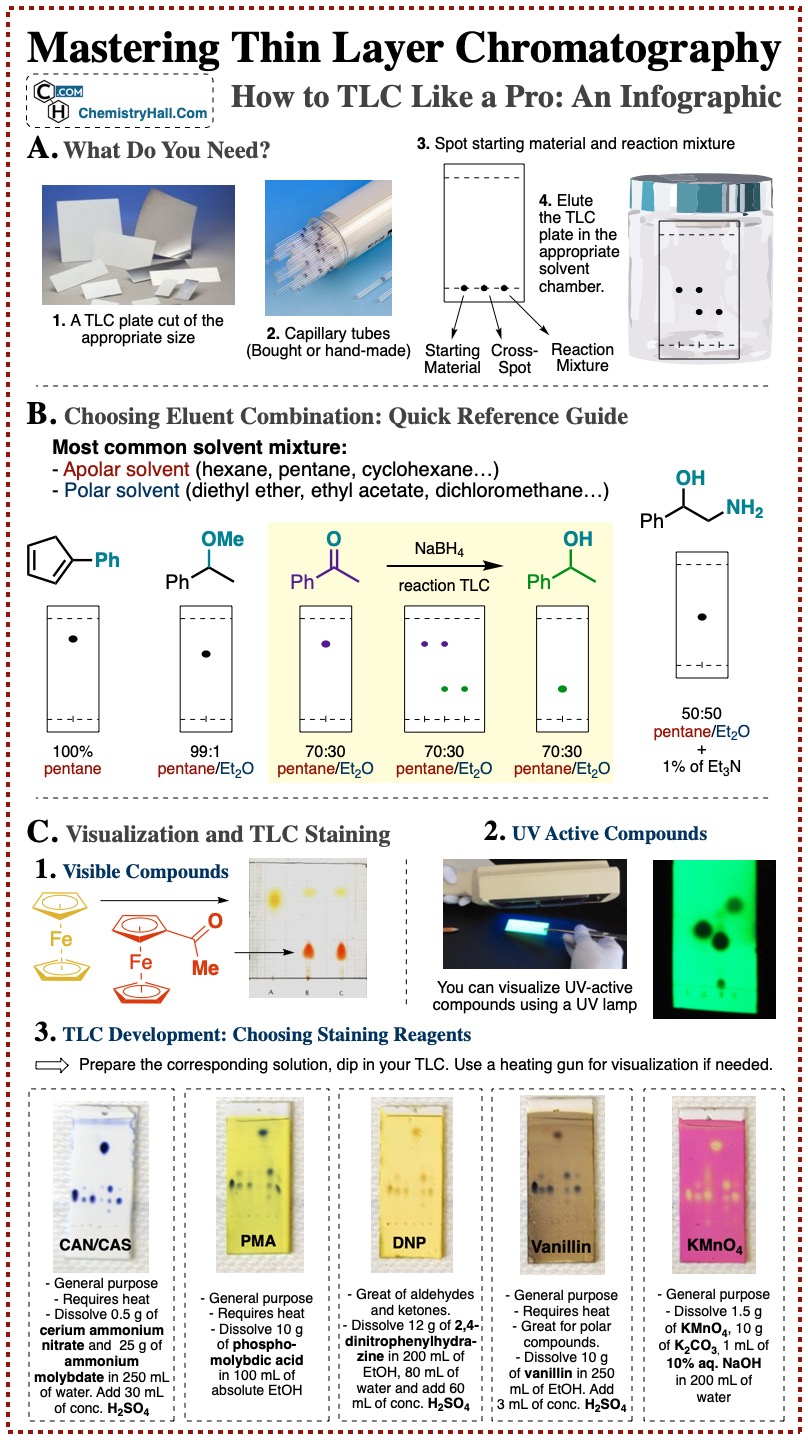
A Quick Infographic Guide for Thin Layer Chromatography
After lining up the entire procedure for running a TLC, I want to cut to a quick reference graphical guide that we prepared.
It is the most visual way to sum up TLC technique that we could think of, and here it is for you:
Infographic guide on how to set up, run and analyze a TLC. Click on the image to expand.
Please, feel free to link, share and use this infographic as you please!
From this point, the introduction is finished.
We will get first into the main basic uses of TLC. Then we will move onto more details into each component of the technique. Then we will cover more advanced uses and techniques, such as prep TLC, 2D TLC, or flash chromatography.
And then we will finish with some mind-blowing tips and tricks and TLC troubleshooting.
Keep reading!
Thin Layer Chromatography for Reaction Monitoring
The main use of TLC is monitoring chemical reactions.
In a chemical transformation, you usually have a starting material (SM) that will get consumed to give rise to a product. In most cases, this product will have a different polarity than the SM. This means that they will have different retention factor in TLC, and you will be able to separate them by TLC.
You generally want a solvent mixture that gives both compounds a retention factor between 0.2 and 0.8. But of course, the main idea is that you can see both spots resolved, not together, so you can see if you still have SM in your reaction mixture or if it is all consumed. This would mean that the reaction is finished in most of the cases.
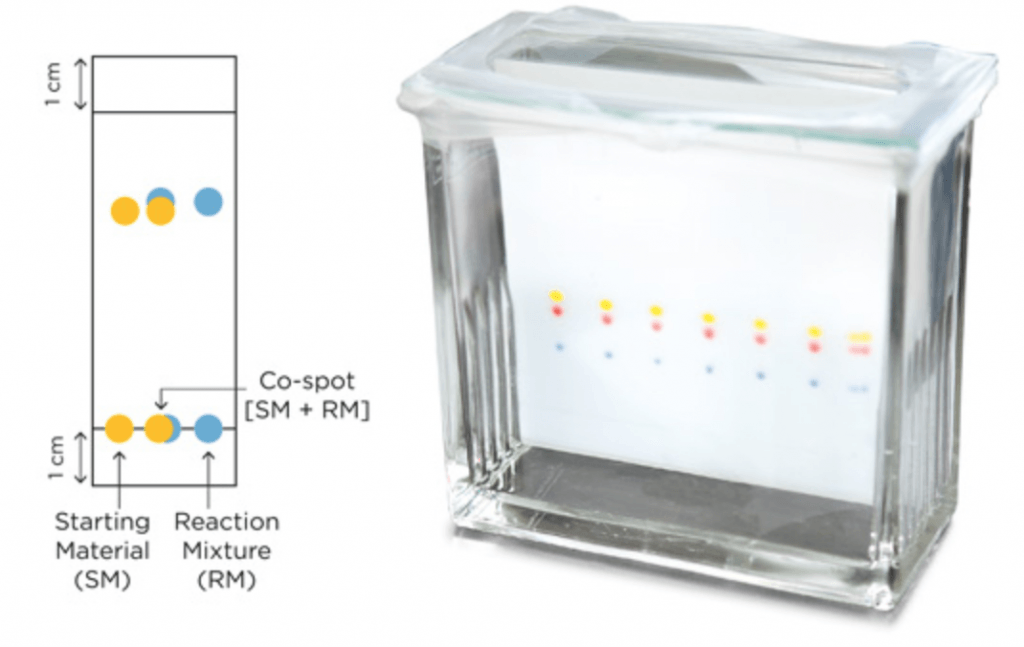
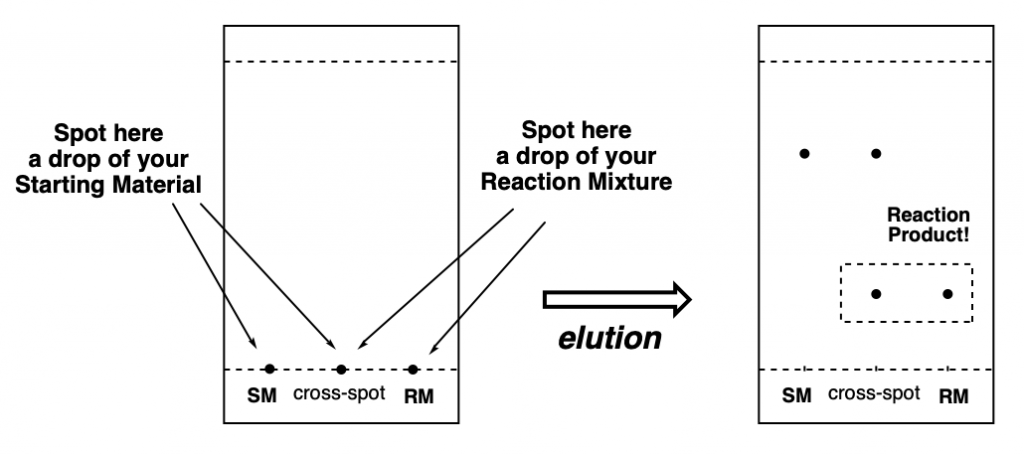
The trick is to make three spots on the TLC, one with the SM, another one with the reaction mixture (RM), and another one in the middle (co-spot or cross-spot) in which you put both a solution of the SM and the reaction mixture. This way you can clearly visualize, after elution, that your SM actually reacted to form a new product. This is particularly important if both SM and product have very similar Rf, and it is difficult to see if you actually have a new product or just SM in the reaction mixture.
Basic way of monitoring reaction progress by TLC. (SM = Starting Material, RM = Reaction Mixture)
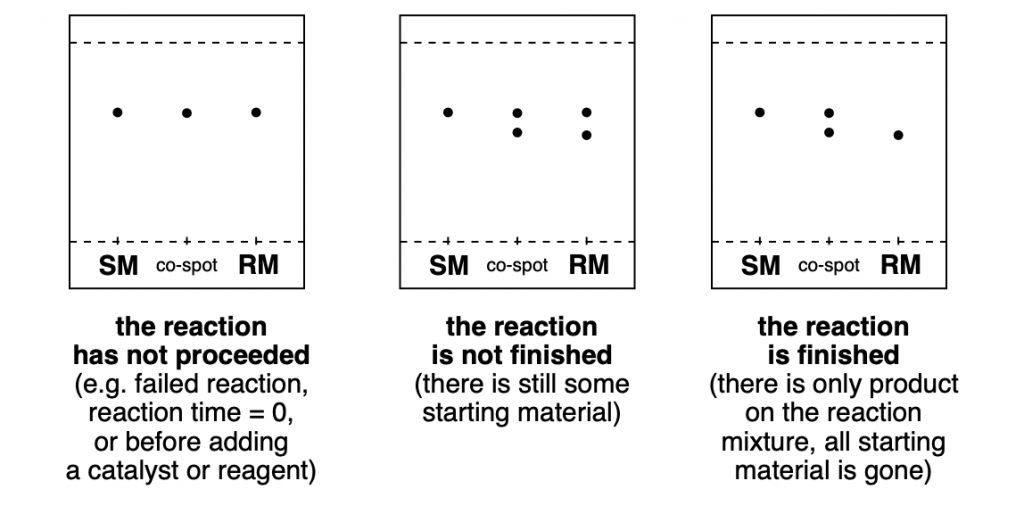
As you can see in the diagrams below, it is very easy to see whether a reaction didn’t work at all (yet), if a product is being formed, but the reaction is not finished, or if all SM has been consumed and there are only products on the RM.
Typical scenarios encountered while monitoring reactions by TLC (SM = Starting Material, RM = Reaction Mixture)
Furthermore, if you happen to have a sample of the reaction product that you want to obtain (because maybe you had run the same reaction before, or because it is a commercially available product), you can add another spot for the product, and another for a co-spot of both product and reaction mixture. This way you can confirm that the desired product has been formed.
Column chromatography is a method for separating and isolating chemical compounds in the lab on a preparative scale, depending on its relative polarity.
The basis are exactly the same than for TLC. We have a glass column filled with a stationary phase (also usually silica gel).
On top of the stationary phase, we put the mixture of compounds that we want to separate. When we are trying to isolate one product from a reaction mixture, we call this mixture “crude product”.
Then, we pass solvent through the column, from the top to bottom, sometimes aided by applying pressure (this is what we call “flash column chromatography”). This makes the different compounds of the mixture elute through the stationary phase at different rates.
Then, the different fractions that come out of the bottom of the column are collected in different test tubes. If the separation was performed correctly, we will have each compound of the mixture in different test tubes. The we can just get rid of the solvent by evaporation and we will have our product pure.
The rate of elution for each compound depends on its retention factor (i.e. its polarity) in that particular solvent system. This means, they will come out of the column in the same relative rate rate as their spots eluted in a TLC.
How Do We Use TLC for Column Chromatography?
Well, first of all, before running a flash column chromatography, we need to select what is the appropriate solvent system for the purification. We do this by using TLC.
Ideally, the product(s) that we want to isolate, should have an Rf (retention factor) of around 0.4 in a given eluent (mixture of solvents) to allow for a smooth column purification.
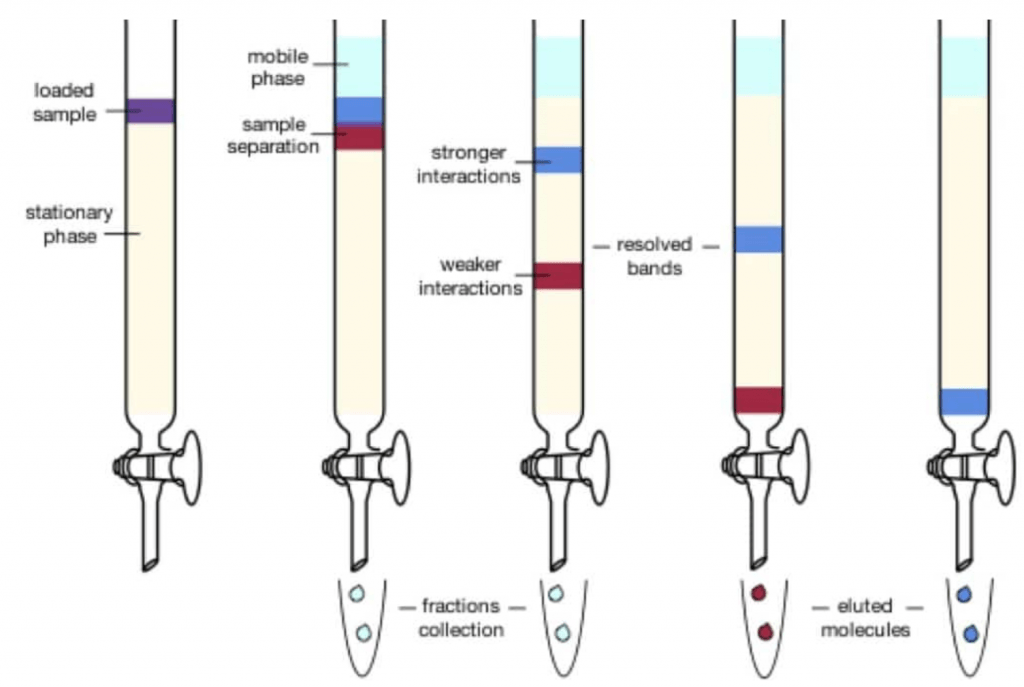
The following image on the left illustrates how an ideal TLC for purification should look like. As you can see, two products are clearly visible and separated. So the solvent mixture that yields this result on TLC, will be a great choice for running the big scale column chromatography purification.
Ideal TLC for flash column chromatography purification. Credit to to Lisa Nichols via LibreTexts
The images on the right, illustrate how this separation does proceed using that same solvent system. As you can see on the far right, the first compound leaves the column completely separated from the other one. It can be collected, and concentrated in vacuum, getting your product completely pure and dry!
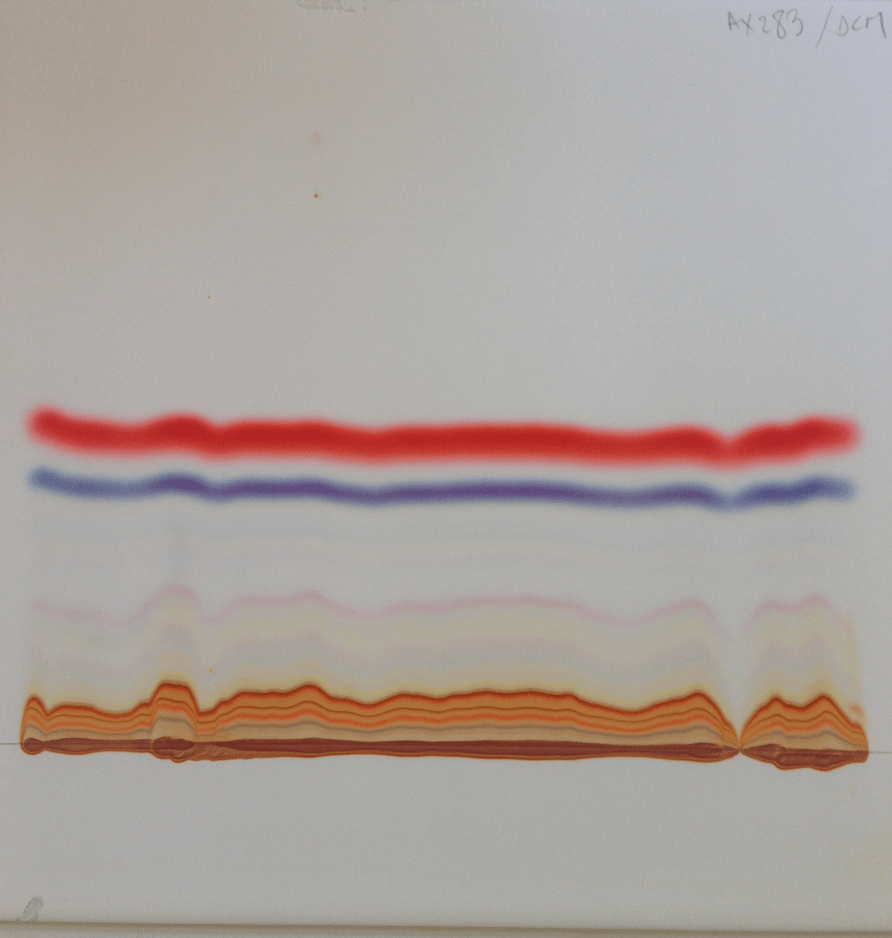
TLCing the Fractions from Column Chromatography
But after running the column chromatography, you usually end up with dozens of tubes filled with eluent with the different compounds dissolved. Now we have to use TLC again!
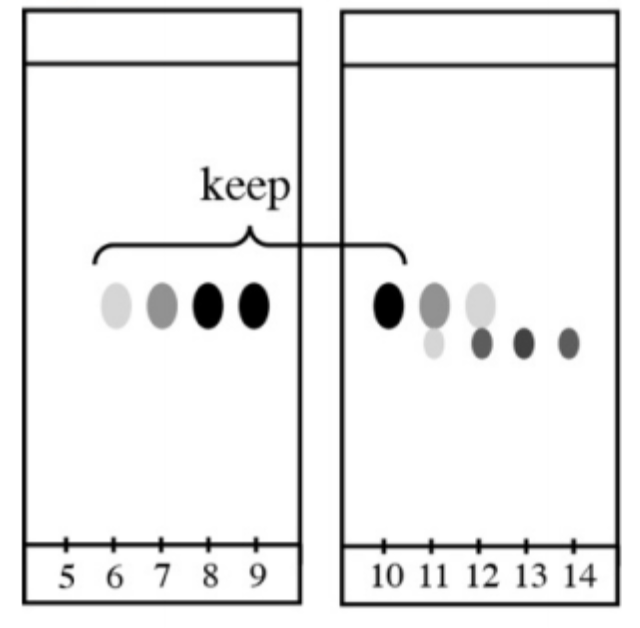
TLC of the different fractions/test tubes from column chromatography.
As you can see, we spotted all the fractions/test tubes on the TLC, and eluted in the same solvent system. As you can see, we have two different products (spots) that came out of the column pretty close.
From fraction 5 to 10, we only have compound one, pure. We can mix these fractions, concentrate them, and we will have pure compound 1.
Fractions 11 and 12, have a mixture of the two compounds. Usually we throw away this kind of mixed fractions (unless we don’t actually care about the impurity, maybe it just doesn’t affect the next step of our synthesis!).
Fractions 13 and 14 have pure compound 2. If we also need this compound, we will just concentrate them together as well.
As you can see, TLC is extremely important for both reaction monitoring and product purification, the two cornerstones of any synthesis laboratory.
Checking What’s on Each Fraction with Other Techinques
Sometimes TLC is just not enough and you don’t know what compound/product is in each of the different fractions that came out of your flash column. Evaporating everything and taking an NMR is really time consuming, so you might want to go for an alternative technique if it’s available to you.
If you have access to a GC-MS (gas chromatography-mass spectrometer) or LC-MS (liquid chromatography-mass spectrometer), you can analyze quickly all the different fractions, and know the molecular mass of the compound(s) present on each of them.
Another cool instrument is the TLC-MS. This technique is usually much less available in chemistry labs than GC-MS or LC-MS, but if you can use it is great. Basically this machine automatically scraps off individual spots on an eluted TLC, and makes an MS analysis, so you can check the molecular masses present on of each spot of the TLC in usually less than a minute.
A Comment on Retention Factors and Flash Column
Using an eluent which gives an Rf of 0.4 for your compound is the usual rule of thumb, but it has of course many exceptions. If you have two compounds that are very close together in Rf, this might not be enough. Having two compounds show as two separate spots in TLC doesn’t mean that they will come out separately from flash column.
Column bands are like much much wider TLC spots, especially as we scale up the purification. Imagine that typical TLC that you overload with sample and you get two big unresolved overlapping spots. That is a closer picture to what is actually happening in your column chromatography.
For this reason, sometimes an Rf of 0.4 will not do the trick. If spots are separated by less than 0.15 Rf, you will usually need to be a bit more conservative and choose an eluent in which they have a retention factor of around 0.3, or even a bit less. Another cool trick to enhance this kind of purification is using thicker columns, this helps a lot with separation. Using longer columns doesn’t usually help, since you are just thickening the bands and making them overlap more!
On the flip side of the coin, sometimes your compound of interest just flies on TLC using certain solvent mixture, giving an Rf of 0.7-0.9. This might allow for extremely easy and fast separations in a couple of the first tubes/fractions.
In Depth Guide: Materials for Thin Layer Chromatography
Making Capillary Tubes
You will have to spot reaction mixtures, or reference samples in your TLC using capillary tubes.
You can either buy them, or make them yourself. This depends on your lab’s budget, but I don’t think there is much harm in buying some good capillary tubes. The commercial ones I use on a daily basis, usually last for months before breaking, if you are careful enough.
But you can make thin capillary tubes out of thicker glass tubes, you just need to heat them up and then pulling. For this, you can either use thicker capillary tubes or glass Pasteur pipettes.
Explaining the method for heating and pulling will sound more complicated than it actually is, just take a look at this short but on-point video:
How to make your own capillary tubes for spotting TLC plates
As you can see is not terribly complicated, and it can even be a nice experiment for undergraduate labs. Just be careful with the flame (or other heating source that you use! Avoid using open flames in the lab if you have alternatives).
Elution Chambers for TLC
So, there are actual chambers designed for running TLC, and they are just great, such as these from Fischer:
TLC chambers designed for that purpose
But that doesn’t mean you need one of those fancy pieces of glasswares to run a TLC. The beauty and simplicity of this technique is that you can use it in basically any situation!
A typical temporary solution, if you are in a rush, is just using a beaker covered with something (like a watch glass, or even aluminum foil), so the solvent doesn’t evaporate and allows for a nice saturated atmosphere
It is worth mentioning here that this is another key for a good eluent chamber: You need the atmosphere as saturated as possible. This way, the solvent doesn’t evaporate on its way up through the plate, which would cause an uneven movement of the eluent front. This can be detrimental for the separation, so always ensure that your chamber is a reasonably closed system.
TLC chamber made with a beaker, a watch glass and filter paper. Credit to CU Boulder
As you can see in the picture above, you can also put a piece of filter paper inside the chamber a while before eluting your TLC.
Why? The solvent will ascend through the filter paper as well (by the same principle than through the TLC), helping a lot in saturating the atmosphere inside the chamber with the eluent. This will make the eluent go up the TLC plate in a much more even manner.
Also, be patient, leave the eluent in the chamber with the filter paper for a while before eluting you plate!
Finally, the more practical low-cost alternative, in my opinion, is just using a glass tar with a screw cap, like the ones you get you jam, or other edible stuff in!
A glass tar with a cap makes up for a great TLC chamber
I survived through my undergrad labs and also through my first research experience only by using these “ghetto-chambers” on a daily basis!
Alternative Stationary Phases
As we were saying, more than 95% of the cases you will perform a TLC in plates coated by silica gel as stationary phase.
But there are very specific cases in which different stationary phase may be considered.
Silica gel (SiO2) is slightly acidic, so certain compounds are quite sensitive to these acidic conditions. In those cases, you can first try to neutralize the silica gel adding a basic solvent to your eluent (typical conditions are adding 2-5% of triethylamine to your solvent mixture).
Many times this does the trick, but in other cases is not enough. For those cases, there are alternative stationary phases such as neutral alumina (Al2O3). Maybe your target compound does survive in alumina and you can use it for both TLC and flash column chromatography purification.
Another alternative stationary phase is reverse phase.
Typical silica gel stationary phases are very polar, and you elute the plate with a solvent systems that is (much) less polar than SiO2. This works wonders form most typical organic compounds.
However, if you are working with extremely polar molecules, you will find that they get stuck into the SiO2 like crazy and no matter how polar you make your eluent, they simply won’t move.
For these cases, we can use reverse phase chromatography, in which the stationary phase is apolar (it will retain polar compounds much less), and you will use polar solvents, such as MeOH, as eluent. Very polar compounds, such as oligopeptides, can literally fly on reverse phase.
But these alternative stationary phases have some drawbacks:
They are not the standard method, and many times you won’t find TLC plates of alumina or reverse phase around in the lab.
Correlating with being less available: they are more expensive than silica gel.
In general, separation and resolution are worse. Also visualization can be more difficult in certain plates.
But sometimes (although very few times, we have to say) they are the only way to go, so keep in mind that these alternatives exist!
Finally, I have to mention that simple filter paper can be used as stationary phase. Separations are going to be bad, and you will get poor visualization. But if you have colored compounds, you can still see some separation. As a matter of fact, my first TLC experiment was just spotting a solution of spinach extract on filtering paper, and eluting it with acetone.
Visualizing Agents: Which One is Best?
There is no use in running a TLC if you cannot see the spots of the different compounds on your mixture. That’s why having access to the appropriate visualization technique is a must.
Visible or UV Light
Sometimes your compounds absorb visible light very strongly, and you don’t need visualizing agent at all. You can see the spots right as they elute up the plate!
This is common with highly conjugated compounds (such as polyaromatics, or polyenes), and with organometallic compounds, such as ferrocene derivatives. These compounds are great because you can basically run TLCs and column chromatography purifications knowing at all times where your compounds are on the silica!
However, most organic compounds do not absorb visible light strongly enough. So you have to use a visualizing agent.
The most common one is just using an ultraviolet lamp. TLC stationary phases are prepared to make your compounds visible in certain UV wavelengths. Most organic compounds, which have a minimum of conjugation will be observable in this manner.
Typical way of visualizing a TLC plate under UV light.
But there are some compounds which don’t even absorb light on the wavelengths typically used in TLC UV lamps. Those are generally highly aliphatic compounds with little functional groups.
For these cases, we use staining agents.
Staining Solutions
Staining agents for TLC are basically solutions of one or more compounds in which we can dip the plates after elution. They will react with your products and help visualizing easily all the different spots/compounds present.
It is worth keeping in mind that, even if your target compound(s) absorbs strongly UV (or even visible) light, it is recommended to stain the plate anyway, if you can. This is because there might be other components of the mixture present as impurities which you cannot observe correctly under typical UV-Vis conditions.
So remember, even if your compound is visible at first sight, check also under UV light. And even if you can see everything under UV light, developing the plate with a general-purpose staining agent will almost never be overkill.
Now follows a list of the most typical staining agents, and how to prepare them. There are many others, some incredibly specific for certain types of compounds. But for the reasons, above, I’d always go with a general-purpose stain. And one of these will work for >95% of organic compounds, so pick your favorite, and go!
Acidic Vanillin
Many people use this vanillin solutions. It is really easy to prepare, and after heating, it is really sensitive to most functional groups.
The coolest thing is that many times, small changes in functionalities on organic compounds lead to a change in the color of the TLC plate after vanillin staining and heating. This is really great if your starting material and product have a very close Rf. You can still differentiate them by the color!
TLC stained with acidic vanillin
Specifically, it shows brightly most compounds with polar functional groups. It might not be great for highly apolar compounds, such as simple alkenes or aromatics.
The recipe for this stain is really easy: Weigh 10-15 g of vanillin, dissolve it 250 mL of ethanol, and add 2.5 mL of concentrated sulfuric acid. Stir and you are good to go! To use it just dip your eluted TLC plate, and heat up with a heating gun.
Phosphomolybdic Acid (PMA)
This is another great general purpose stain. It is my personal favorite, and it does color almost anything you can find in an organic chemistry lab. From polyaromatics to alcohols, going through alkenes, or simpler aliphatic compounds.
It gives you different blue-green shades, so it might not be the best for identifying different compounds with similar Rf, but for first choice, it will do great.
TLC stained with PMA
This staining solution is also extremely easy to prepare. You just need to dissolve around 5 g of phosphomolybdic acid (buy the lesser quality one for this purpose!) for each 500 mL of ethanol, and it’s done!
Potassium Permanganate (Basic KMnO4)
This is the most classical one, probably the cheaper option, and it is also quite general. Basically it turns your TLC plate purple, and every compound that can potentially be oxidized will show up as a yellow spot. This guy makes no distinction, and TLCs don’t look very pretty, but sometimes it does the trick.
TLC stained with basic KMnO4
The usual recipe is a bit more complex here, but nothing that you won’t find around in any lab. You basically need to dissolve 1.5 g of potassium permanganate and 10 g of potassium carbonate in 200 mL of water. To this mixture, add in 1 mL of 10% aqueous NaOH, and stir. Just be careful not to stain yourself with the mixture! You don’t want your skin to get oxidized (i.e. dark brown for a couple of days-weeks…)!
This stain is also known as Hanessian’s Stain, or simply “blue stain” (for obvious reasons), and it is another multi-purpose beast.
It is a water based stain which makes your spots turn blue over a cool pale yellow background, after heating. If you heat too much, the background will also turn blue and the plate won’t look so nice, so be careful!
TLC stained with CAM or Hanessian’s stain, after a bit of heating (left) and after overheating (right)
I have seen people use two different recipes. Both work more or less the same, it just depends in which cerium reagent you find around/is cheaper for you.
Dissolve 5 g of ammonium molybdate and 1 g of cerium sulfate (OR 2 g of cerium ammonium sulfate) into 100 mL of water. To this mixture, add 10 mL of concentrated sulfuric acid, and stir!
Other Staining Agents
There are many other staining agents, but they are usually more specific for certain types of compounds, and not the best ones to prepare or use routinely in the lab.
Iodine vapor chamber: Fill a more or less sealed jar with a small spoon of iodine crystals. Cover it with silica gel. Put the dry eluted TLC plate in this developing chamber, and wait for the brown spots to appear. This is not the most sensitive stain, but the good thing is that you can use the same plate and develop it right after with a different stain.
Ninhydrin: A solution of 10 g of ninhydrin in 250 mL of EtOH. It is great for amines, especially primary ones. Those will show up as green spots even before heating.
Dinitrophenylhydrazine (DNP): Dissolve 1 g of DNP in 250 mL of aqueous HCl 2 M. This stain is extremely selective for aldehydes and ketones. Those spots will turn orange immediately at room temperature.
Anisaldehyde: Dissolve 4 mL of anisaldehyde in 200 mL of EtOH. Then, add 3 mL of glacial acetic acid and finally 10 mL of concentrated sulfuric acid. The result is a stain very similar to vanillin. Maybe less selective and less easy to prepare, but sometimes, it makes for a wider variety of colors after development, allowing to distinguish very close spots on the plate.
Solvent Polarity: Reference Guide
To anyone with a couple of years of experience in the lab, choosing the solvent combination for running a TLC or a column comes really easy. Or at least a good starting point.
But for beginners, it can be really overwhelming. After all, there are a lot of different functional groups, and A LOT of different combinations. Not to mention the endless solvent combinations that you could imagine.
That is the reason why it is extremely difficult to find a good guide out there to choosing the eluent for chromatography.
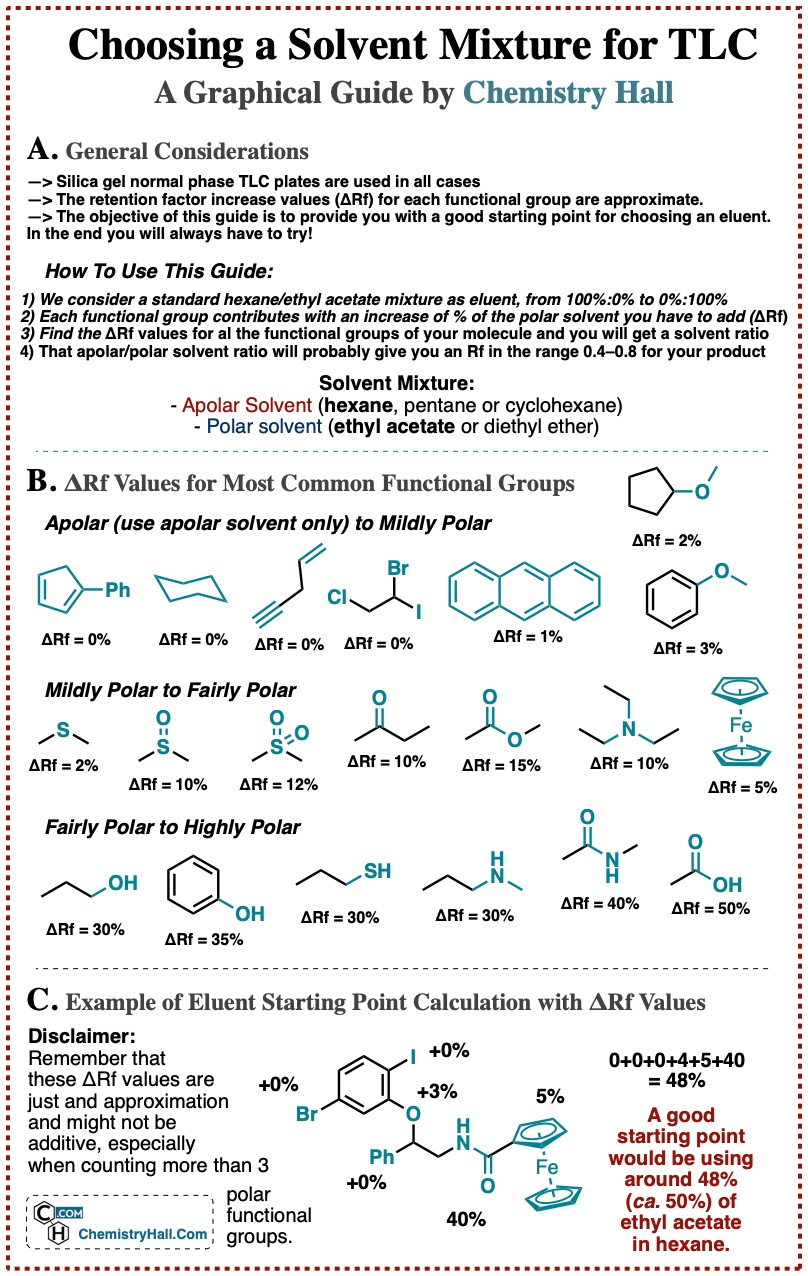
A Solvent Polarity Guide for Thin Layer Chromatography
We wanted to get as close as possible to the best guide. And we came up with the following infographic for choosing solvents for TLC.
Keep in mind that of course this is an orientation and approximation, and there will always be compounds that behave weirdly. But we think that it will do the trick to for most situations, at least as a first shoot for a new reaction that you are running.
Graphic guide to choose a eluent starting point for TLC
As you can see, we have broken down organic compounds depending on their functional groups, and added a value in the form of a % of polar solvent that you would need to your eluent mixture in order to get the compound with that group to go up the plate significantly.
We have limited it to classical mixtures of apolar solvent (hexane, pentane or cyclohexane) and polar solvent (ethyl acetate or diethyl ether), as a combination of these solvents will be usually enough to deal with most organic compounds.
Again, this is an approximation, and the values are not always additive. For example, an alcohol elutes with a 7:3 hexane/EtOAc. But if you have 3 alcohols, it is not certain that 1:9 will work. Maybe 1:1 is enough. Or maybe not even 1:9, maybe you even need to add methanol. There is no universal rule, that’s why guides such as this one are not very abundant.
As you can imagine, the most polar group itself will often dictate the polarity of the entire molecule.
Relative polarities of “minor” groups are important. Take a molecule which has an amide (6:4 hexane/EtOAc), but also a methoxy group (2-3% extra polarity). Then you change that methoxy group for an alcohol. Alcohol adds an extra 30-35% of polar solvent, so your reaction product spot will appear below the one for your starting substrate!
Which One of the Most Common Solvents is Better?
For practical purposes, solvents such as pentane, hexane, heptane or cyclohexane are similar, polarity-wise.
However, there are several considerations that might make you go for one or another.
Hexane/EtOAc is usually the standard mixture for organic separations. However, hexane is known to be a neurotoxic compound, that’s why many people swap from hexane to cyclohexane or heptane.
The only problem with those two solvents is that are less volatile, and more difficult to get rid of. If you need a more volatile alternative, use pentane. This should be used in cases where your target compound is relatively volatile and you cannot put it under high vacuum to remove the solvent completely.
In the polar component side, ethyl acetate and diethyl ether can be the main options. Diethyl ether is more volatile, so it should generally be avoided if possible, unless it gives you a much better separation or your target product is also volatile.
Also, when pairing solvent mixtures, try to go for solvents with similar volatility, so you don’t get faster evaporation of one of the components of the mixture than the other. This can potentially lead to reproducibility issues.
“Sticky” Compounds with Acid or Basic Sites
As an exception, you might want to consider as additives (up to 5-10%) of your mixtures other solvents such as MeOH (for extremely polar compounds), triethylamine (for compounds with basic sites) and acetic acid (for compounds with acid sites).
Compounds with basic or acidic sites, such as amines, amides (basic) or carboxylic acids (acid), can sometimes stick to the silica gel of the stationary phase a little bit too much.
This results on very wide spots on TLC, and as a consequence, very broad bands in your flash column chromatography purifications. Band/spot broadening often complicates purification, since your target compound might overlap with a byproduct or impurity that you want to get rid of.
Many times this has a simple solution: add to your solvent mixture 2-5% of triethylamine for basic compounds. This deactivates de acidic sites of the silica: Si–O–H bonds. These bonds, or extra protons, are responsible of basic compounds sticking to the silica gel, and making broader bands/spots. By adding Et3N to your eluent, you remove all of them and your compound will elute freely!
Similarly, acidic compounds such as carboxylic acids can react with Si–O bonds in silica gel to give Si–O–H, which really makes them stick to the stationary phase. You just need to add acetic acid as an additive, saturating Si–O sites into Si–O–H. This will make acidic compounds much more mobile through the TLC plate or column.
Preparative TLC
We have already covered flash column chromatography in a previous section. Running purifications is one of the main applications of thin layer chromatography.
But we can actually apply TLC to run preparative-scale purification. Not just to check how the different compounds/spots on a mixture separate, but to separate our reaction mixtures themselves, and isolate miligrams of pure products!
How Does Prep TLC Work?
Well, preparative TLC is just a regular thin layer chromatography separation, but with a bigger plate!
There are commercial TLC plates made specifically for prep TLC. They are usually made of glass coated with a thicker layer of silica gel. Then, instead of a single point spot, you apply the solution of your mixture (in roughly 0.5-1 mL of a volatile solvent such as DCM) along a line, parallel to the bottom (around 3-4 cm above the bottom).
For applying this solution, I usually use a 1 mL syringe with the thinest needle I can find. It has to be uniform and you need to be careful not to scrap the silica!
After drying it, you elute the plate in the appropriate solvent system (carefully chosen by classical TLC), and the different compounds will get separated. You obviously will need a bigger chamber. Typical prep TLC plates are around 30×30 cm.
Afterwards, you just need to scrap off separately the bands that you are interested in. For this, visualize the plate under UV light, and mark with a pencil the bands you are interested in.
Then, scrap off the band, and just pass a polar solvent such as DCM through the silica gel with your product, so it gets dissolved. Filter it off to get rid of the SiO2.
Then, just remove the solvent and there you go, pure product!
Different compounds after a prep TLC separation. Then you just need to scrap the band of the compound that you want, and elute the compound from the silica, filtrate and concentrate.
Preparative Thin Layer Chromatography: When Should I Use It?
So what are the advantages of preparative TLC?
Allows you to separate compounds that are extremely similar in polarity. Often times, you can separate a little bit two compounds by TLC but they wont come separately after column chromatography. This is the perfect scenario to run prep TLC!
You elute the plate several times with lower polarity solvent. If you need to perform a very careful separation, just use an eluent in which your compounds have a retention factor of around 0.10. Then, dry the plate, and elute it again. Repeat this process until your bands are well resolved.
It’s handier than column chromatography. You just spot your compound, put the plate in the elution chamber and wait until the solvent goes up. Then dry and repeat until the level of separation pleases you. In the meantime, you can do anything else!
It’s great to separate compound when you have only a few miligrams. Doing flash column of 10 mg of target product can be painful. This is not a problem with prep TLC.
Sometimes you can use the same 30×30 to elute several mixtures. You can cut the glass plate on half to use different eluents, or just mark it in half with a pencil and deposit each solution in each of the halves, along the same parallel line.
But of course, there are drawbacks:
It is not really scalable. I have separated up to 100-150 mg of compound using 2000 microns silica gel prep plates. But you cannot really go further than that in a practical manner. Preparative TLC is great for purifying the products of a reaction scope, or for the final steps of your total synthesis, but you cannot get grams of pure material with it.
If your compound does not absorb UV or visible light, you will have a hard time knowing where it is on the plate. You can always “paint” a vertical line with a staining agent on one edge, and then heat. But I would only use this as a last resort measure.
It is more expensive than flash column chromatography. No more to add to this, regular silica gel will always be cheaper than a commercial prep TLC plate. And making them yourself is really time consuming.
All this being said, I will leave you with a short time-lapse video of how does running preparative thin layer chromatography go:
Reporting Thin Layer Chromatography Data
TLC is a simple yet widely used technique. So in most reports and journals, you should provide information about TLC data for experimental procedures.
The very minimum is stating in which solvent mixture you have run the purification of each compound.
The best way, is reporting retention factors (Rf) of your product in a certain solvent mixture.
For example, you report a procedure to make benzaldehyde. You should mention that the product was purified by X chromatographic technique, using pentane/diethyl ether 1:1 as eluent, in which the product has a Rf of 0.75.
Tips and Tricks for Thin Layer Chromatography
We will finish by gathering some tricks, tips and lab hacks for TLC. You will definitely find something useful here!
2D TLC: Checking Compound Stability
Two-dimensional thin layer chromatography or 2D TLC got me through my first year of grad school, when I had to work with a great deal of compounds that could potentially decompose during purification on silica gel.
How to run a two-dimensional TLC
Get a square TLC:Cut a TLC plate with the shape of a square, around 7×7 cm is fine.
Spot the sample in one corner: Spot the solution of your sample in one of the corners of the square, leaving around 0.5-1 cm from each of the two borders.
Elute the plate in one direction: Use an eluent that gives roughly an Rf of 0.5 for your compound, and elute the plate as usual in one direction.
Elute the plate in another direction: Dry your plate, and rotate it 90 degrees, so the lane of all the spots is at the bottom. Elute it again on this direction.
Analyze the results: Any compound that is stable in silica gel, will appear somewhere in the diagonal of the square plate. Any compound that appears below the diagonal is decomposing.
Sand Bed for Your Elution Chamber
We have covered this sand bed for TLC in our lab hacks post.
If you have trouble leaving your plates standing vertically on your elution chamber, of if you want to run many plates on the same eluent at the same time… Get a big enough chamber, and make a bed with sea sand at the bottom (about 2 cm is enough)
Then, put your eluent in the chamber covering just a bit above the sea sand, and stick all the TLCs you need on the sand! They will not fall, and you can elute many of them parallel to each other.
Frequently Asked Questions (FAQ)
Do you develop the TLC plate all the way to the top?
No. Letting your plate drawn will result in spot broadening and worse separations. Also, the most apolar components of the mixture might “disappear” if you elute them to the top.
How do you fix big spots on TLC?
Huge spots appear when you overload your TLC plate. Dilute more your sample before spotting.
How do you know if a compound is stable on silica gel?
Some compounds can decompose when passing through silica gel from TLC plates or columns. You can tell if a compound is stable by using 2D thin layer chromatography (see above).
Should you spot TLC samples right at the bottom of the plate?
No, you should always spot the samples slightly above the level of eluent in your TLC chamber. Otherwise, you will dilute the spots and worsen your separation.
How do you TLC extremely polar compounds?
If your compounds stay in the baseline while using typical solvent combinations, go for more polar ones such as DCM/MeOH, or use reverse phase TLC.
How do you know if a reaction is finished by TLC?
Spot both the starting material and the reaction mixture in your TLC. Also, make an additional spot with both starting material and reaction (co-spot). If the reaction is finished, you will see two different spots (snowman shape) in the co-spot, even if the Rf of both compounds is the same.
How do you report thin layer chromatography?
The most important thing is to report the retention factor (Rf) in a certain eluent combination, of all the compounds that you have used. Alternatively, you can draw the TLC in your lab report.
How do you calculate retention factors on TLC?
The retention factor is the distance that a compound travels through the silica plate respect to the total distance the eluent front has moved. Rf = (distance compound moved from the baseline)/(distance of eluent front from the baseline).
What solvents do you use in thin layer chromatography?
The typical eluent for TLC is a mixture of an apolar solvent (typically hexane or pentane) and a polar solvent (dichloromethane, diethyl ether or ethyl acetate).
Closing Up and Conclusions
We really hope this comprehensive guide can help you master this wonderful technique.
Also, thanks to Lisa Nichols for borrowing some of her images from: Organic Chemistry Laboratory Techniques, Nichols, 2017.
Top sum up, o matter if you are new to synthetic chemistry or an experienced researcher, we hope you have learnt something from it!
Also we would love to hear from you and read your feedback and questions!
So please, head right into the comment section, and ask whatever you want. Remember that there are no stupid questions.
Any criticism and suggestion to improve the guide further will be highly appreciated. If you think that something is missing, or not well explained, go for it.
Finally, if you found this guide useful, please, feel free to share this on your websites, with your students or colleagues, or anywhere you like.
]]>https://chemistryhall.com/thin-layer-chromatography/feed/31Keys for the Best Chemistry Lab Notebook
https://chemistryhall.com/keys-for-the-best-chemistry-lab-notebook/
https://chemistryhall.com/keys-for-the-best-chemistry-lab-notebook/#commentsFri, 21 Jun 2019 09:16:51 +0000http://chemistryhall.com/?p=5555The importance of keeping a chemistry lab notebook in good shape throughout any kind of laboratory session is HUGE. Writing down and reporting what you do is the most important thing in science besides making observations. Especially if you are a student, you probably want to get better at organising a laboratory notebook. This is... [Read More]
]]>The importance of keeping a chemistry lab notebook in good shape throughout any kind of laboratory session is HUGE.
Writing down and reporting what you do is the most important thing in science besides making observations. Especially if you are a student, you probably want to get better at organising a laboratory notebook. This is natural step while learning chemistry. On this article we will share keys, tips and tricks to handle this important task from the beginning.
The chemistry lab notebook: perhaps the most important companion of any chemist.
Before we start with all our recommendations, if you want to jump real quick to our top recommendation for a lab notebook that will work for you in every case, check out the following one to fit all purposes:
But, what should a laboratory notebook contain? What information should you keep? Why should you keep record of things? What are the best options out there for lab notebooks? We will answer all these questions one by one.
Why is a lab notebook important in chemistry?
Chemistry is the experimental science by definition. We want to make observations to prove hypothesis. For this purpose, we perform experiments in the lab. But human memory is very limited. Not even the greatest scientific geniuses in history remember everything. For this reason, you need to keep track on what exactly you have performed, and write down the outcome of those experimental conditions. As we have remarked in other occasions, writing all your observations down is a master trick in any chemistry lab. Especially if you are taking a chemistry course at school, keeping a good student lab notebook is going to be the key to be successful!
Lab Notebook Format: What to Include in your Reports
Any laboratory session, from the first one that you take at school to the ones that I do in a daily basis as a chemistry researcher, starts with writing down your “hypothesis”, or your “problem” that you want to solve, or understand.
If you are about to run a synthetic chemistry reaction, the first thing you should write down is all the data a about that reaction:
Write clearly the overall chemical equation: What are the reactants? (Left side) Which is the reaction product, or possible byproducts? (Right side) What are the reaction conditions? (Other reagents, solvent, temperature, time… Over the reaction arrow).
Typical chemical scheme for a Grignard reaction
Table of reagents: Typically you need to make a table with a list of all the reagents you use, its molecular weight, number of moles, number of equivalents, and other relevant data about the experiment.
If you are taking organic chemistry courses, and you have trouble visualizing 3D structures, makes sure to get your hands into a chemistry model kit.
Recording your Procedures, Results and Observations
After all the appropriate preparation, you can jump into the actual chemistry experiment! But as you run it, you need to make as many observation as possible. The more the better, keep in mind that you will not remember everything afterwards. This is something that is hard to swallow at the beginning, but everybody ends up learning.
Do not limit yourself to writing the experimental procedure that you follow (which is obviously a basic requirement, including the different pieces of equipment and identifying all glassware that you use). Color changes in your chemical reactions, a mixture heating up (exothermic reaction), a solid precipitating from a reaction… Everything can be useful for coming up with a conclusion of the experiment!
To end up, the last step is putting everything you learnt together in your mind, and then writing it into the chemistry lab notebook. Learning how to extract conclusions and put them into words is one of the most important skills of a chemist. Why my reaction yield was low? In which experimental step could I have lost some product? Is there a byproduct forming? What caused that beautiful color change after adding the last reagent? These are great questions to ask yourself.
As for anything else, the bedrock of a good project is in the foundations. You need to buy a decent laboratory notebook for your sessions. Otherwise it will probably look messy, get damaged, or not look very good or professional. But worry not! We have some selected recommendations. I tested many lab notebooks over my years working in research. One of them which will fit your needs.
1. A Solid Professional Lab Notebooks to Fit Most Purposes
This kind of BookFactory lab notebooks are the ones that I actually use professionally. The cover and the pages are extremely resistant, you would have to try really hard to destroy it. You can buy them in several colors and with different pages (depending on how long your lab sessions are going to be), which is nice. As it should, this is a notebook with numbered pages, ruled pages, index, owner data page, and even some nice guidelines page. You cannot go wrong with this one:
2. Carbon Copy Notebooks: The Best Option for Student Labs
If you are taking a school or university chemistry course, there is nothing that can compare to carbon copy notebooks. Many universities are adapting to this format entirely, because it makes it easy for grading purposes: The student writes down their reports in the notebook, and everything gets carbon-copied to the page right after it. Then the copy can be handed in to the lab teacher for him to grade it. But it goes further than that: it can be very useful in profesional environments as well, since keeping records of everything is extremely important. Or maybe you are collaborating with a colleague and want to quickly share a piece of your notebook with them: this notebook is your solution. This is one of the best options that you can find.
I have tested these myself, and the copy works wonderfully. This notebook comes with 100 pages, and allows a perfect permanent documentation of any observations. The best thing is that, since you keep your own writing and hand in the copy to another person, if they need to grade it, you don’t need to wait until they give it back to check it any time. Besides, since you can hand in individual copies, you can use the very same chemistry lab notebook for all your courses or lab sessions! Back in the day when I was at school, I had one regular notebook for each course, and probably >80% of the space and paper ended up wasted. Not anymore!
3. Carbonless-Copy Student Lab Notebook
A clear alternative to carbon copy is another way of making non-electronic copies. Works similarly but basically does not use carbon, as you can probably tell. There are several options, but the most recommended one, and also quite affordable is this one:
4. More Affordable and Simple Lab Notebooks
If you want something simpler, more affordable and smaller, we got you covered. This recommendation will work especially well if you are just keeping track of your own chemistry experiments at home as a hobby chemist. It has plenty of pages, easier to handle and store due to its reduced size, very cheap and fairly resistant. The only downside is losing all the space that a regular A4 sized notebook offers, and in many cases is required.
5. The Definitive High End: BARBAKAM Carbonless Copy Lab Notebook
This is our personal best recommendation. We already have listed some of the advantages of having a carbon copy notebook. This performs great in the task of allowing you to hand in a copy of the pages to your professor, your boss, or your collaborators, and then you can keep all the originals for reference.
This notebook has 100 carbonless pages, but this is not its only feature. It comes with room for an index and personal data, but also plenty of reference pages! The periodic table of elements, common NMR shifts, formulas for calculating molarity and concentrations of typical solutions, metric units and conversion factors, properties of common acids and bases, or properties of solvents. This is something that you would use on a daily basis either as a student (I did) or as a professional chemist (I do). It is an awesome complement for a chemistry lab notebook. If I ever have to choose a notebook for a university or company department, it would probably be this one.
Enjoy your New Lab Notebook, and Fill it with Wonderful Chemistry!
Now that you have already selected and bought your new notebook, the only thing left is to fill it with all your observations and conclusions.
Do you need to write a report in a word processor afterwards? Check out our post on how to draw chemical structures in Word and much more!
You are now ready to ace your lab sessions if you are a student, to keep perfect record of your research if you are a professional, or just enjoy chemistry if you are a hobby scientist doing chemistry experiments at home!
]]>https://chemistryhall.com/keys-for-the-best-chemistry-lab-notebook/feed/1Lab Hacks – How to Increase your Productivity in the Lab
https://chemistryhall.com/lab-hacks-increase-productivity-lab/
https://chemistryhall.com/lab-hacks-increase-productivity-lab/#commentsSat, 19 Nov 2016 19:33:15 +0000http://chemistryhall.com/?p=234I have been working in a chemistry laboratory for some years and still every once in a while I learn new amazing tricks or lab hacks that leave me open-mouthed. Also, it has been a while since I last talked about chemistry lab tricks. For these reason, I decided to share with all of you... [Read More]
]]>I have been working in a chemistry laboratory for some years and still every once in a while I learn new amazing tricks or lab hacks that leave me open-mouthed. Also, it has been a while since I last talked about chemistry lab tricks. For these reason, I decided to share with all of you a handful of lab hacks I believe will be very useful to anyone working on a laboratory. Some of them I learnt from coworkers and others from reading books or over the internet, but most of them have proved useful to me at a certain point. I will get straight to the point.
1. Lab hacks for taking care of air sensitive chemicals: What works and what does not
I have seen people remove the “sureseal” from Aldrich bottles of buthyllithum and exchange it for a rubber septum. This is not the way to go: a piece of rubber full of holes is not protecting you reagent at all. The only long-term reliable method for protecting air-sensitive commercial compounds like BuLi is the metal/plastic seal that originally comes attached to the bottle. Aldrich’s sureseals worked fine in my experience, if you want something more, Acros multi-layer seals provide an even better reliability.
A more useful lab hack is to use a needle that leaves almost no hole while using it to take the reagent out of your bottle. A good choice is using 4 in. 22 ga needles (Fisher #14-817-102). I found them for the first time in my current lab and they work perfectly fine.
But if you really need to store a chemical properly under complete inert conditions you should transfer it into a Schlenk bomb.To do so you can just follow the same procedure than doing a cannula transfer, having throughouly purged it with an inert gas like Ar beforehand. Of course, most of this reagents can be titrated so you can know its exact concentration before using it, which is required especially in cases where you do not want to use an excess but a stoichiometric amount of the compound. Shenvi’s group in Scripps has published online a very nice guide on titration of common soluble RM, R2NM and ROM reagents.
2. Most commonly used pyrophoric reagents
Most of the fires and explosions that can happen in the labs are usually caused by the same chemicals. We found very interesting to share a list of the most common reagents that might cause a fire or an explosion if not handled properly.
The most popular one would be sodium metal, which is still used in many labs as drying reagent for solvents via distillation. Take special care when handling it under air atmosphere.
Lithium aluminum hydride (LiAlH4) is a frequently used reagent for performing reductions. It is of extreme importance to add the hydride in very small portions to the substrate, and in a ice/water bath if possible, especially at the beginning of the addition. Another approach would be to add a solution of the substrate to a suspension of LiAlH4, once again, in a controlled manner.
Palladium on carbon (Pd/C) can also ignite in contact with MeOH (a common solvent for hydrogenations), so it is usually recommended to cover completely the Pd/C with another solvent like toluene, and then add the substrate and the methanol. Obviously, hydrogen can also cause explosions, so if you are planning to do hydrogenations, consider asking for advice or training first. As a general rule, set up the reaction completely under Ar/N2 atmosphere, only exchange for H2 last. When the reaction is complete, exchange again H2 for inert gas and then you can open the flask.
Other common chemicals that may ignite are organolithium reagents, especially tBuLi. Always quench the syringe you used for the addition with not dry Et2O or THF, you do not want to create a flamethrower!
You can check some guidelines on the safe use of pyrophoric reagents by Columbia University.
3. Short but very useful advices, lab hacks and proverbs
Labelling a compound takes 5-10 seconds. Identifying an unlabeled compound may take 30 minutes later (if you are lucky).
A bit of an impurity can make a huge difference in color. If a product that should be colorless looks orange, brown or whatever, do not assume your reaction failed.
If you do not have time to do something properly/right, make sure you do have time to do it again.
There is no “having too much starting material”.
Hofstadter’s law: Everything will take longer time than you think, even if you take into account this rule.
A week in SciFinder will save months in the lab.
One gram in hand is worth two in the reaction flask.
Garbage in, garbage out.
You get luckier the more you try.
You can find more of them, as well as loads of advice and lab hacks for working in the lab at NotVoodooX (University of Rochester) This is a really neat website, especially for beginners. I would recommend everyone to have a look at it.
These are general tips that will be useful mainly in professional labs, but you might find something useful even if you just want to do chemistry experiments at home!
4. Plan the project before planning the experiments
Collecting data that will not be publishable is not an efficient way to organize your work. You do not want to end up with a lot of meaningless or unconnected data after weeks or months of work, this just would be a disaster.
The best idea is to always keep in mind the big picture. What do you actually want? Even if the next experiment that you have in mind looks cool, if it does not provide any meaningful insight to the whole project, it is not worth performing. But if it gives you a bit of knowledge about how your reaction works, or puts you in a closer position to your goal, go for it.
5. Lab tricks for weighing compounds
Over the years I have seen people use a lot of different tricks or lab hacks to weigh chemicals. Here I list some of them that can make your life easier every day in the lab.
If you are weighing a compound from a small container (let’s say, a 5 mg bottle of catalyst), you can just put the container in the balance, set it to 0.0, and then pick with your spatula until the balance reads the negative value of the amount you wanted to measure. I find this very useful when I am setting up several small-scale parallel reactions with the same reagents but different conditions.
If you need to weigh amounts bellow the accuracy limit of your balance, just weigh a larger amount, dissolve it in a known amount of your reaction solvent, and add the corresponding volume of the resulting solution.
When I find myself with the need of weighing oils/liquids which I do not know the density of, the best solution is to weigh the appropriate empty syringe, then fill it with my reagent and weigh it again. Just adjust until you have picked up the amount you needed. Of course now with the values of weigh and volume you can calculate the density of your product for the next time.
For very tiny amount of liquids, apply the first point: Weigh the oil container, set the balance to 0.0, dip the tip of a pipette, check the mass that you have taken. Then adjust picking up more amount or dropping some of it. When you have the desired mass on your pipette, rinse it in your reaction solvent and you are done.
If you want to set up one (or more) small-scale reactions (lets say, 10 mg) but you only have some mg of your starting material (50 mg), you just need to dissolve it in your reaction solvent, for this example 5 mL, and then take 1 mL of the solution to each of your reaction flasks/vials.
Do you need to run a lot of TLCs in the same solvent system at the same time? Just get a big glass container that you can close, fill it with sea sand, and then your solvent system. You can now just stick all the TLC plates you want on the sand and they will run at the same time.
Classic TLC are mandatory before doing a column or preparative TLC purification. This seems obvious, but should always be kept it in mind.
A nice thing to try if you are not getting good TLCs is after spotting your reaction (and the other components/mixtures) eluting it for a few millimeters in pure MeOH. MeOH will concentrate all the spots, and you can now mark the front line and run normal TLC. This gives very nice TLCs and can solve problems like big spots, or spots overlapping.
If you think a compound is not stable in silica, try running a 2D TLC: Use a square TLC plate and spot the sample in one corner. First run the plate in one direction, then dry it and run it turned 90 degrees (with the line of spots at the bottom). If the compounds are stable in silica, all the spots should appear on the diagonal. If any compound does not, it will probably be decomposing.
7. Dealing with air sensitive compounds NMR
If you have one, you can use a Schlenk line NMR adapter. You can insert the neck of your NMR tube in the bottom hole and do vacuum/Ar cycles. Then you can just fill your tube with your compound in dry deuterated solvent.
If you do not have one of those adapters, you can use a small rubber septum: it has enough room to insert a needle from your Schlenk line, so you can fill the tube with an inert gas.
You can usually dry your deuterated solvents like CDCl3 passing them through a plug of activated alumina (A pipette with a cotton plug will work. This will also remove acid traces from chloroform), or adding 4A molecular sieves. You can also try adding some CaH2 or K2CO3 and the filtering them out. If you have access to a glovebox and closed-ampoules of deuterated solvents, you can totally skip the drying step.
8. Organizing your fumehood
Do you use a certain solvent or bench reagent a lot of times? Instead of wasting every time a new syringe and needle, what I do is sticking some column test tubes in the walls of my fumehood, label them, and put in there a syringe+needle which I use to manipulate a certain solvent or reagent. For example, I have one for my deuterated chloroform, another one for the HPLC grade solvent that I use every day for setting up my reactions and another one for the stock solution of my internal standard to calculate NMR or GC yields.
Fill and label washing bottles with the technical grade solvents that you use normally.
If you use reflux condensers in a daily basis, it is probably better if you leave them all permanently connected in series to your cooling water and clamped in the back of your fumehood.
Sometimes you have a new product, and after checking out your NMR for characterizing it, you find that a lot of solvent shows on the spectra. If you are having a hard time removing the solvent from a sample, there are several things you can try. Place your container (if its hygroscopic or air sensitive, under an inert gas) intro a dry ice or acetone (cryocooled) bath for 30 seconds. Then take it out of the bath and apply high vacuum. Repeat twice more and most solvents will have left.
Another trick that I usually apply, for example right after a column purification, is redisolving my pure product in the solvent (not the deuterated one, of course) I will be getting my NMR with (which is usually chloroform) and then removing it under reduced pressure. This usually helps a lot, since the main traces of solvent will only cause your NMR solvent peak to increase a bit (most of the other solvents will be gone), but you will get a very clean spectra.
10. Miscellaneous lab hacks and tricks
Multiple rinses using smaller amounts of solvents are better than only one with a large amount, e., 3x1mL is better than 1x3mL.
If you want to weigh a liquid with very low boiling point, leave it in the fridge or freezer for some minutes before proceeding to do so.
Rinse your extraction funnel with brine before doing your actual brine wash to the organic phase. It helps removing aqueous residue which remains on the separatory funnel.
Using a short sentence to describe the result of every reaction (like “the reaction worked well”, “very clean reaction/TLC”, “only SM on GC/TLC”). Writing it down on your notebook is very useful.
Repeat every new reaction with a positive result. Always make sure that the procedures that you create are reproducible.
If two pieces are stuck together by a ground glass joint, try heating them up with a burner or other heat source, then it will be easier to separate them.
If you deal with chemicals that will stick to your gloves a lot (like iodine) you can just double glove. When the moment to manipulate it comes, use the sticky reagent then throw the outer pair of gloves and you will not have to deal with sweaty hands to put new gloves on.
That is all for today, I hope you have enjoyed it and find it useful! I want to thank, apart from the sources cited/linked above, the chemistry reddit community for providing both information and inspiration for making this post. I also wanted to thank Wikimedia for the nice pictures included.
Finally, if you have any doubts or if you feel like contributing with your own tricks/pictures/examples you can do it on the comments. Or even better: contact me so I can include your tricks on a future second edition of this lab hacks post (you can contribute with your own posts if you like).
]]>https://chemistryhall.com/lab-hacks-increase-productivity-lab/feed/410 Great Lab Tricks To Improve Your Performance
https://chemistryhall.com/10-little-known-tricks-to-improve-your-performance-at-the-lab/
https://chemistryhall.com/10-little-known-tricks-to-improve-your-performance-at-the-lab/#commentsMon, 22 Dec 2014 01:39:50 +0000http://chemistryhall.com/?p=119I am aware that many of you spend most or a good part of your life working in a laboratory or something related to that, time to share some nice lab tricks. Some people are better than other doing lab research or chemistry experiments, but the basis of why is that true are mainly two:... [Read More]
]]>I am aware that many of you spend most or a good part of your life working in a laboratory or something related to that, time to share some nice lab tricks. Some people are better than other doing lab research or chemistry experiments, but the basis of why is that true are mainly two:
Practice, practice, practice. The most important part of learning how to efficiently perform tasks in a laboratory is just spending time on it. No magic tricks on this part. That’s up to you, we cannot do anything to help you on this part, but we can help you with:
Improving your performance by knowing and using tricks and strategies to approach your daily problems and get better at the lab.
We have discussed in other occasions some lab hacks to get better at doing chemistry experiments. In this article, I am going to show you some tricks and strategies that will help you increase your efficiency at the lab. I have gathered all of this information through the years, from my own experience, colleagues’ experience, reading books, and other kinds of material. I have tried most of them on my own and can confirm they work perfectly well. I have heard many chemists or chemistry students crying because they get overwhelmed by lab work and the difficulties they find every day.
The reason I want to share them with you is basically that when I first learned about them they happened to be really useful, and I had never thought of them. Most of these are organic chemistry oriented, but can be applied for most kinds of labs. Some of them are more widely known, but I think is worth posting them, because they should not be unknown for anyone in this chemistry business. Anyway, I am sure that you will learn something really interesting here out of these lab tricks today, so keep reading!
Microscale Flash Column Chromatography Tricks
1. If you want to purify little amounts of a product, you can just use syringes as “mini columns”. They work just very fine to this job.
How do you proceed? Just put a bit of cotton at the bottom of the syringe to plug the end, fill it with silica, and you are ready to proceed adding the solvent and then your crude product. You can of course apply pressure using the syringe’s plunger.
Columns can be as scary as pretty
Why does this work in many cases? You need to keep in mind that in order to purify a compound in the lab you must use a column of a size which is proportional to the quantity of compound you need to purify. Sometimes “standard lab size” columns just do not fit this description, and you need a rapid solution. This will work perfect. Remember also that when it comes to column purification (although in some cases is unavoidable for tricky purifications), in most of the situations the more silica you employ, the more product you will lose (also there are exceptions where stuff just quantitatively separates from silica) so this micro scale columns are ideal.
A syringe is not required. I know someone who runs columns in glass pipettes all the time. The procedure is just the same, take a pipette, put in some cotton and fill it with a few spatula-fills of silica. Alternatively, glass wool or chem Kimwipes can be used to plug the end of the mini-columns instead of cotton.
Now is time for a simple but extremely useful trick to get better at the lab!
Regarding chromatography, specifically TLC, don’t miss out complete guide here.
Pouring Reaction Mixtures
2. Every time you are pouring a reaction mixture out of a flask in which you have a stirring bar in, don’t let it go inside your work-up recipient! Just hold a magnet (or another large stir bar) against the glass when the moment to transfer the liquid comes, keeping the bar in the reaction flask. This is especially useful when it comes to transferring mixtures to a separatory funnel. It is nothing pleasant to end up with a stirring rod inside the funnel, or in a residues container, or down the sink etc.
Stirring Bar Lab Tricks
3. Also related to stirring, if you need to use a stir bar on a very large container, (especially if you are using a container like let’s say, a 5 liters graduated cylinder, which makes the magnetic interaction more difficult) sometimes the bar magnet will just don’t couple with the stirrer magnet. Solution: put a bar on the top of the stirring plate between the plate and the flask, and the plate magnet will just stir the first bar, and this bar will easily stir the reaction flask bar.
Write Everything Down in Your Chemistry Lab Notebook
4. Are you in doubt about if you need to write something down during a lab session? Do you think you will not need to write something down? Just DO IT. Write everything down. Also the things you think you might not need. You will regret later if you don’t. There are no “lab tricks” around this.
This “hint” is probably something the 99% of you already know, but I believe that is SO important that is worth some lines, even an entire post about lab notebooks. This is not actually a trick; this is the basis of science. One of the main differences between chemistry and mixing things around and see what happens is that in chemistry you write everything down: exact amounts of reagents, conditions, observations, comparison between what is expected and what happens, yields, TLC analysis… An experiment can turn up completely useless if you do not write down in your lab notebook everything you did. Also, review the notes you have taken. And don’t wait much to do this. Do not rely on memory. Trust me, me and many more people before have found out that you never remember.
NMR Sample Tricks
5. Time to do get an NMR of your product? Having a hard time selecting a nice scanning region? Just put the NMR tube inside of a graduated cylinder and fill it up to 3 mL. This sample size makes up a perfect region for NMR scan every time.
Some people suggest using just the “three fingers” rule to measure the scanning region height. It’s somehow the same.
Get Capillary Tubes Made from Glass Pipettes
6. You can make fine capillary tubes your own from glass pipettes. You only need, of course, a pipette, a Bunsen burner or blowtorch. You heat the glass pipette up in its middle point and once the glass flows, remove it from the heat source and pull offhandedly on both ends.
This is a good choice for labs where there is not much money, or just for when you don’t have any other option to obtain capillary tubes in that moment. Also using micropipettes (1-10 μL) is an option (if they are available to you).
Be Careful with Hot Things!
7. Hot glass looks exactly the same (unless it’s really hot) than cold glass. And the same goes for metals, and heating plates, and for any stuff in the lab. Most of the people I know working in a lab, including me, had to learn this lesson by experimenting them by themselves. It would be nice if you don’t need to, wouldn’t it? Also, keep in mind that latex or nitrile gloves don’t prevent you from getting burn.
In the Lab, Safety First, then Lab Tricks
8. Working in a lab is not something that you do (or at least you should never do) alone. So you will need to work with other people. There are many tips that can be given related to this, so I’m just going to give some general thoughts about it here.
Move slowly in the lab, and try to avoid crowded spaces: the more dispersed the people working on a lab are the better will be the performance of all of them in most cases. You should never assume that an instrument or piece of glassware is already cleaned by another people. It’s easier and ends up with better overall results if you just clean it by yourself. Do not make enemies out of your lab mates. This can only end badly for all of you. And you indeed can make enemies in many different ways, for instance, by continuously making mistakes as a result of a careless behavior or just by being a complete jerk. Be nice to all of your mates and the people from your department. Also I recommend you to treat well the staff and managers of your department, and just don’t piss anybody off who is higher in the laboratory/company pyramid than you. Be nice to other people and they will be nice to you (sometimes) and this definitely helps. That being said, being friendly is good, but in some cases becoming friends is something you might want to avoid. This can be applied not only for laboratories, but for any kind workplace.
9. Now, this point is a bit more philosophical and kind of related to the last ones:
Did I mention that you should write everything down?
Be absolutely prepared for ANYTHING that you will do in the lab. And I mean both theoretically and experimentally. Never perform an experiment without knowing all you need to do about it. In the best bad case, the experiment could turn to be useless and you would be wasting your time. In the worst bad case, you or your lab mates could end up harmed.
Never assume that someone did something correctly. Don’t base your actions in something that a lab mate just has told you. Only trust contrasted and reviewed data and facts.
Not getting a good result is indeed almost any time a relevant result.
Control your emotions. Don’t let a failed experiment get you down -this happens a lot to people during their PhD. Realize that failure is inevitable in science. You need to be objective and critical; science cannot be based on emotions.
Take Pictures in the Lab!
10. Pictures are useful. In the old times, it was really difficult to get photos or there were no pictures at all. Nowadays it’s very easy to have a camera available all the time, for example, in your smartphone. I always take a picture every time I acquire of use a new chemical (the container or even the chemical itself), and it’s something that helps while you have to write reports, theses or journal papers. Especially through your journy in inorganic chemistry, pictures of colorfull chemicals or reacttions are really helpful!
Also you might want to attach some of them to your lab notebook, just remember, a picture is worth a thousand words. (This does not mean that you don’t have to WRITE EVERYTHING DOWN, it’s just a supporting feature).
Well, this is the end for now. While I was writing this article, collecting and recalling all the information many more hints, lab tricks and strategies came to my mind, many more than the one I decided to write. Even now, more important and useful techniques to get better at the lab come to my mind!
But those will have to wait for the next time. I promise that I will provide much more information about this if it ends up being useful! So make sure to subscribe and visit Chemistry Hall periodically so you don’t miss any of this.
To conclude, I want to point out that what keeps us writing is that people like you find this information useful, so make sure you share it with your colleagues, students, or whoever! It will be useful for them!