
If there is one technique or experiment that every chemist, or student learning chemistry should know, it is Thin Layer Chromatography (or TLC for short).
If you want to become a synthetic chemist, or you are planning to ace an experimental course on organic chemistry, TLC is something you really need to master.
So, what is this tutorial about? What am I going to learn if I continue reading?
Well, I am a synthetic organic chemist with years of experience in the lab, and I have run thousands of TLC and flash columns in any solvent combination that you can imagine. I also enjoy sharing and reading lab tricks with colleagues, or even online. You could say that there are very few things that I still don’t know about this technique.
What I decided to do, is to put together all my knowledge in this tutorial article, so you can start reading without knowing what a TLC is, and finish up by being able to separate and identify (almost) anything you want in an organic chemistry lab!
This guide is for many different levels.
I can tell you that even if you have never been in a chemistry lab before, you will be prepared to do a thin layer chromatography just by continuing to read the first sections.
On the other hand, I can also promise you that even if you have PhD in organic synthesis, there is still some tricks or hacks to learn in this guide.
Considering this, you can navigate this tutorial page by using the index shown right below. Happy TLCing everyone!
What is Thin Layer Chromatography?
You might be familiar with what chromatography is, but maybe you din’t know that, as a matter of fact, the name “chromatography” comes from some early experiments on thin layer chromatography.
The word chromatography comes from the Greek chroma, “color”, and graphein, “to write”. It was a technique to separate substances that had different colors.
Basically, a chromatography is any lab technique in which we separate different chemical components of a mixture by their affinity to a stationary phase (usually silica gel in TLC) and to a mobile phase (the solvent or mixture of solvents). They don’t necessary have to be colored compounds, since there are many other ways to detect or identify them.
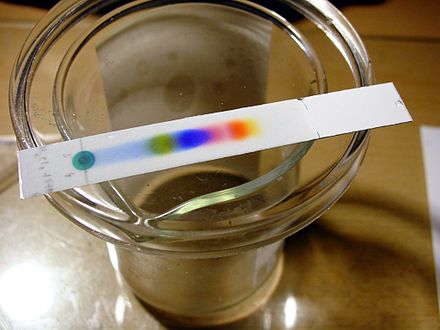
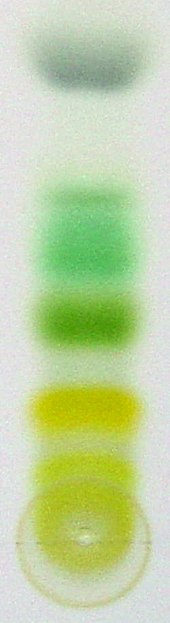
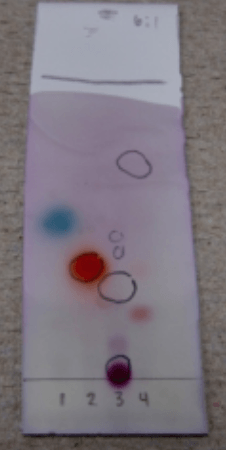
Initial experiments on TLC allowed separating pigments of plant’s extracts. These pigments (such as chlorophyl) have different colors, and elute at different rates through the stationary phase, so they can be separated and easily visualized:
Chromatography can get very complex, with complicated and expensive instruments such as GC-MS or HPLC, but the most basic, most important and oldest technique is thin layer chromatography, or TLC.
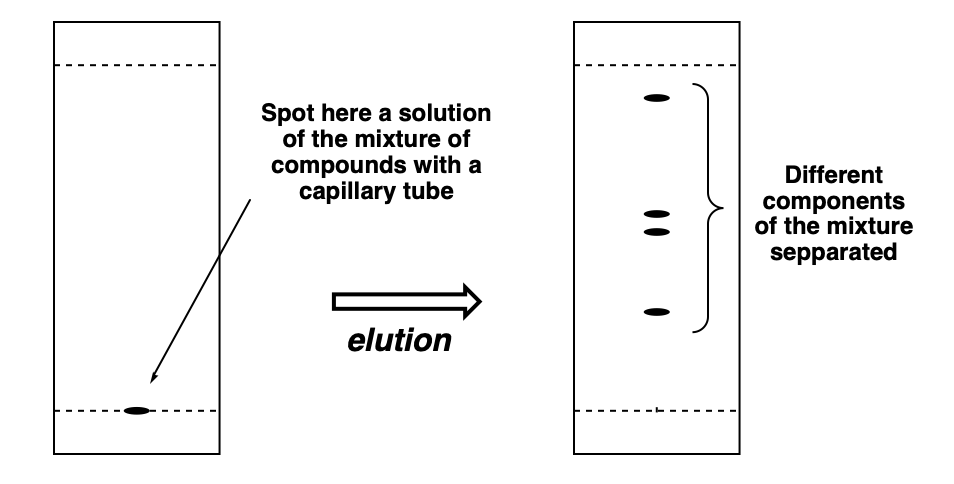
In TLC, we use a stationary phase (most frequently silica gel) which is deposited over a glass or aluminum support. We then can spot mixtures of compounds over the same line. Then we elute the TLC with an organic solvent, and the different compounds will move upwards at different rates, allowing the separation of the different components.
What Is Thin Layer Chromatography Used for?
Thin Layer Chromatography is a cheap, quick and easy technique to separate components of a mixture. It is used by synthetic chemists to monitor chemical reactions and purifications.
And How Does a TLC Work?
Well, a TLC plate is an aluminum plate coated by a “thin layer” of a stationary phase, which is usually (>95% of the time in organic synthesis) silica gel.
Around 1 cm above the bottom of the plate, you can spot a solution of a mixture of compounds of different polarity.
Then, you “elute” the plate. you basically put it vertically inside a closed chamber which contains an amount of an appropriate solvent mixture. The solvent flows slowly up the plate through capillary action.
The stationary phase, silica gel contains Si–O–H bonds that bind to the different compounds of the mixtures in a variable manner depending on the polarity of the compounds. Also, depending on the nature of the solvent used (more polar or less polar), it will pull upwards some compounds faster than others.
In general, more polar compounds will “climb” slower up through the TLC plate, and less polar ones will fly upwards.
Then you just need to check how many and where in the TLC plate each spot is. Each spot corresponds to a different chemical compound on the mixture.
Usually you will need a UV (Ultraviolet) lamp to visualize the different spots, but if the compounds are strongly colored, as in the picture above, you can easily see the different components of the mixture.
How Do You Run a TLC? Step by Step Guide
1. Cut Your Plate
First you need to cut a piece of TLC plate of the appropriate size. What is the appropriate size? It depends on the purpose of the TLC, and how many spots you need to separate. If you just want to take a look on how many compounds you have in a mixture, one spot is enough.
TLC plates are generally made of aluminum coated by the stationary phase, and can be cut with scissors. Sometimes, the supporting material is glass and you will need a glass cutter to do the job.
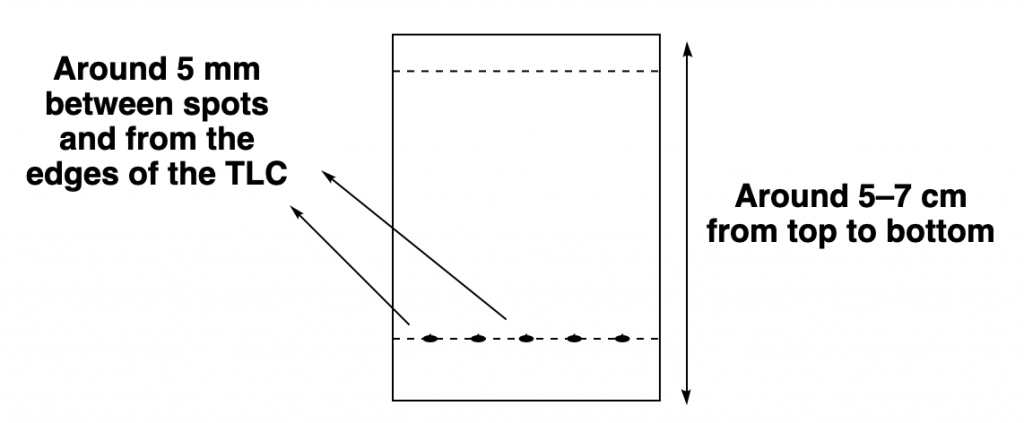
Usually, a thin layer chromatography plate is around 5–7 cm high, and a line is drawn around 0.5–1.0 cm from the bottom. That is the line in which you will spot your mixtures to separate. It is important that you spot the mixtures above the solvent level on your elution chamber!
Also, remember to leave some separation between each spot at the bottom spotting line (so they don’t mix to each other!) and also leave a similar separation (of around half a centimeter) from each edge of the TLC plate.
2. Spot Your TLC
Then is time to prepare the samples of the mixtures to separate, and spot them on the TLC plate.
For simplicity, let’s start off with just a single spot, in which we will put a solution of a mixture of several compounds.
First we need to prepare a solution of our mixture. The usual average concentration of these solutions is a few miligrams of mixture/compound in around 0.5–1 mL of solvent. Those few miligrams are totally approximate. Just add a spatula or Pasteur pipette tip and dissolve it in a bit of solvent!
Once you got the solutions prepared (in this case, just the one!), it’s time to spot it on the bottom line of the TLC. You need to use a capillary tube (see the corresponding section for details). Take up some mixture solution with the capillary tube and press it lightly into the corresponding marked spot (use ALWAYS a pencil to mark in a TLC! Pen ink will elute with organic solvents, pencil graphite will not!) at the line around 0.5–1 cm above the bottom of the TLC.
Try to spot your mixtures as tightly as possible. Make very small spots of sample. Very wide spots will make the different compounds overlap leading to a not so nice separations. Maybe even some compounds will be hidden since those will be basically co-eluting with other massive spots. Generally speaking, more diluted and smaller spots are they way to go.
3. Elute the TLC Plate
Then is time to elute the plate. For this you need an elution chamber. There are commercial options, as the one in the picture below, specific for that purpose.
But you can use any glass container that you can cap, actually. A beaker works. A a clean jam jar will also do the job!
Then you need to fill it with about 0.5 cm height of the desired solvent system.
There is no absolute best starting point for selecting a solvent system. However, a extremely quick summary would be:
- If you are working with absolutely apolar organic molecules (no polar functional groups, only C and H), such as naphthalene, start with pure pentane or hexane.
- If you want to separate a compound with one or two mildly polar functional groups (ether, ketone, ester…), go for a 4:1 hexane/EtOAc mixture.
- If your molecule has one or two very polar groups (alcohol, amine, etc), go for 1:1 hexane/EtOAc.
- If your molecule is much more polar than that (e.g. a sugar, an amino acid…), swap hexane for DCM, and keep EtOAc as polar component. Use a 1:1 ratio for starters.
- If your compounds are so polar that do not move at all from the baseline with DCM/EtOAc, go for 9:1 DCM/MeOH or even 9:1 EtOAc/MeOH.
- If none of this works, you are looking at a extremely polar compound and you might want to consider using reverse phase (an apolar stationary phase, instead of silica gel)
If you want more details about choosing a solvent system, check the corresponding section below!
This being said, it is important that the solvent level is below the initial point where you spot your samples! Otherwise, they will get diluted and you will not get a clean separation.
Once the chamber is ready, just put in the TLC inside, vertically, and wait for the solvent to go up by capillary action. Take out the TLC plate when the solvent level is around 90% form the top (don’t let it drown!)
Before the plate dries, mark the eluent front (the line on the plate the solvent level has reached). You will need this to determine the retention factor (Rf) of each spot/compound.
Then, dry off the plate (with compressed air, blowing air, or just waiting…)
4. Visualize the TLC: Check Out the Results!
Finally, visualization. This is a matter of finding the right way to visualize the spots corresponding to each compound in the mixture you just separated.
If they are strongly colored (as in the picture above), you are good! You don’t need anything else, just look directly at the plate.
Most of the times, organic compounds will not be visible, but they will absorb UV radiation. So you just use a UV lamp. Finally, there are a lot of staining solutions that can be used to develop the plates and easily tell where each compound appears. Scroll down to the corresponding section to known more about visualization.
5. Determine the Retention Factor of the Different Compounds
What is Retention Factor?
In thin layer chromatography, retention factor (Rf) is the distance that a compound travels through the stationary phase (TLC plate) between the origin spot and the distance the solvent front moved above the origin.
To calculate the value of the Rf, you just have to apply this simple formula:
Rf(spot) = (distance the spot has moved)/(distance solvent front moved)
A visual example:
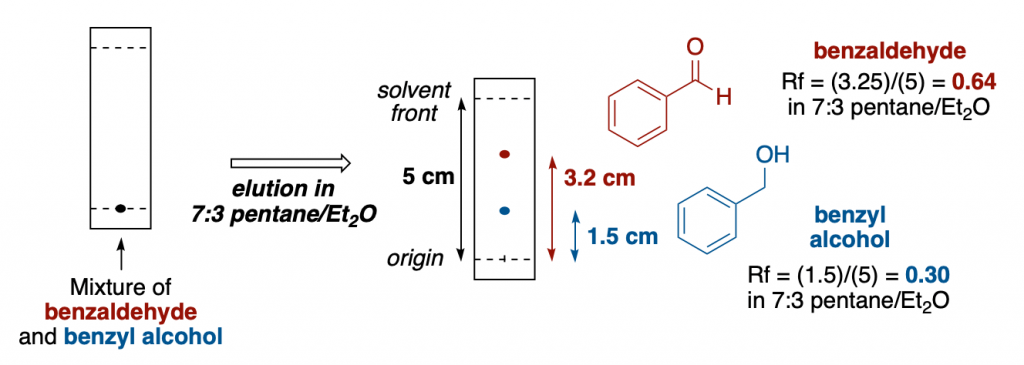
After eluting a mixture of benzaldehyde and benzyl alcohol in a TLC plate using 7:3 pentane/diethyl ether as a solvent, the two compounds travel a certain distance.
Benzaldehyde is less polar than the corresponding alcohol, so it is easily identifiable as the top spot.
After measuring the distance that both of the spots traveled, we can determine the retention factor for each compound in that solvent mixture. Simply divide the distance that one spot has traveled by the total distance the solvent has moved from the origin spot line.
For example, for benzaldehyde, it moved 3.2 cm from the origin. The solvent from has moved a total of 5 cm. So we can say and report the Rf of benzaldehyde in 7:3 pentane/diethyl ether to be 3.2/5 = 0.64.
Please, keep in mind that retention factors depend greatly on the solvent system used and on the stationary phase of the TLC. If you modify any of those, Rf will change. That’s why when reporting retention factor values, it is essential to specify those parameters for each compound.
6. Re-run the TLC with a Better Solvent System if the First Attempt Was not Successful
Finally, something that is very common while working with new compounds: Many times the first choice of solvent system will not be the appropriate, and maybe all the compounds of the mixture eluted together to the top of the TLC, or just didn’t move from the base spot, or maybe they are somewhere between, but still the separation is not perfect.
In any of these cases, you just have to keep tweaking the solvent system until you find the most suitable for your mixture!
It is not uncommon to run 3-4 TLC plates of a reaction crude (even for experienced chemists) before starting a flash column chromatography purification.
And that is pretty much what you really need to know to perform a TLC experiment. The only thing left is knowing which solvent system you need to separate your mixture appropriately, and to know what are the real-life applications of TLC.
Was anything not clear?
Don’t worry, a video is worth a thousand words! Check out this video guide for TLC:
A Quick Infographic Guide for Thin Layer Chromatography
After lining up the entire procedure for running a TLC, I want to cut to a quick reference graphical guide that we prepared.
It is the most visual way to sum up TLC technique that we could think of, and here it is for you:
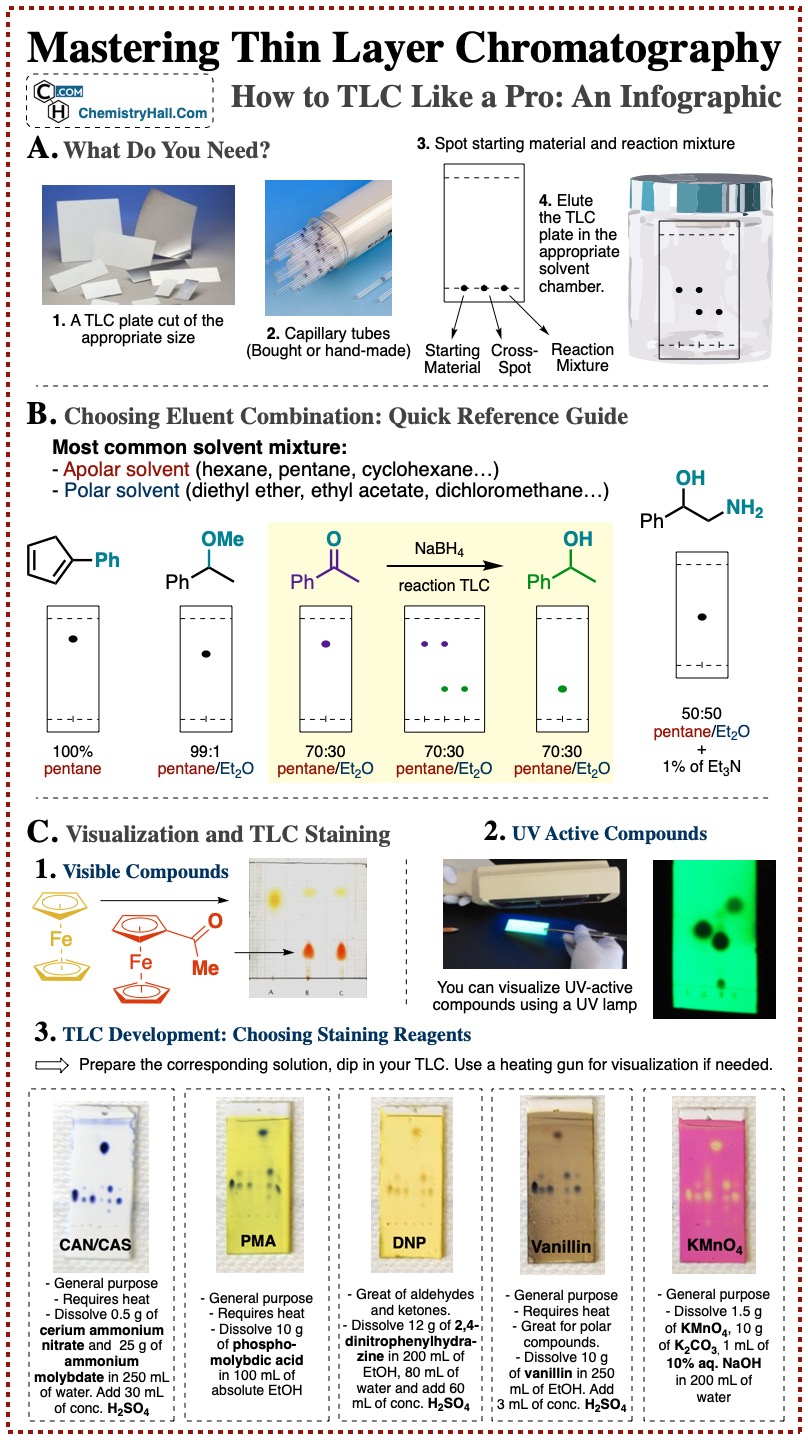
Please, feel free to link, share and use this infographic as you please!
From this point, the introduction is finished.
We will get first into the main basic uses of TLC. Then we will move onto more details into each component of the technique. Then we will cover more advanced uses and techniques, such as prep TLC, 2D TLC, or flash chromatography.
And then we will finish with some mind-blowing tips and tricks and TLC troubleshooting.
Keep reading!
Thin Layer Chromatography for Reaction Monitoring
The main use of TLC is monitoring chemical reactions.
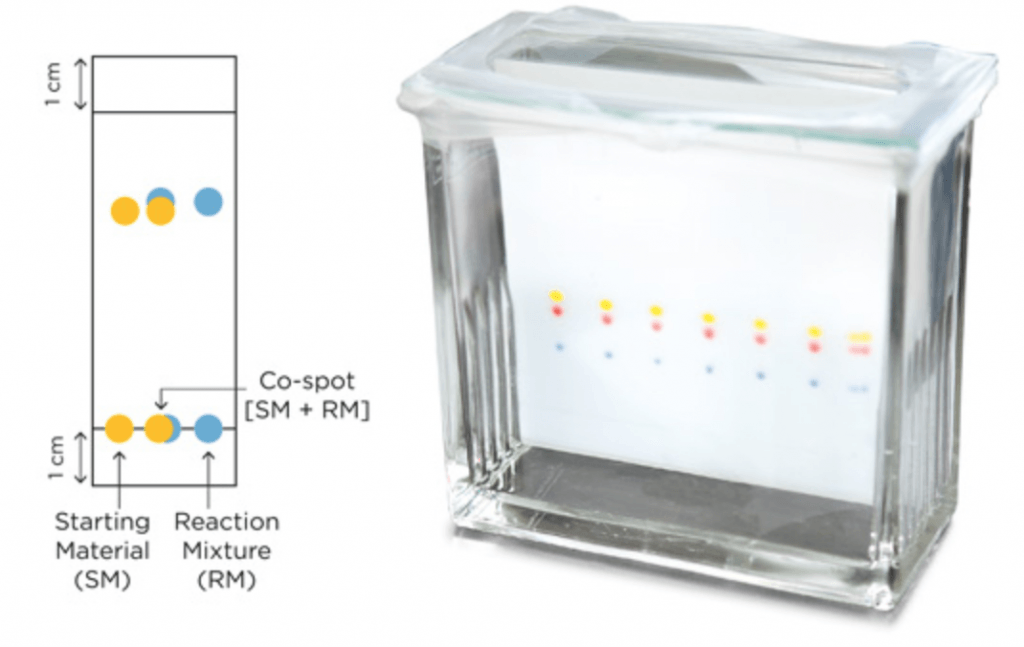
In a chemical transformation, you usually have a starting material (SM) that will get consumed to give rise to a product. In most cases, this product will have a different polarity than the SM. This means that they will have different retention factor in TLC, and you will be able to separate them by TLC.
You generally want a solvent mixture that gives both compounds a retention factor between 0.2 and 0.8. But of course, the main idea is that you can see both spots resolved, not together, so you can see if you still have SM in your reaction mixture or if it is all consumed. This would mean that the reaction is finished in most of the cases.
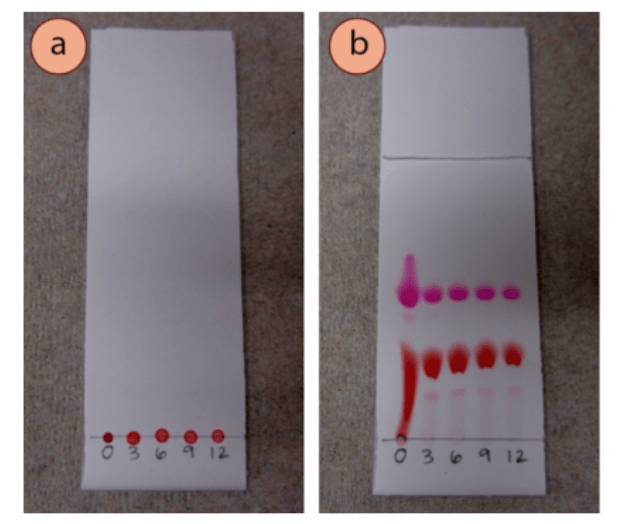
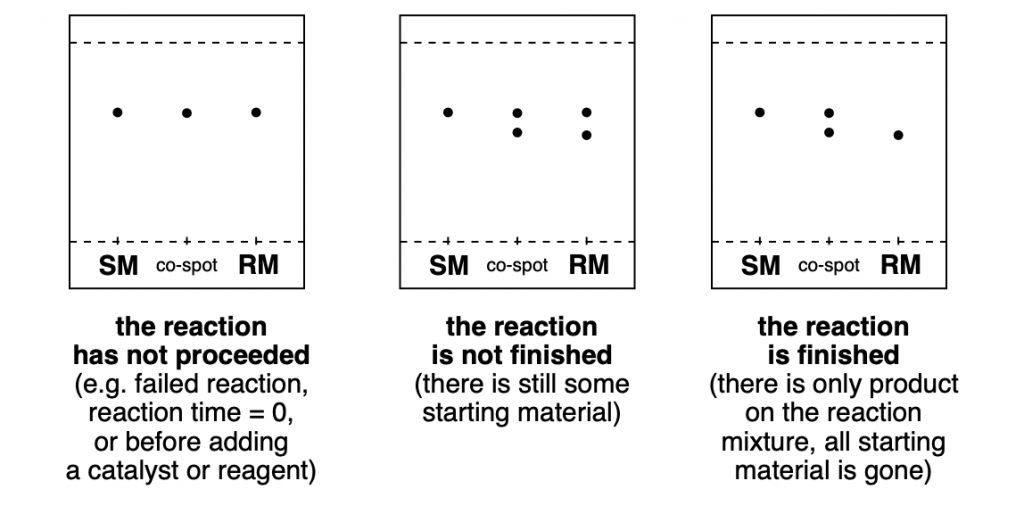
The trick is to make three spots on the TLC, one with the SM, another one with the reaction mixture (RM), and another one in the middle (co-spot or cross-spot) in which you put both a solution of the SM and the reaction mixture. This way you can clearly visualize, after elution, that your SM actually reacted to form a new product. This is particularly important if both SM and product have very similar Rf, and it is difficult to see if you actually have a new product or just SM in the reaction mixture.
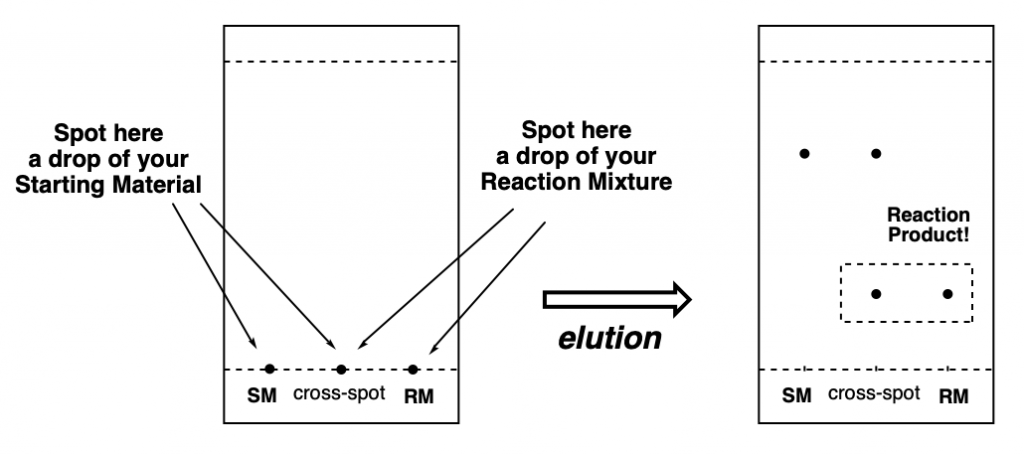
As you can see in the diagrams below, it is very easy to see whether a reaction didn’t work at all (yet), if a product is being formed, but the reaction is not finished, or if all SM has been consumed and there are only products on the RM.
Furthermore, if you happen to have a sample of the reaction product that you want to obtain (because maybe you had run the same reaction before, or because it is a commercially available product), you can add another spot for the product, and another for a co-spot of both product and reaction mixture. This way you can confirm that the desired product has been formed.
TLC for Column Chromatography Purification
The second most typical scenario in which you are gonna have to use thin layer chromatography is while working on a flash column chromatography purification.
What Is Column Chromatography?
Column chromatography is a method for separating and isolating chemical compounds in the lab on a preparative scale, depending on its relative polarity.
The basis are exactly the same than for TLC. We have a glass column filled with a stationary phase (also usually silica gel).
On top of the stationary phase, we put the mixture of compounds that we want to separate. When we are trying to isolate one product from a reaction mixture, we call this mixture “crude product”.
Then, we pass solvent through the column, from the top to bottom, sometimes aided by applying pressure (this is what we call “flash column chromatography”). This makes the different compounds of the mixture elute through the stationary phase at different rates.
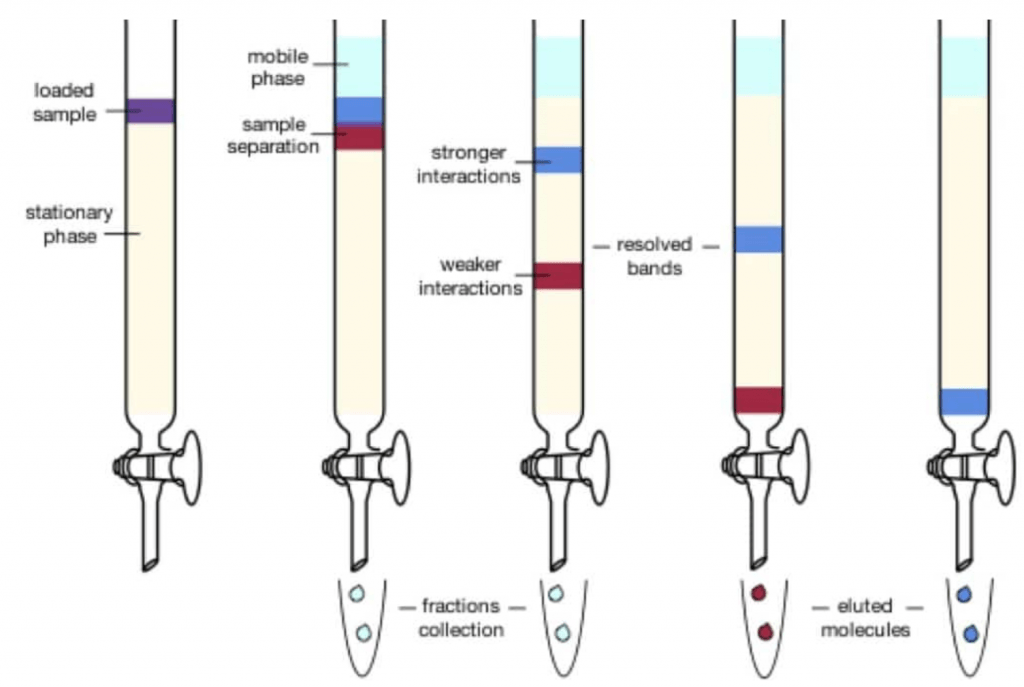
Then, the different fractions that come out of the bottom of the column are collected in different test tubes. If the separation was performed correctly, we will have each compound of the mixture in different test tubes. The we can just get rid of the solvent by evaporation and we will have our product pure.
The rate of elution for each compound depends on its retention factor (i.e. its polarity) in that particular solvent system. This means, they will come out of the column in the same relative rate rate as their spots eluted in a TLC.
How Do We Use TLC for Column Chromatography?
Well, first of all, before running a flash column chromatography, we need to select what is the appropriate solvent system for the purification. We do this by using TLC.
Ideally, the product(s) that we want to isolate, should have an Rf (retention factor) of around 0.4 in a given eluent (mixture of solvents) to allow for a smooth column purification.
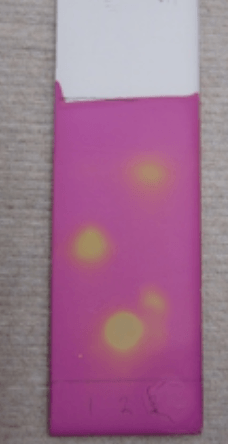
The following image on the left illustrates how an ideal TLC for purification should look like. As you can see, two products are clearly visible and separated. So the solvent mixture that yields this result on TLC, will be a great choice for running the big scale column chromatography purification.
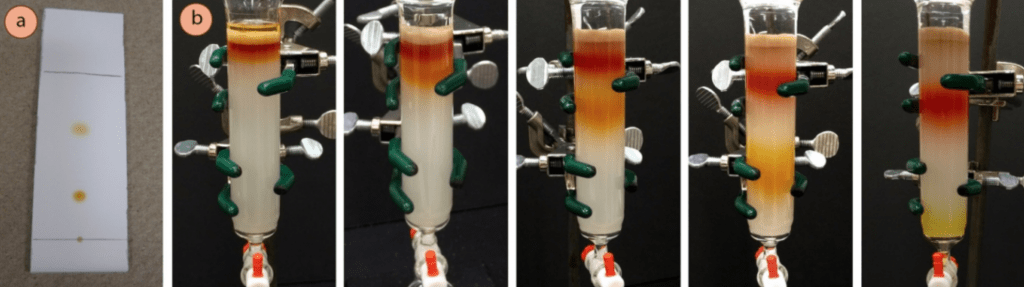
The images on the right, illustrate how this separation does proceed using that same solvent system. As you can see on the far right, the first compound leaves the column completely separated from the other one. It can be collected, and concentrated in vacuum, getting your product completely pure and dry!
TLCing the Fractions from Column Chromatography
But after running the column chromatography, you usually end up with dozens of tubes filled with eluent with the different compounds dissolved. Now we have to use TLC again!
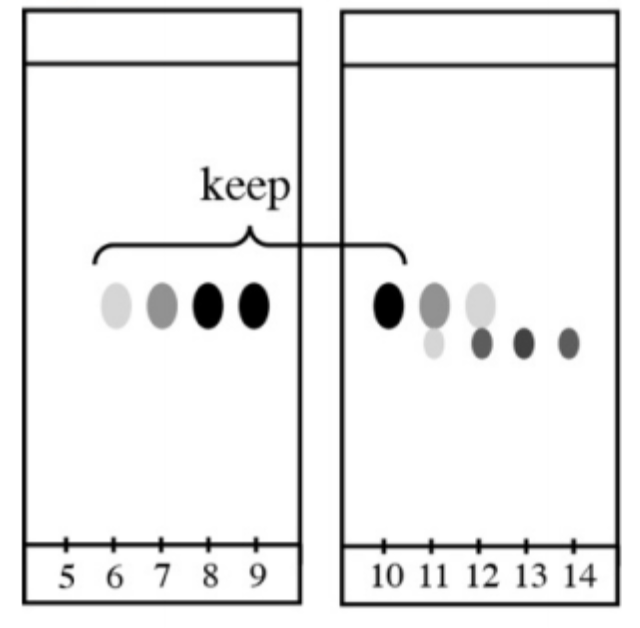
As you can see, we spotted all the fractions/test tubes on the TLC, and eluted in the same solvent system. As you can see, we have two different products (spots) that came out of the column pretty close.
From fraction 5 to 10, we only have compound one, pure. We can mix these fractions, concentrate them, and we will have pure compound 1.
Fractions 11 and 12, have a mixture of the two compounds. Usually we throw away this kind of mixed fractions (unless we don’t actually care about the impurity, maybe it just doesn’t affect the next step of our synthesis!).
Fractions 13 and 14 have pure compound 2. If we also need this compound, we will just concentrate them together as well.
As you can see, TLC is extremely important for both reaction monitoring and product purification, the two cornerstones of any synthesis laboratory.
Checking What’s on Each Fraction with Other Techinques
Sometimes TLC is just not enough and you don’t know what compound/product is in each of the different fractions that came out of your flash column. Evaporating everything and taking an NMR is really time consuming, so you might want to go for an alternative technique if it’s available to you.
If you have access to a GC-MS (gas chromatography-mass spectrometer) or LC-MS (liquid chromatography-mass spectrometer), you can analyze quickly all the different fractions, and know the molecular mass of the compound(s) present on each of them.
Another cool instrument is the TLC-MS. This technique is usually much less available in chemistry labs than GC-MS or LC-MS, but if you can use it is great. Basically this machine automatically scraps off individual spots on an eluted TLC, and makes an MS analysis, so you can check the molecular masses present on of each spot of the TLC in usually less than a minute.
A Comment on Retention Factors and Flash Column
Using an eluent which gives an Rf of 0.4 for your compound is the usual rule of thumb, but it has of course many exceptions. If you have two compounds that are very close together in Rf, this might not be enough. Having two compounds show as two separate spots in TLC doesn’t mean that they will come out separately from flash column.
Column bands are like much much wider TLC spots, especially as we scale up the purification. Imagine that typical TLC that you overload with sample and you get two big unresolved overlapping spots. That is a closer picture to what is actually happening in your column chromatography.
For this reason, sometimes an Rf of 0.4 will not do the trick. If spots are separated by less than 0.15 Rf, you will usually need to be a bit more conservative and choose an eluent in which they have a retention factor of around 0.3, or even a bit less. Another cool trick to enhance this kind of purification is using thicker columns, this helps a lot with separation. Using longer columns doesn’t usually help, since you are just thickening the bands and making them overlap more!
On the flip side of the coin, sometimes your compound of interest just flies on TLC using certain solvent mixture, giving an Rf of 0.7-0.9. This might allow for extremely easy and fast separations in a couple of the first tubes/fractions.
In Depth Guide: Materials for Thin Layer Chromatography
Making Capillary Tubes
You will have to spot reaction mixtures, or reference samples in your TLC using capillary tubes.
You can either buy them, or make them yourself. This depends on your lab’s budget, but I don’t think there is much harm in buying some good capillary tubes. The commercial ones I use on a daily basis, usually last for months before breaking, if you are careful enough.
But you can make thin capillary tubes out of thicker glass tubes, you just need to heat them up and then pulling. For this, you can either use thicker capillary tubes or glass Pasteur pipettes.
Explaining the method for heating and pulling will sound more complicated than it actually is, just take a look at this short but on-point video:
As you can see is not terribly complicated, and it can even be a nice experiment for undergraduate labs. Just be careful with the flame (or other heating source that you use! Avoid using open flames in the lab if you have alternatives).
Elution Chambers for TLC
So, there are actual chambers designed for running TLC, and they are just great, such as these from Fischer:
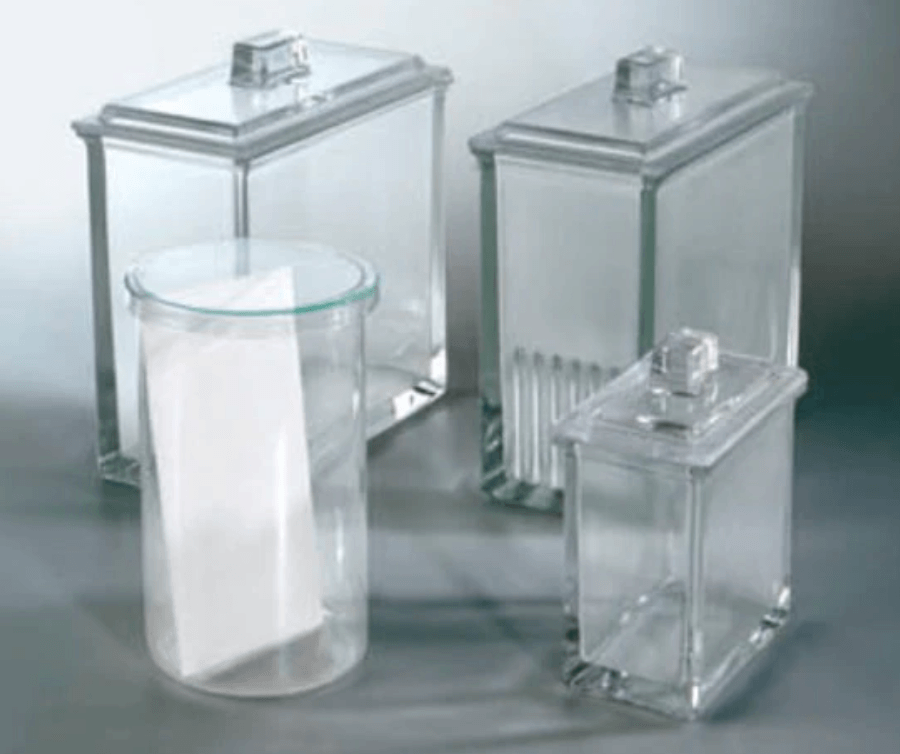
But that doesn’t mean you need one of those fancy pieces of glasswares to run a TLC. The beauty and simplicity of this technique is that you can use it in basically any situation!
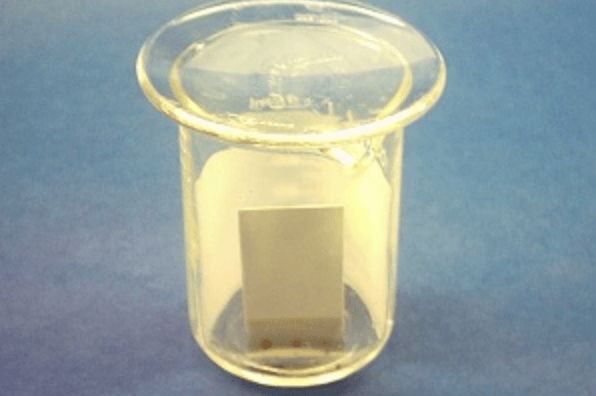
A typical temporary solution, if you are in a rush, is just using a beaker covered with something (like a watch glass, or even aluminum foil), so the solvent doesn’t evaporate and allows for a nice saturated atmosphere
It is worth mentioning here that this is another key for a good eluent chamber: You need the atmosphere as saturated as possible. This way, the solvent doesn’t evaporate on its way up through the plate, which would cause an uneven movement of the eluent front. This can be detrimental for the separation, so always ensure that your chamber is a reasonably closed system.
As you can see in the picture above, you can also put a piece of filter paper inside the chamber a while before eluting your TLC.
Why? The solvent will ascend through the filter paper as well (by the same principle than through the TLC), helping a lot in saturating the atmosphere inside the chamber with the eluent. This will make the eluent go up the TLC plate in a much more even manner.
Also, be patient, leave the eluent in the chamber with the filter paper for a while before eluting you plate!
Finally, the more practical low-cost alternative, in my opinion, is just using a glass tar with a screw cap, like the ones you get you jam, or other edible stuff in!
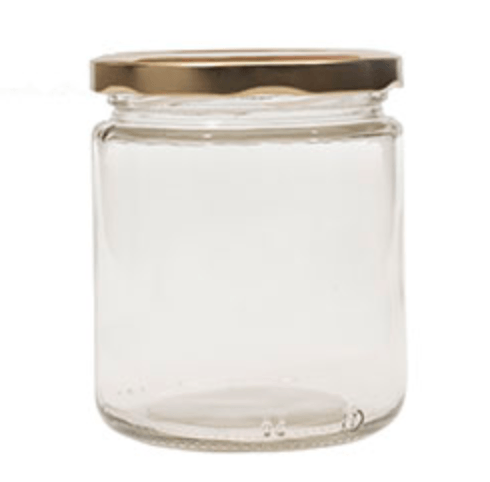
I survived through my undergrad labs and also through my first research experience only by using these “ghetto-chambers” on a daily basis!
Alternative Stationary Phases
As we were saying, more than 95% of the cases you will perform a TLC in plates coated by silica gel as stationary phase.
But there are very specific cases in which different stationary phase may be considered.
Silica gel (SiO2) is slightly acidic, so certain compounds are quite sensitive to these acidic conditions. In those cases, you can first try to neutralize the silica gel adding a basic solvent to your eluent (typical conditions are adding 2-5% of triethylamine to your solvent mixture).
Many times this does the trick, but in other cases is not enough. For those cases, there are alternative stationary phases such as neutral alumina (Al2O3). Maybe your target compound does survive in alumina and you can use it for both TLC and flash column chromatography purification.
Another alternative stationary phase is reverse phase.
Typical silica gel stationary phases are very polar, and you elute the plate with a solvent systems that is (much) less polar than SiO2. This works wonders form most typical organic compounds.
However, if you are working with extremely polar molecules, you will find that they get stuck into the SiO2 like crazy and no matter how polar you make your eluent, they simply won’t move.
For these cases, we can use reverse phase chromatography, in which the stationary phase is apolar (it will retain polar compounds much less), and you will use polar solvents, such as MeOH, as eluent. Very polar compounds, such as oligopeptides, can literally fly on reverse phase.
But these alternative stationary phases have some drawbacks:
- They are not the standard method, and many times you won’t find TLC plates of alumina or reverse phase around in the lab.
- Correlating with being less available: they are more expensive than silica gel.
- In general, separation and resolution are worse. Also visualization can be more difficult in certain plates.
But sometimes (although very few times, we have to say) they are the only way to go, so keep in mind that these alternatives exist!
Finally, I have to mention that simple filter paper can be used as stationary phase. Separations are going to be bad, and you will get poor visualization. But if you have colored compounds, you can still see some separation. As a matter of fact, my first TLC experiment was just spotting a solution of spinach extract on filtering paper, and eluting it with acetone.
Visualizing Agents: Which One is Best?
There is no use in running a TLC if you cannot see the spots of the different compounds on your mixture. That’s why having access to the appropriate visualization technique is a must.
Visible or UV Light
Sometimes your compounds absorb visible light very strongly, and you don’t need visualizing agent at all. You can see the spots right as they elute up the plate!
This is common with highly conjugated compounds (such as polyaromatics, or polyenes), and with organometallic compounds, such as ferrocene derivatives. These compounds are great because you can basically run TLCs and column chromatography purifications knowing at all times where your compounds are on the silica!
However, most organic compounds do not absorb visible light strongly enough. So you have to use a visualizing agent.
The most common one is just using an ultraviolet lamp. TLC stationary phases are prepared to make your compounds visible in certain UV wavelengths. Most organic compounds, which have a minimum of conjugation will be observable in this manner.

But there are some compounds which don’t even absorb light on the wavelengths typically used in TLC UV lamps. Those are generally highly aliphatic compounds with little functional groups.
For these cases, we use staining agents.
Staining Solutions
Staining agents for TLC are basically solutions of one or more compounds in which we can dip the plates after elution. They will react with your products and help visualizing easily all the different spots/compounds present.
It is worth keeping in mind that, even if your target compound(s) absorbs strongly UV (or even visible) light, it is recommended to stain the plate anyway, if you can. This is because there might be other components of the mixture present as impurities which you cannot observe correctly under typical UV-Vis conditions.
So remember, even if your compound is visible at first sight, check also under UV light. And even if you can see everything under UV light, developing the plate with a general-purpose staining agent will almost never be overkill.
Now follows a list of the most typical staining agents, and how to prepare them. There are many others, some incredibly specific for certain types of compounds. But for the reasons, above, I’d always go with a general-purpose stain. And one of these will work for >95% of organic compounds, so pick your favorite, and go!
Acidic Vanillin
Many people use this vanillin solutions. It is really easy to prepare, and after heating, it is really sensitive to most functional groups.
The coolest thing is that many times, small changes in functionalities on organic compounds lead to a change in the color of the TLC plate after vanillin staining and heating. This is really great if your starting material and product have a very close Rf. You can still differentiate them by the color!
Specifically, it shows brightly most compounds with polar functional groups. It might not be great for highly apolar compounds, such as simple alkenes or aromatics.
The recipe for this stain is really easy: Weigh 10-15 g of vanillin, dissolve it 250 mL of ethanol, and add 2.5 mL of concentrated sulfuric acid. Stir and you are good to go! To use it just dip your eluted TLC plate, and heat up with a heating gun.
Phosphomolybdic Acid (PMA)
This is another great general purpose stain. It is my personal favorite, and it does color almost anything you can find in an organic chemistry lab. From polyaromatics to alcohols, going through alkenes, or simpler aliphatic compounds.
It gives you different blue-green shades, so it might not be the best for identifying different compounds with similar Rf, but for first choice, it will do great.

This staining solution is also extremely easy to prepare. You just need to dissolve around 5 g of phosphomolybdic acid (buy the lesser quality one for this purpose!) for each 500 mL of ethanol, and it’s done!
Potassium Permanganate (Basic KMnO4)
This is the most classical one, probably the cheaper option, and it is also quite general. Basically it turns your TLC plate purple, and every compound that can potentially be oxidized will show up as a yellow spot. This guy makes no distinction, and TLCs don’t look very pretty, but sometimes it does the trick.
The usual recipe is a bit more complex here, but nothing that you won’t find around in any lab. You basically need to dissolve 1.5 g of potassium permanganate and 10 g of potassium carbonate in 200 mL of water. To this mixture, add in 1 mL of 10% aqueous NaOH, and stir. Just be careful not to stain yourself with the mixture! You don’t want your skin to get oxidized (i.e. dark brown for a couple of days-weeks…)!
Cerium Ammonium Molybdate/Sulfate/Nitrate (CAM/CAS/CAN…)
This stain is also known as Hanessian’s Stain, or simply “blue stain” (for obvious reasons), and it is another multi-purpose beast.
It is a water based stain which makes your spots turn blue over a cool pale yellow background, after heating. If you heat too much, the background will also turn blue and the plate won’t look so nice, so be careful!

I have seen people use two different recipes. Both work more or less the same, it just depends in which cerium reagent you find around/is cheaper for you.
Dissolve 5 g of ammonium molybdate and 1 g of cerium sulfate (OR 2 g of cerium ammonium sulfate) into 100 mL of water. To this mixture, add 10 mL of concentrated sulfuric acid, and stir!
Other Staining Agents
There are many other staining agents, but they are usually more specific for certain types of compounds, and not the best ones to prepare or use routinely in the lab.
- Iodine vapor chamber: Fill a more or less sealed jar with a small spoon of iodine crystals. Cover it with silica gel. Put the dry eluted TLC plate in this developing chamber, and wait for the brown spots to appear. This is not the most sensitive stain, but the good thing is that you can use the same plate and develop it right after with a different stain.
- Ninhydrin: A solution of 10 g of ninhydrin in 250 mL of EtOH. It is great for amines, especially primary ones. Those will show up as green spots even before heating.
- Dinitrophenylhydrazine (DNP): Dissolve 1 g of DNP in 250 mL of aqueous HCl 2 M. This stain is extremely selective for aldehydes and ketones. Those spots will turn orange immediately at room temperature.
- Anisaldehyde: Dissolve 4 mL of anisaldehyde in 200 mL of EtOH. Then, add 3 mL of glacial acetic acid and finally 10 mL of concentrated sulfuric acid. The result is a stain very similar to vanillin. Maybe less selective and less easy to prepare, but sometimes, it makes for a wider variety of colors after development, allowing to distinguish very close spots on the plate.
Solvent Polarity: Reference Guide
To anyone with a couple of years of experience in the lab, choosing the solvent combination for running a TLC or a column comes really easy. Or at least a good starting point.
But for beginners, it can be really overwhelming. After all, there are a lot of different functional groups, and A LOT of different combinations. Not to mention the endless solvent combinations that you could imagine.
That is the reason why it is extremely difficult to find a good guide out there to choosing the eluent for chromatography.
A Solvent Polarity Guide for Thin Layer Chromatography
We wanted to get as close as possible to the best guide. And we came up with the following infographic for choosing solvents for TLC.
Keep in mind that of course this is an orientation and approximation, and there will always be compounds that behave weirdly. But we think that it will do the trick to for most situations, at least as a first shoot for a new reaction that you are running.
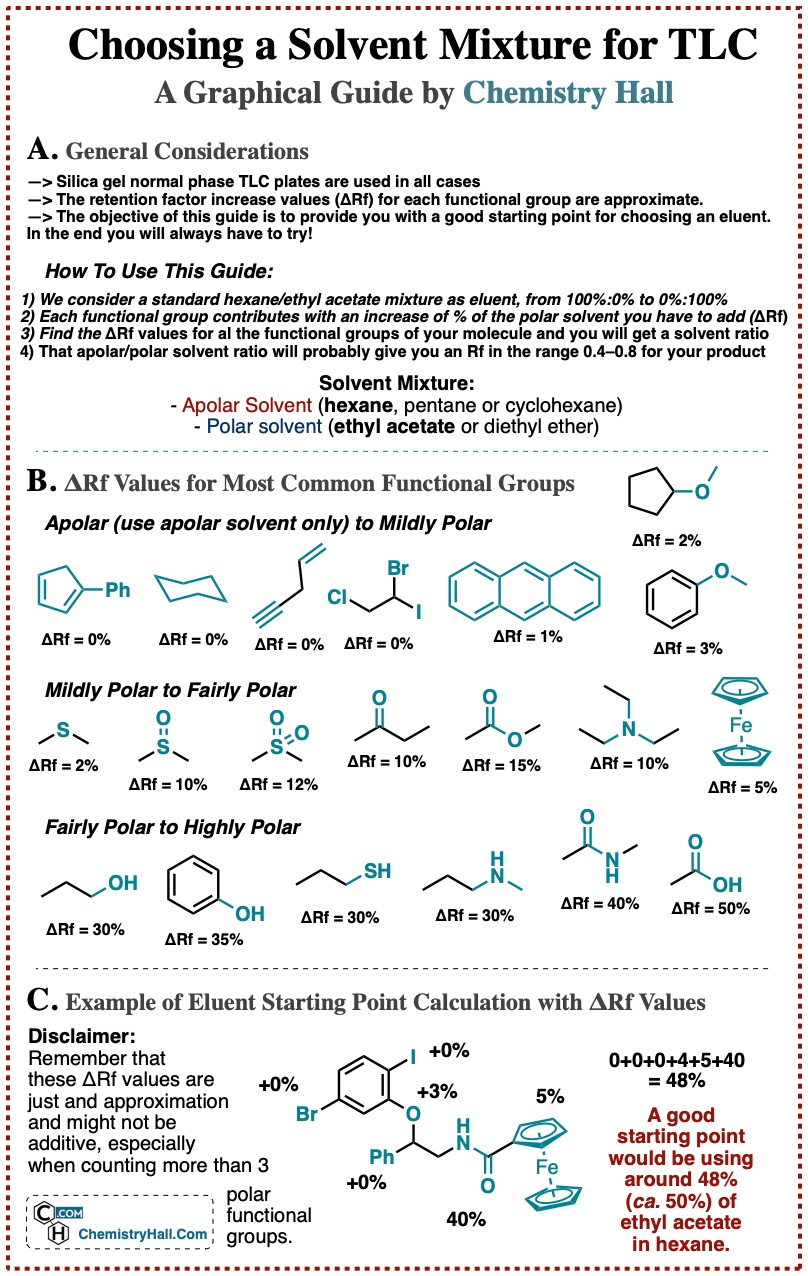
As you can see, we have broken down organic compounds depending on their functional groups, and added a value in the form of a % of polar solvent that you would need to your eluent mixture in order to get the compound with that group to go up the plate significantly.
We have limited it to classical mixtures of apolar solvent (hexane, pentane or cyclohexane) and polar solvent (ethyl acetate or diethyl ether), as a combination of these solvents will be usually enough to deal with most organic compounds.
Again, this is an approximation, and the values are not always additive. For example, an alcohol elutes with a 7:3 hexane/EtOAc. But if you have 3 alcohols, it is not certain that 1:9 will work. Maybe 1:1 is enough. Or maybe not even 1:9, maybe you even need to add methanol. There is no universal rule, that’s why guides such as this one are not very abundant.
As you can imagine, the most polar group itself will often dictate the polarity of the entire molecule.
Relative polarities of “minor” groups are important. Take a molecule which has an amide (6:4 hexane/EtOAc), but also a methoxy group (2-3% extra polarity). Then you change that methoxy group for an alcohol. Alcohol adds an extra 30-35% of polar solvent, so your reaction product spot will appear below the one for your starting substrate!
Which One of the Most Common Solvents is Better?
For practical purposes, solvents such as pentane, hexane, heptane or cyclohexane are similar, polarity-wise.
However, there are several considerations that might make you go for one or another.
Hexane/EtOAc is usually the standard mixture for organic separations. However, hexane is known to be a neurotoxic compound, that’s why many people swap from hexane to cyclohexane or heptane.
The only problem with those two solvents is that are less volatile, and more difficult to get rid of. If you need a more volatile alternative, use pentane. This should be used in cases where your target compound is relatively volatile and you cannot put it under high vacuum to remove the solvent completely.
In the polar component side, ethyl acetate and diethyl ether can be the main options. Diethyl ether is more volatile, so it should generally be avoided if possible, unless it gives you a much better separation or your target product is also volatile.
Also, when pairing solvent mixtures, try to go for solvents with similar volatility, so you don’t get faster evaporation of one of the components of the mixture than the other. This can potentially lead to reproducibility issues.
“Sticky” Compounds with Acid or Basic Sites
As an exception, you might want to consider as additives (up to 5-10%) of your mixtures other solvents such as MeOH (for extremely polar compounds), triethylamine (for compounds with basic sites) and acetic acid (for compounds with acid sites).
Compounds with basic or acidic sites, such as amines, amides (basic) or carboxylic acids (acid), can sometimes stick to the silica gel of the stationary phase a little bit too much.
This results on very wide spots on TLC, and as a consequence, very broad bands in your flash column chromatography purifications. Band/spot broadening often complicates purification, since your target compound might overlap with a byproduct or impurity that you want to get rid of.
Many times this has a simple solution: add to your solvent mixture 2-5% of triethylamine for basic compounds. This deactivates de acidic sites of the silica: Si–O–H bonds. These bonds, or extra protons, are responsible of basic compounds sticking to the silica gel, and making broader bands/spots. By adding Et3N to your eluent, you remove all of them and your compound will elute freely!
Similarly, acidic compounds such as carboxylic acids can react with Si–O bonds in silica gel to give Si–O–H, which really makes them stick to the stationary phase. You just need to add acetic acid as an additive, saturating Si–O sites into Si–O–H. This will make acidic compounds much more mobile through the TLC plate or column.
Preparative TLC
We have already covered flash column chromatography in a previous section. Running purifications is one of the main applications of thin layer chromatography.
But we can actually apply TLC to run preparative-scale purification. Not just to check how the different compounds/spots on a mixture separate, but to separate our reaction mixtures themselves, and isolate miligrams of pure products!
How Does Prep TLC Work?
Well, preparative TLC is just a regular thin layer chromatography separation, but with a bigger plate!
There are commercial TLC plates made specifically for prep TLC. They are usually made of glass coated with a thicker layer of silica gel. Then, instead of a single point spot, you apply the solution of your mixture (in roughly 0.5-1 mL of a volatile solvent such as DCM) along a line, parallel to the bottom (around 3-4 cm above the bottom).
For applying this solution, I usually use a 1 mL syringe with the thinest needle I can find. It has to be uniform and you need to be careful not to scrap the silica!
After drying it, you elute the plate in the appropriate solvent system (carefully chosen by classical TLC), and the different compounds will get separated. You obviously will need a bigger chamber. Typical prep TLC plates are around 30×30 cm.
Afterwards, you just need to scrap off separately the bands that you are interested in. For this, visualize the plate under UV light, and mark with a pencil the bands you are interested in.
Then, scrap off the band, and just pass a polar solvent such as DCM through the silica gel with your product, so it gets dissolved. Filter it off to get rid of the SiO2.
Then, just remove the solvent and there you go, pure product!
Preparative Thin Layer Chromatography: When Should I Use It?
So what are the advantages of preparative TLC?
- Allows you to separate compounds that are extremely similar in polarity. Often times, you can separate a little bit two compounds by TLC but they wont come separately after column chromatography. This is the perfect scenario to run prep TLC!
- You elute the plate several times with lower polarity solvent. If you need to perform a very careful separation, just use an eluent in which your compounds have a retention factor of around 0.10. Then, dry the plate, and elute it again. Repeat this process until your bands are well resolved.
- It’s handier than column chromatography. You just spot your compound, put the plate in the elution chamber and wait until the solvent goes up. Then dry and repeat until the level of separation pleases you. In the meantime, you can do anything else!
- It’s great to separate compound when you have only a few miligrams. Doing flash column of 10 mg of target product can be painful. This is not a problem with prep TLC.
- Sometimes you can use the same 30×30 to elute several mixtures. You can cut the glass plate on half to use different eluents, or just mark it in half with a pencil and deposit each solution in each of the halves, along the same parallel line.
But of course, there are drawbacks:
- It is not really scalable. I have separated up to 100-150 mg of compound using 2000 microns silica gel prep plates. But you cannot really go further than that in a practical manner. Preparative TLC is great for purifying the products of a reaction scope, or for the final steps of your total synthesis, but you cannot get grams of pure material with it.
- If your compound does not absorb UV or visible light, you will have a hard time knowing where it is on the plate. You can always “paint” a vertical line with a staining agent on one edge, and then heat. But I would only use this as a last resort measure.
- It is more expensive than flash column chromatography. No more to add to this, regular silica gel will always be cheaper than a commercial prep TLC plate. And making them yourself is really time consuming.
All this being said, I will leave you with a short time-lapse video of how does running preparative thin layer chromatography go:
Reporting Thin Layer Chromatography Data
TLC is a simple yet widely used technique. So in most reports and journals, you should provide information about TLC data for experimental procedures.
The very minimum is stating in which solvent mixture you have run the purification of each compound.
The best way, is reporting retention factors (Rf) of your product in a certain solvent mixture.
For example, you report a procedure to make benzaldehyde. You should mention that the product was purified by X chromatographic technique, using pentane/diethyl ether 1:1 as eluent, in which the product has a Rf of 0.75.
Tips and Tricks for Thin Layer Chromatography
We will finish by gathering some tricks, tips and lab hacks for TLC. You will definitely find something useful here!
2D TLC: Checking Compound Stability
Two-dimensional thin layer chromatography or 2D TLC got me through my first year of grad school, when I had to work with a great deal of compounds that could potentially decompose during purification on silica gel.
How to run a two-dimensional TLC
- Get a square TLC: Cut a TLC plate with the shape of a square, around 7×7 cm is fine.
- Spot the sample in one corner: Spot the solution of your sample in one of the corners of the square, leaving around 0.5-1 cm from each of the two borders.
- Elute the plate in one direction: Use an eluent that gives roughly an Rf of 0.5 for your compound, and elute the plate as usual in one direction.
- Elute the plate in another direction: Dry your plate, and rotate it 90 degrees, so the lane of all the spots is at the bottom. Elute it again on this direction.
- Analyze the results: Any compound that is stable in silica gel, will appear somewhere in the diagonal of the square plate. Any compound that appears below the diagonal is decomposing.
Sand Bed for Your Elution Chamber
We have covered this sand bed for TLC in our lab hacks post.
If you have trouble leaving your plates standing vertically on your elution chamber, of if you want to run many plates on the same eluent at the same time… Get a big enough chamber, and make a bed with sea sand at the bottom (about 2 cm is enough)
Then, put your eluent in the chamber covering just a bit above the sea sand, and stick all the TLCs you need on the sand! They will not fall, and you can elute many of them parallel to each other.
Frequently Asked Questions (FAQ)
No. Letting your plate drawn will result in spot broadening and worse separations. Also, the most apolar components of the mixture might “disappear” if you elute them to the top.
Huge spots appear when you overload your TLC plate. Dilute more your sample before spotting.
Some compounds can decompose when passing through silica gel from TLC plates or columns. You can tell if a compound is stable by using 2D thin layer chromatography (see above).
No, you should always spot the samples slightly above the level of eluent in your TLC chamber. Otherwise, you will dilute the spots and worsen your separation.
If your compounds stay in the baseline while using typical solvent combinations, go for more polar ones such as DCM/MeOH, or use reverse phase TLC.
Spot both the starting material and the reaction mixture in your TLC. Also, make an additional spot with both starting material and reaction (co-spot). If the reaction is finished, you will see two different spots (snowman shape) in the co-spot, even if the Rf of both compounds is the same.
The most important thing is to report the retention factor (Rf) in a certain eluent combination, of all the compounds that you have used. Alternatively, you can draw the TLC in your lab report.
The retention factor is the distance that a compound travels through the silica plate respect to the total distance the eluent front has moved. Rf = (distance compound moved from the baseline)/(distance of eluent front from the baseline).
The typical eluent for TLC is a mixture of an apolar solvent (typically hexane or pentane) and a polar solvent (dichloromethane, diethyl ether or ethyl acetate).
Closing Up and Conclusions
We really hope this comprehensive guide can help you master this wonderful technique.
Also, thanks to Lisa Nichols for borrowing some of her images from: Organic Chemistry Laboratory Techniques, Nichols, 2017.
Top sum up, o matter if you are new to synthetic chemistry or an experienced researcher, we hope you have learnt something from it!
Also we would love to hear from you and read your feedback and questions!
So please, head right into the comment section, and ask whatever you want. Remember that there are no stupid questions.
Any criticism and suggestion to improve the guide further will be highly appreciated. If you think that something is missing, or not well explained, go for it.
Finally, if you found this guide useful, please, feel free to share this on your websites, with your students or colleagues, or anywhere you like.
Gigantic work. Easily the most comprehensive practical guide for TLC that I’ve seen online. I’ll reference this for my students. 2D TLC is also a commonly overlooked technique. I think it should be worth teaching in advanced org chem practical courses.
Thanks for the kind words, I’m glad you find it useful!
How can I know which colour indicates to which compound? Is there any guidance or reference to that?
Unfortunately, there is no general rule. Of course, if a compound is intensely colored by itself, you can often see a spot of that color on the TLC. UV-Vis spots normally look identical for similar compounds. Staining them with agents such as PMA or vanillin can lead to different shades or colors for different compounds, but after >10 years working in the lab, I can tell you that deriving general rules for this is pretty much imposible.
Proper identification on TLC has to be done by comparison with a standard (co-spot) or qualitatively by polarity.
Out of the most common stain mixtures, which one would you choose first for general purposes?
In most labs I’ve been, they usually have like 5 shared solutions of the most common ones, mentioned in the guide. Maybe in smaller labs this is less practical, since some of them remain less used and just dry out. If I had to choose one it would be phosphomolybdic acid. Second running up acidic vanillin. But from all the general purpose stains, it’s mostly just a matter of preference or the “colors” you are more used to.
How to identify in TLC by comparing the Rf value of sample and reference standard? How is tolerance range?
To do this you run a TLC with a co-spot. This means, you do three spots on the TLC: one with the sample (or reaction mixture), another one with the reference standard and another one (usually in the middle), in which you spot both your sample and your reference. The you elute the TLC. If the compound is exactly the same, you will only see a single spot in the co-spot. If you see two closely overlapping spots (snowman shape), that means that you have two different products. Like this you can usually resolve products with y Rf differences as low as 0.05.
Also, staining the TLC afterwards with solutions such as acidic vanillin or PMA, often allow to see different compounds in different color shades.
Thank you so much for this!!!!! I needed a review on TLC and came out leaving with brilliant new tips!!! Thank you so much for you tips!
– Random Chemistry major student
Glad to be of help!
Hi, in the reaction progress, why why can’t we see the 2 components on the cospot at the very beginning of the reaction?
At the very beginning of the reaction, we assume that there is not a significant amount of product yet, so we can only see the starting material. Technically, if we have already added all reagents and catalyst and put the reaction at enough temprature, there will be some product even after some seconds. But if that reaction takes around 24 h to complete, at that time the amount of product will be too low to detect it by TLC.
Bear in mind that those examples in the reaction progress scheme are for a very simple reaction in which there is only one reactant being transformed into a product.
Depending on the reaction rate and the time you take the TLC, you will start to see some product.
hello, how would you calculate Rf value of a sample if there are two resulting spots on one lane?
Hey there, thanks for the question! I understand why you might find that confusing.
In a TLC separation, each one of the resulting spots corresponds to an individual chemical compound. So each of the two compounds (i.e. each of the two spots), will have an specific Rf value, so you will have to calculate each one separately for each compounds, and report them as such. That is pretty much it. The bigger the difference between the Rf of the two compounds, the larger the difference between their polarities is!
I still don’t understand why we have made a co-spot in reaction monitoring by TLC. Aren’t just SM and RM spots enough to draw all the conclusions? Can you please explain in simple terms.
The co-spot is often used for reference in difficult separations. In practice, it only takes a couple of extra seconds to add it to the TLC plate, so the extra info that it can give is worth that little additional effort.
If the SM and reaction product have very different polarities (i.e., very different Rf), two spots are usually enough to know if a reaction has gone to completion. However, if the spot of the SM and the product come up very close after eluting the TLC, it is usually very hard to tell whether the spot of the reaction mixture corresponds only to the product, to the SM, or to a mixture of the two. In these cases, having a co-spot which shows you what a mixture of the two exactly looks like can be an important hint in judging if the spot that you observe for the “reaction mixture” is actually just product or a mixture of SM and product (which would mean the reaction is not finished yet).
In summary: it’s not absolutely necessary, but it helps judging the results in many situations. It’s so easy to do that most people do it automatically for most TLCs. Especially if it’s thee first time you run the reaction and you don’t have a clue how the TLC is going to look like.
Hope it’s clear.
hi, Which solvent is best for cleaning TLC sheets for reuse?
That’s interesting, I never though of reusing TLC sheets, they are a significantly cheap material, I don’t think any thorough and reliable cleaning process could justify it’s cost compared to throwing away and buying new ones.
This said, I would think on some typical polar universal solvents such as DCM or EtOAc, but again, I’m not sure how well typical disposable TLC sheets will survive through several cleaning rounds.
My products is aromatic compound which contain 3 or more polar grp
And I have tried numerous solvents ratio like Etoac: hexane 2:1,1:2,1:1 and 1:4 but neither of them gave me satisfactory separation
Can u suggest me solvent ratio
Hi, very interesting information, i have two question.
1) I have 2 products (resorcinol as standar and an alkylresorcinol with an unknown chain lenght) when I develop my TLC using chloroform/methanol 30/70 the resorcinol run practicly as the same as the eluent (at the top) and the alkylresorcinol runs slower, so, based on this, the alkylresorcinol seems to be more polar than the resorcinol, but thats no true, can you have some idea why?
2) why my spot looks like a smile or has an “U” shape (specificly when they have rf > 0.9)
Thnaks
1) Polarity analysis (or more specifically, how exactly each molecule interacts with the stationary/mobile phase) is not that straightforward sometimes. There are cases where I’ve seen something like this that go against basic chemical intuition. Where is the alkyl chain on the alkyl resorcinol? If it’s not in one of the -OH groups, I wouldn’t be so surprised.
2) I usually observe that phenomena when something goes up too fast through the TLC. I guess it has to do with the silica gel getting saturated in amount of product that it can hold, so the shape gets uneven.
I never can get how fast to change the percentage of the gradient, if I should change it very slowly, like 100 steps of 1% change in solvent percentage for every step and make huge amounts of fractions or change it faster and make less amount of fractions. People always seem to skip telling how fast they changed their solvent percentages, I just see it reported as the initial percentage and the final percentage but not the steps,
also doing natural products chemistry, so the things that I am trying to separate are all unknown structures,
do you have any tips?
Best thing for this is of course experience, the more columns you run, the better the “feeling” you get for changing gradients. But I’ll do my best to give some tips.
First, in manual standard flash column chromatography you cannot do “proper” gradients, you change solvent% in a kind of stepwise manner. Say, 200 mL with 9:1, 200 mL with 8:2 and finish with 200 mL 7:3.
Looking at reported Rfs and solvent% is great, but you only can judge the proper way of doing the “stepwise gradient” by looking at the TLC of the reaction.
If you want to analyze them theoretically, every case is different. You need to look at what are the other spots that you want to separate your wanted product from.
Imagine you do a TLC in 7:3 hexane/EtOAc, and you see three spots: 1) side-product at 0.9 Rf, 2) your product at 0.5 Rf and 3) byproduct at 0.3 Rf.
I would compact the column in something much less polar (Eg 9:1 or even 95:5 hexane/EtOAc). Then I would move to something like 8:2, until side-product 1 comes out. Once it’s out, you can go for 7:3, and take out the product which came at Rf 0.5.
I don’t usually do many “steps” of solvent change. One for compacting the column, and then maybe 3 changes until you get out your product.
At the beginning you can do it more carefully, and checking by TLC the fractions as they come out before increasing polarity. As you get the hand of it, or you run a similar column to one you already did before, you’ll start to do it more confidently, and maybe just running the gradients continuously without checking any fraction until you have the rack of tubes full.
Unfortunately I cannot be more specific because there are so many variables (scale, column height/thickness, solvents… and all that added to the fact that every TLC is different!), but I hope this helps!
Dear Sir
I am Working as a Process development Chemist
your guideline is very usefull to me
GOD Will Help you
Cheers!
I need to show that there is quercetin in a my ethyl acetete solvent. Do you have suggestion regarding the eluent and the staining agent?
Looks like a very polar molecule with all those free -OH bonds! I’d give 25:75 hexane/EtOAc, or even pure ethyl acetate a shot. If still too polar for that, and it stays on the baseline, go with DCM/MeOH 95:5.
thank you so much, it helped me a lot.
My products is aromatic compound which contain 3 or more polar grp
And I have tried numerous solvents ratio like Etoac: hexane 2:1,1:2,1:1 and 1:4 but neither of them gave me satisfactory separation
Can u suggest me solvent ratio
Hi
I have been trying to show adulterants in olive oil using 2D tlc and wondering whst the relationship between to 2 Rf values is and how could I analyse the data?
Omg kind sir thank you so much for this wonderful and detailed guideline of TCL…You are literally my second favorite person on this planet right now. Seriously, I love you…I hope you are happy, safe and surrounded by love every moment of your life.